Reports
Evaluations, tests, free feedback and questionnaires can be analyzed in the Evaluations section.
- Reports "Select Test"
- Reports overview of all evaluations
- Report overview of all test objects in a test
- Results of a test / test object (result tiles)
- "Create report" for tests / test objects
- Questionnaire Reports
- Instruction Reports
- Feedback Reports
- How do I interpret simple feedback reports?
- How do I interpret advanced feedback reports?
- How do I interpret feedback validation?
- How do I create feedback?
- How do I add (additional) columns to the feedback list?
- How do I validate feedback?
- How do I assign feedback to other test objects?
- Edit Feedbacks
- Excel Report Templates
- Creating an Excel report template
- Editing an Excel report template
- Publishing a Excel report template
- Downloading an Excel report template
- Extending Excel data range with attributes / attribute sets
- Communication with the Tester
Reports "Select Test"
Reports overview of all evaluations
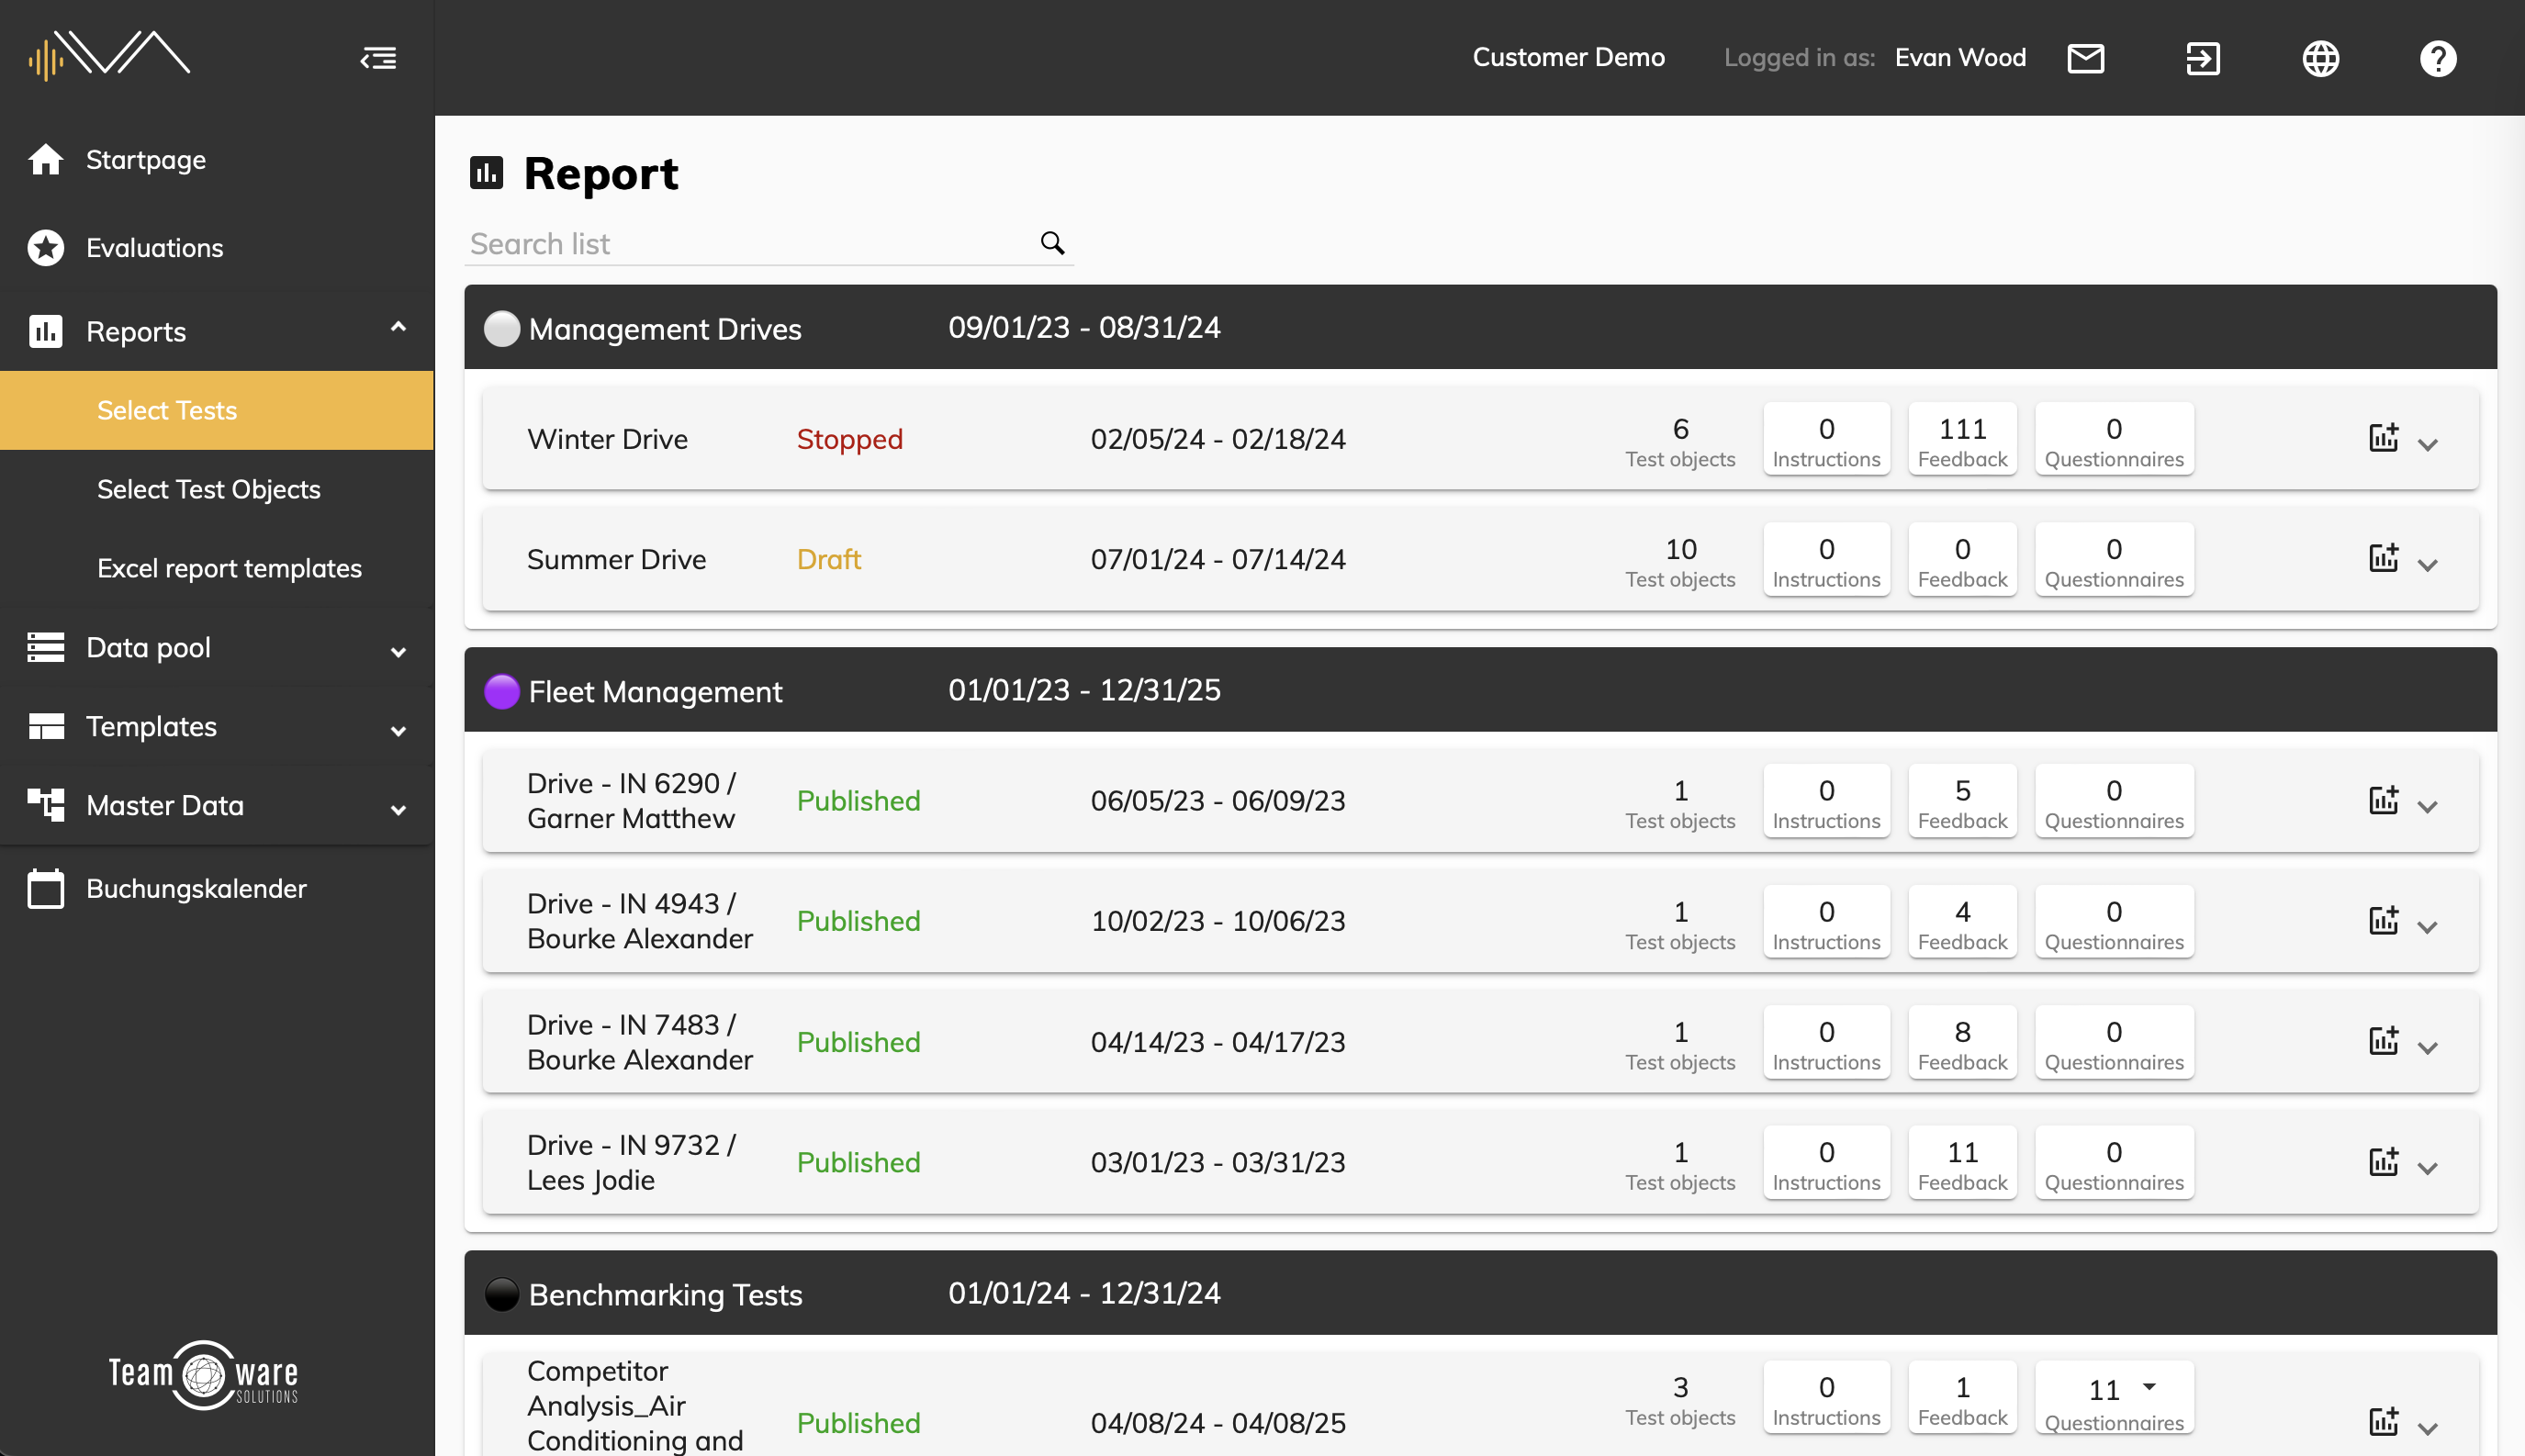
Tests are displayed in a gray tile containing the following information:
- Test name
- Test status (LINK to the manual)
- Time period
- Number of test objects
- Results for instructions, feedback and questionnaires
- "Create report" icon
Report overview of all test objects in a test
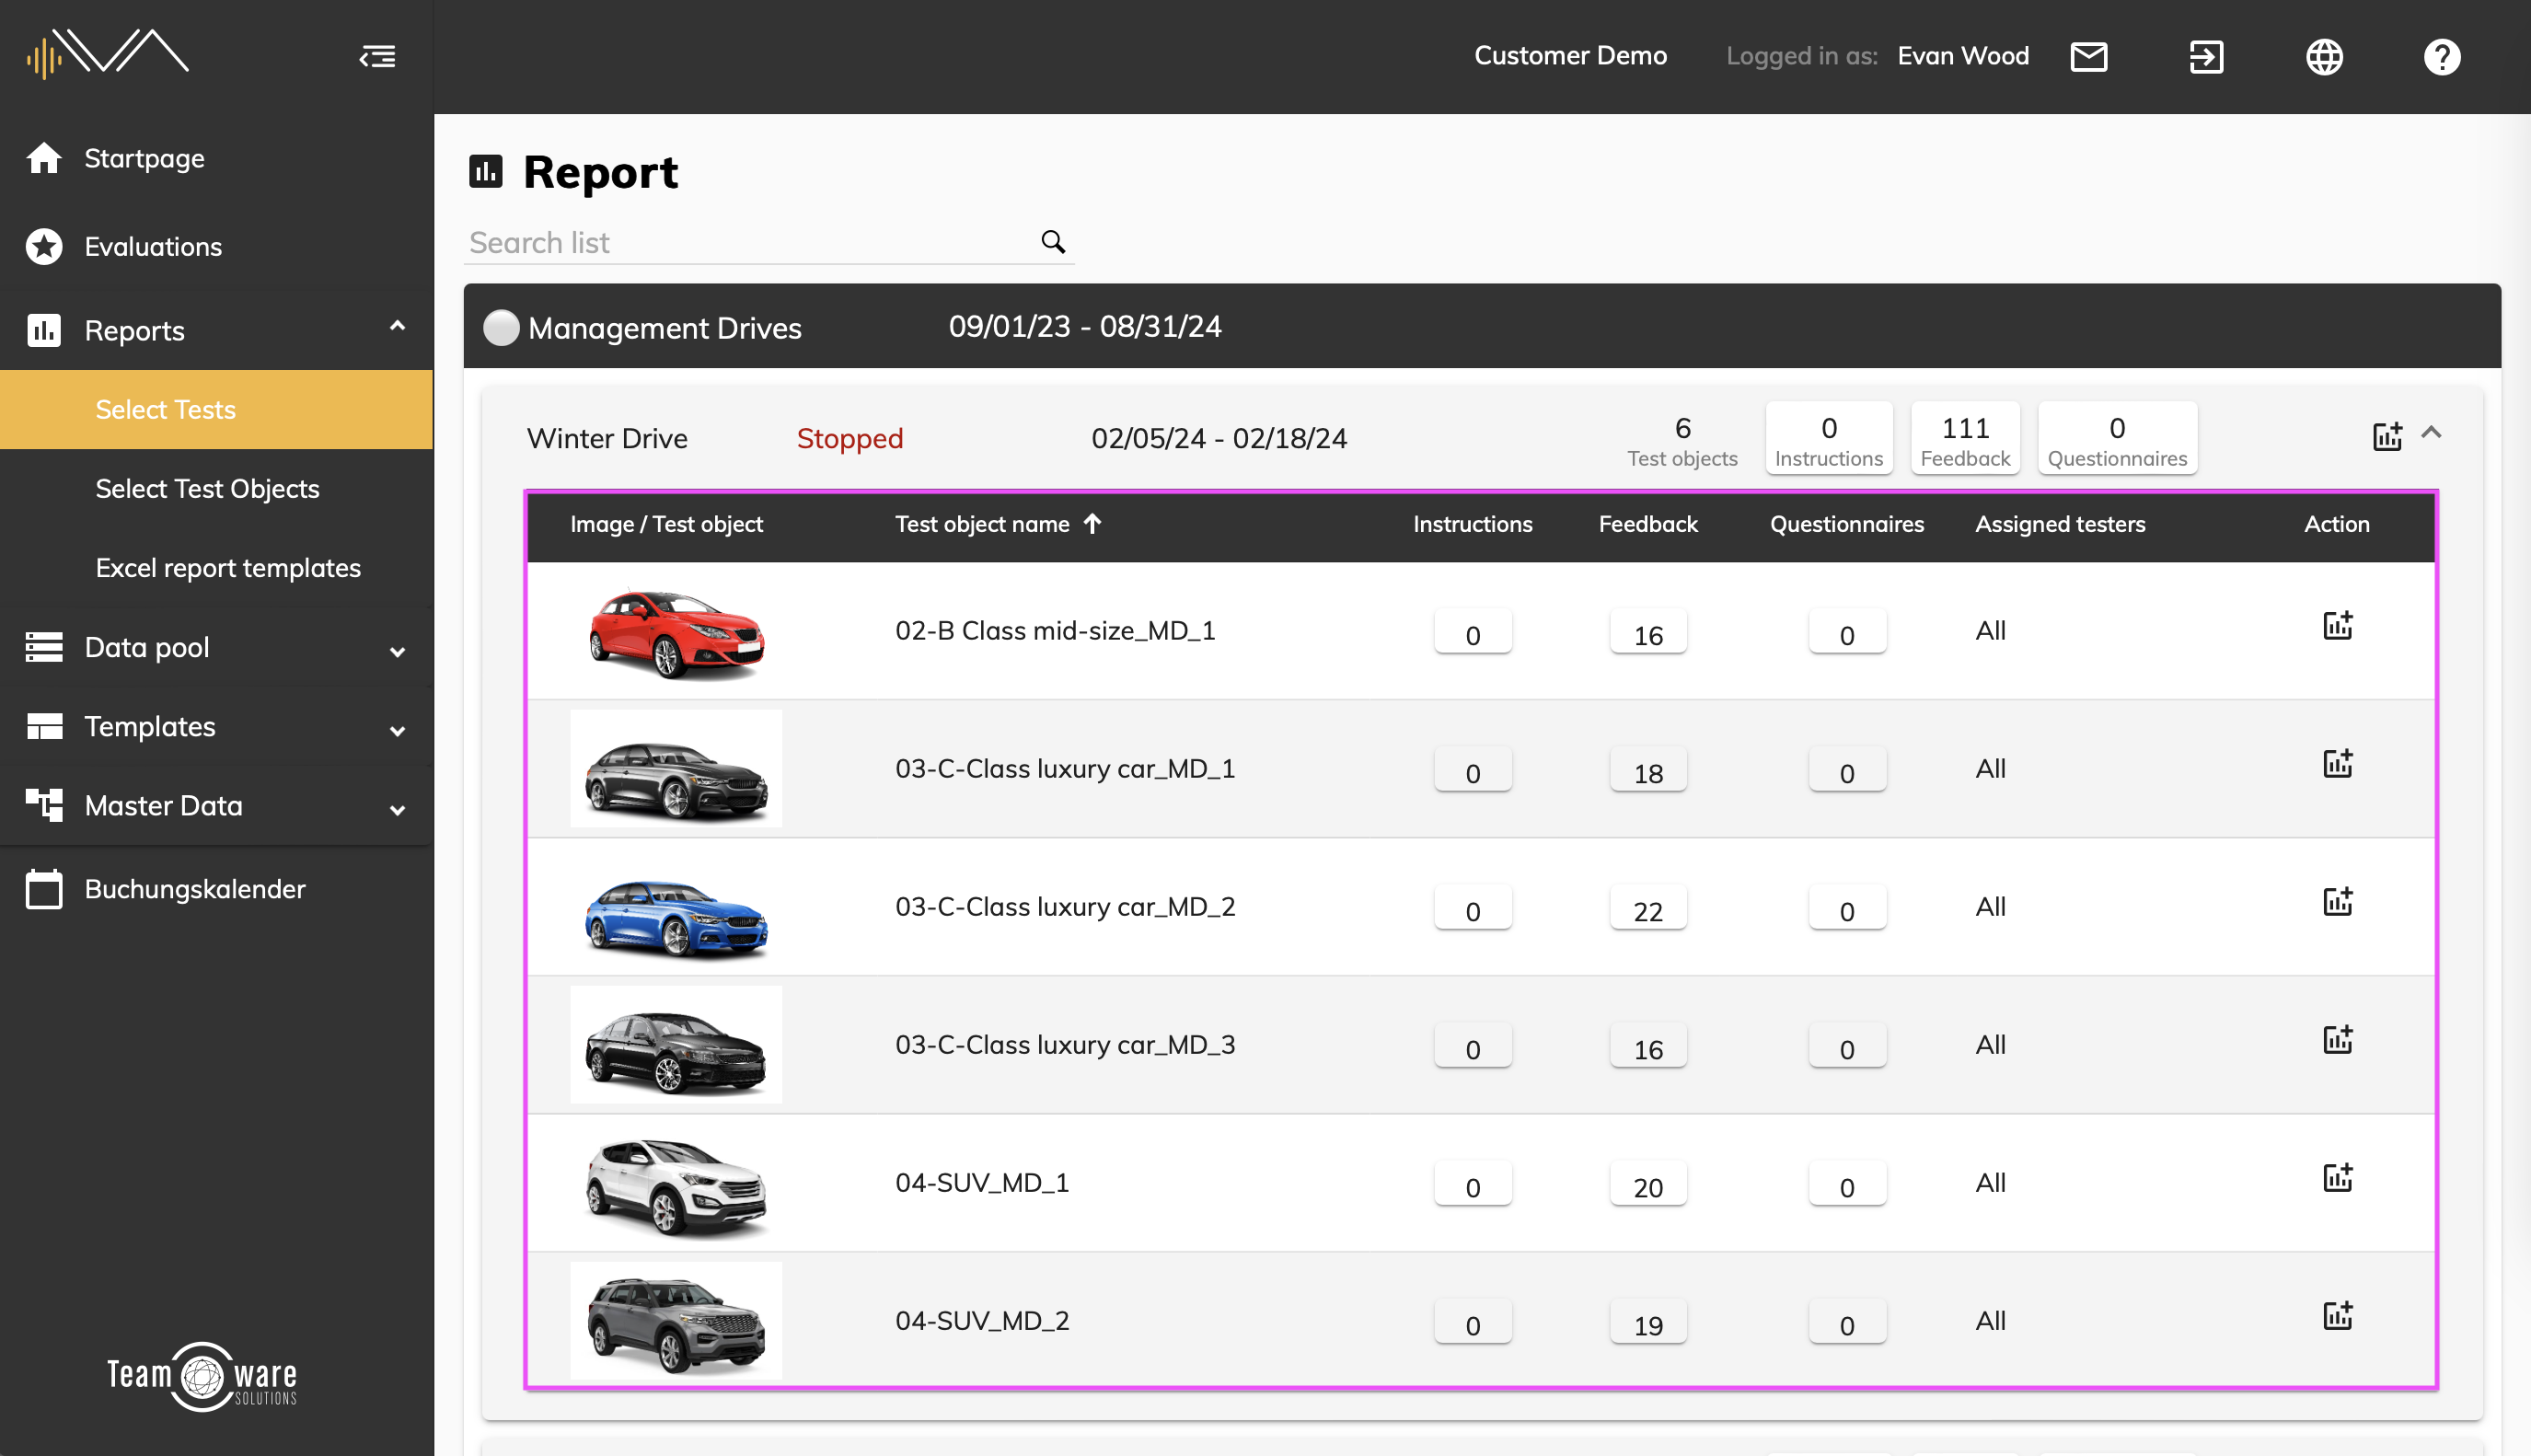
You can get an overview of all test objects in a test by clicking on the respective tile or on the arrow icon in the right-hand corner of the gray tile.
A test object is displayed in a gray tile containing the following information:
- Image of the test object
- Test object name
- Results for instructions, feedback and question catalogs of the respective test object
- Assigned testers
- "Create report" icon
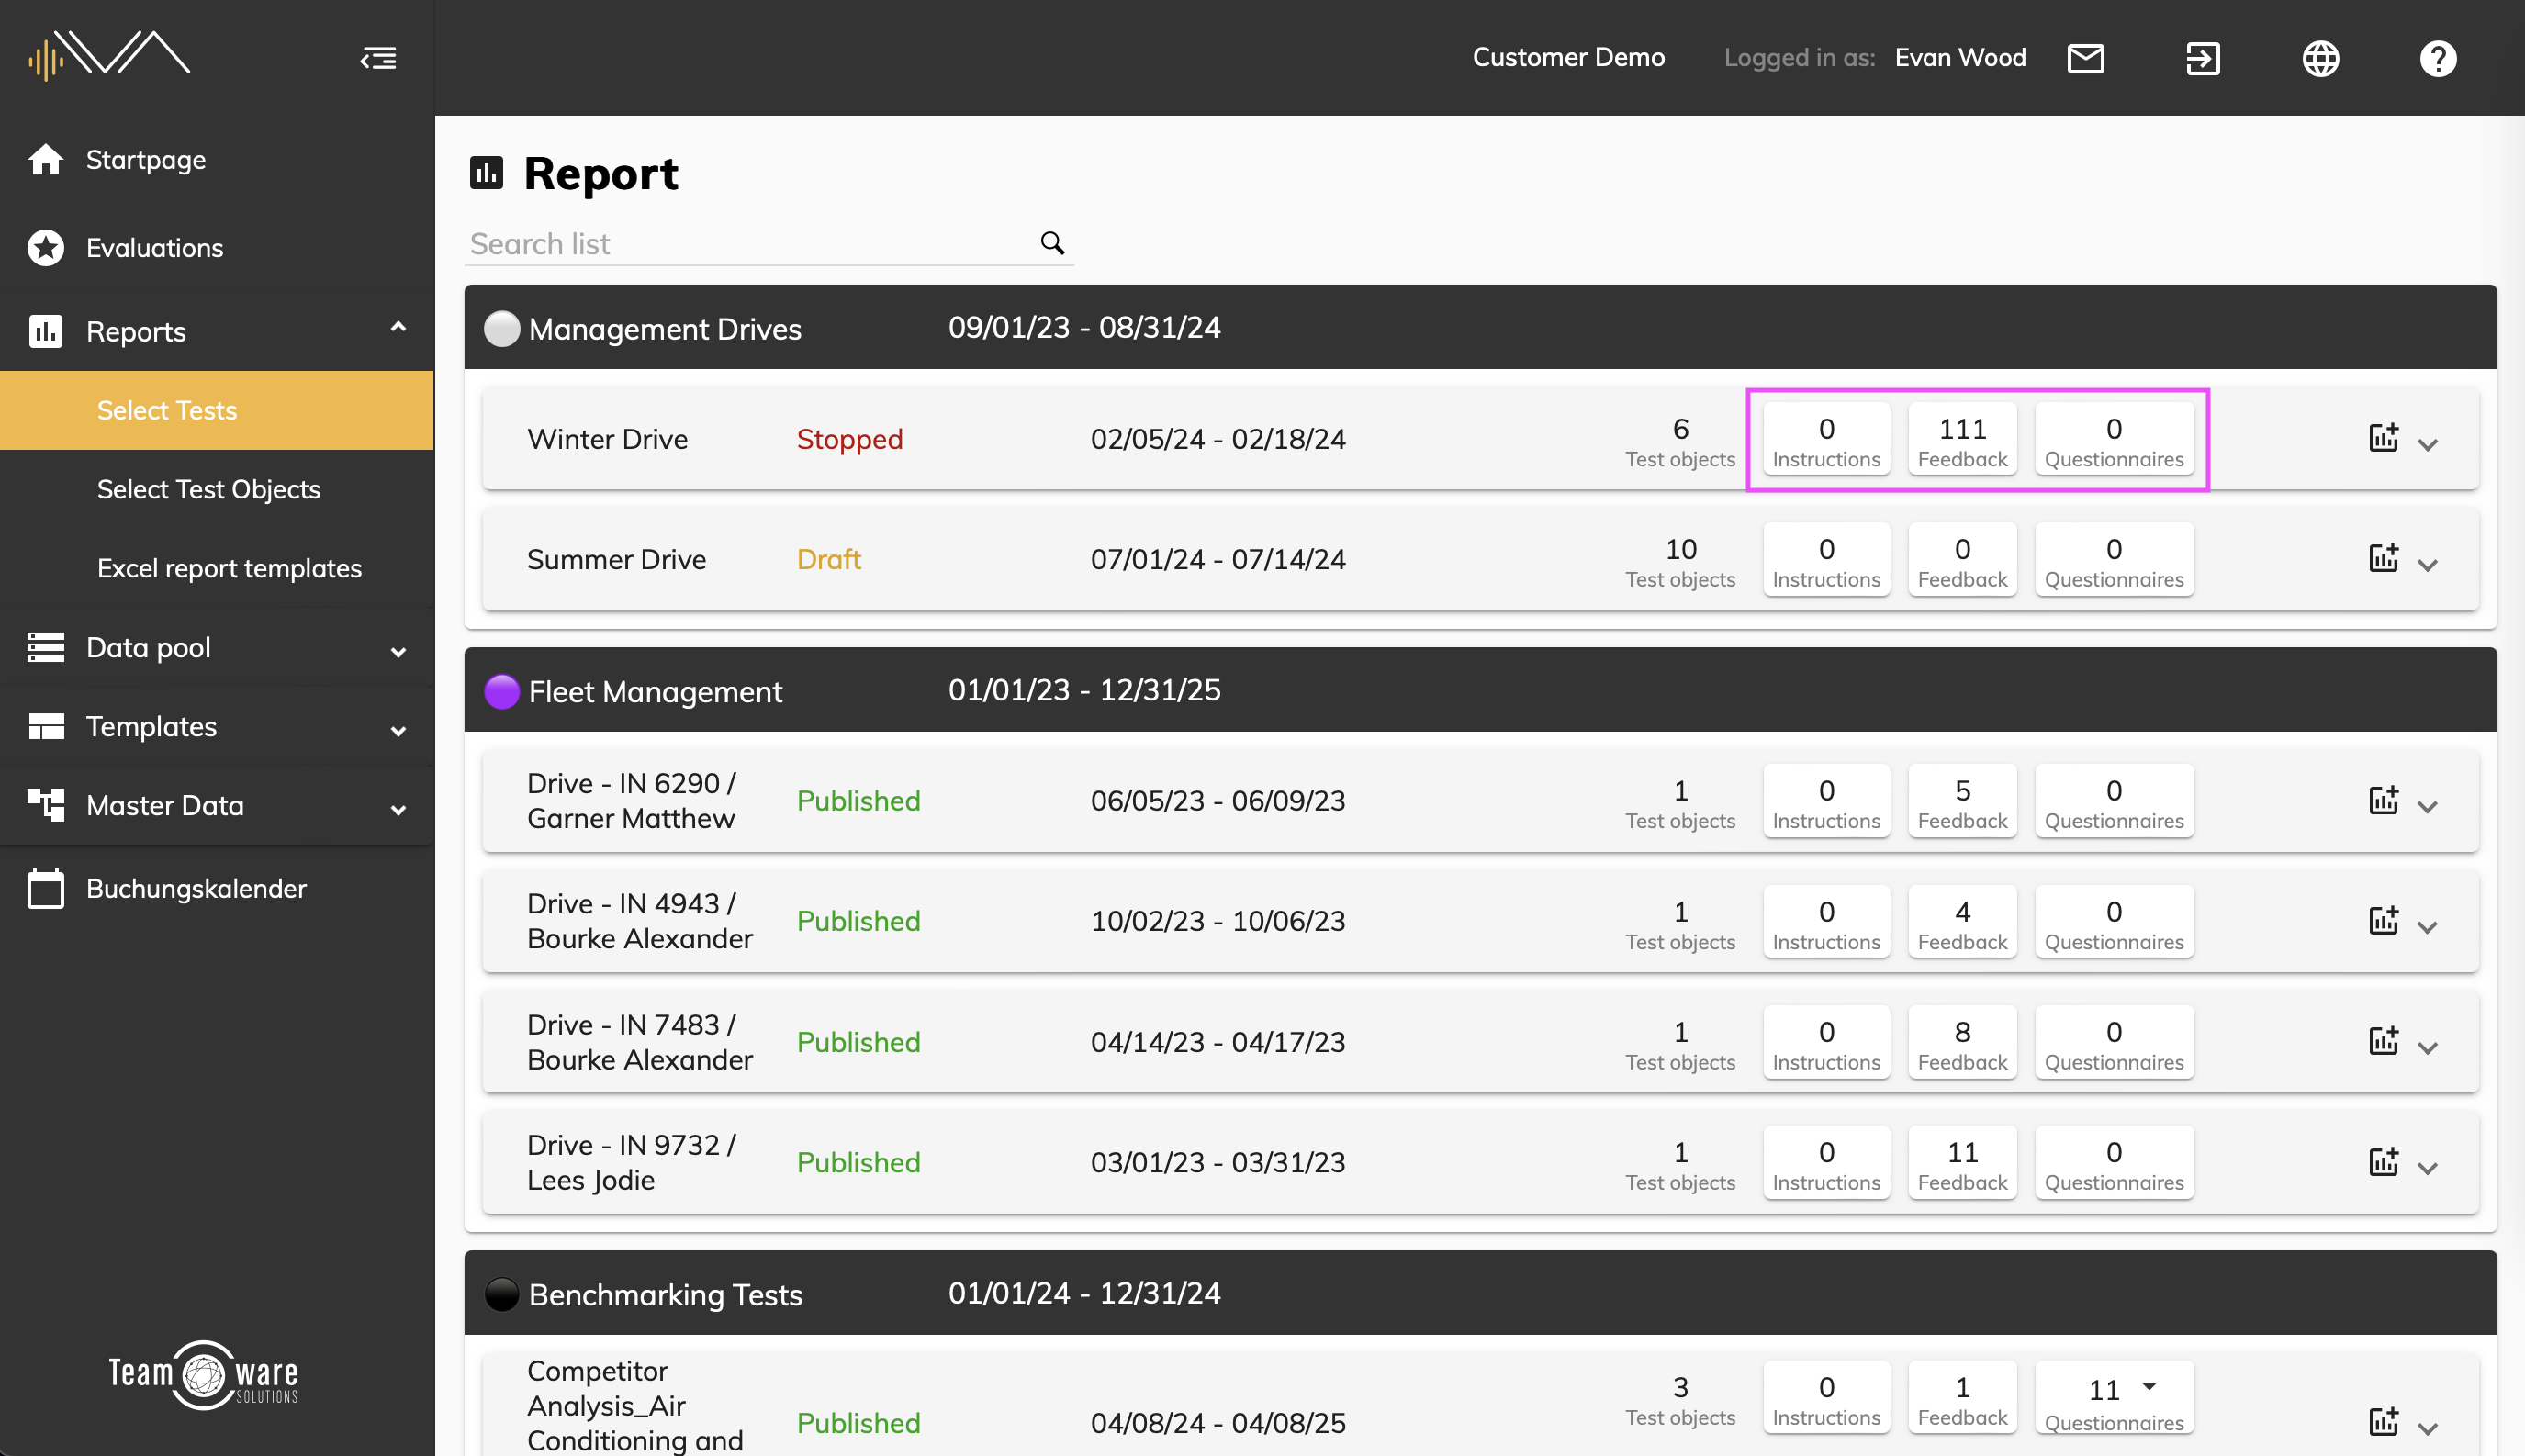
Results of a test / test object (result tiles)
By clicking on one of the result tiles, you can access more detailed views and reports of instructions, feedback or questionnaires of the corresponding test.
To access a more detailed view of the results for a specific test object, click on the corresponding result tile of the relevant test object.

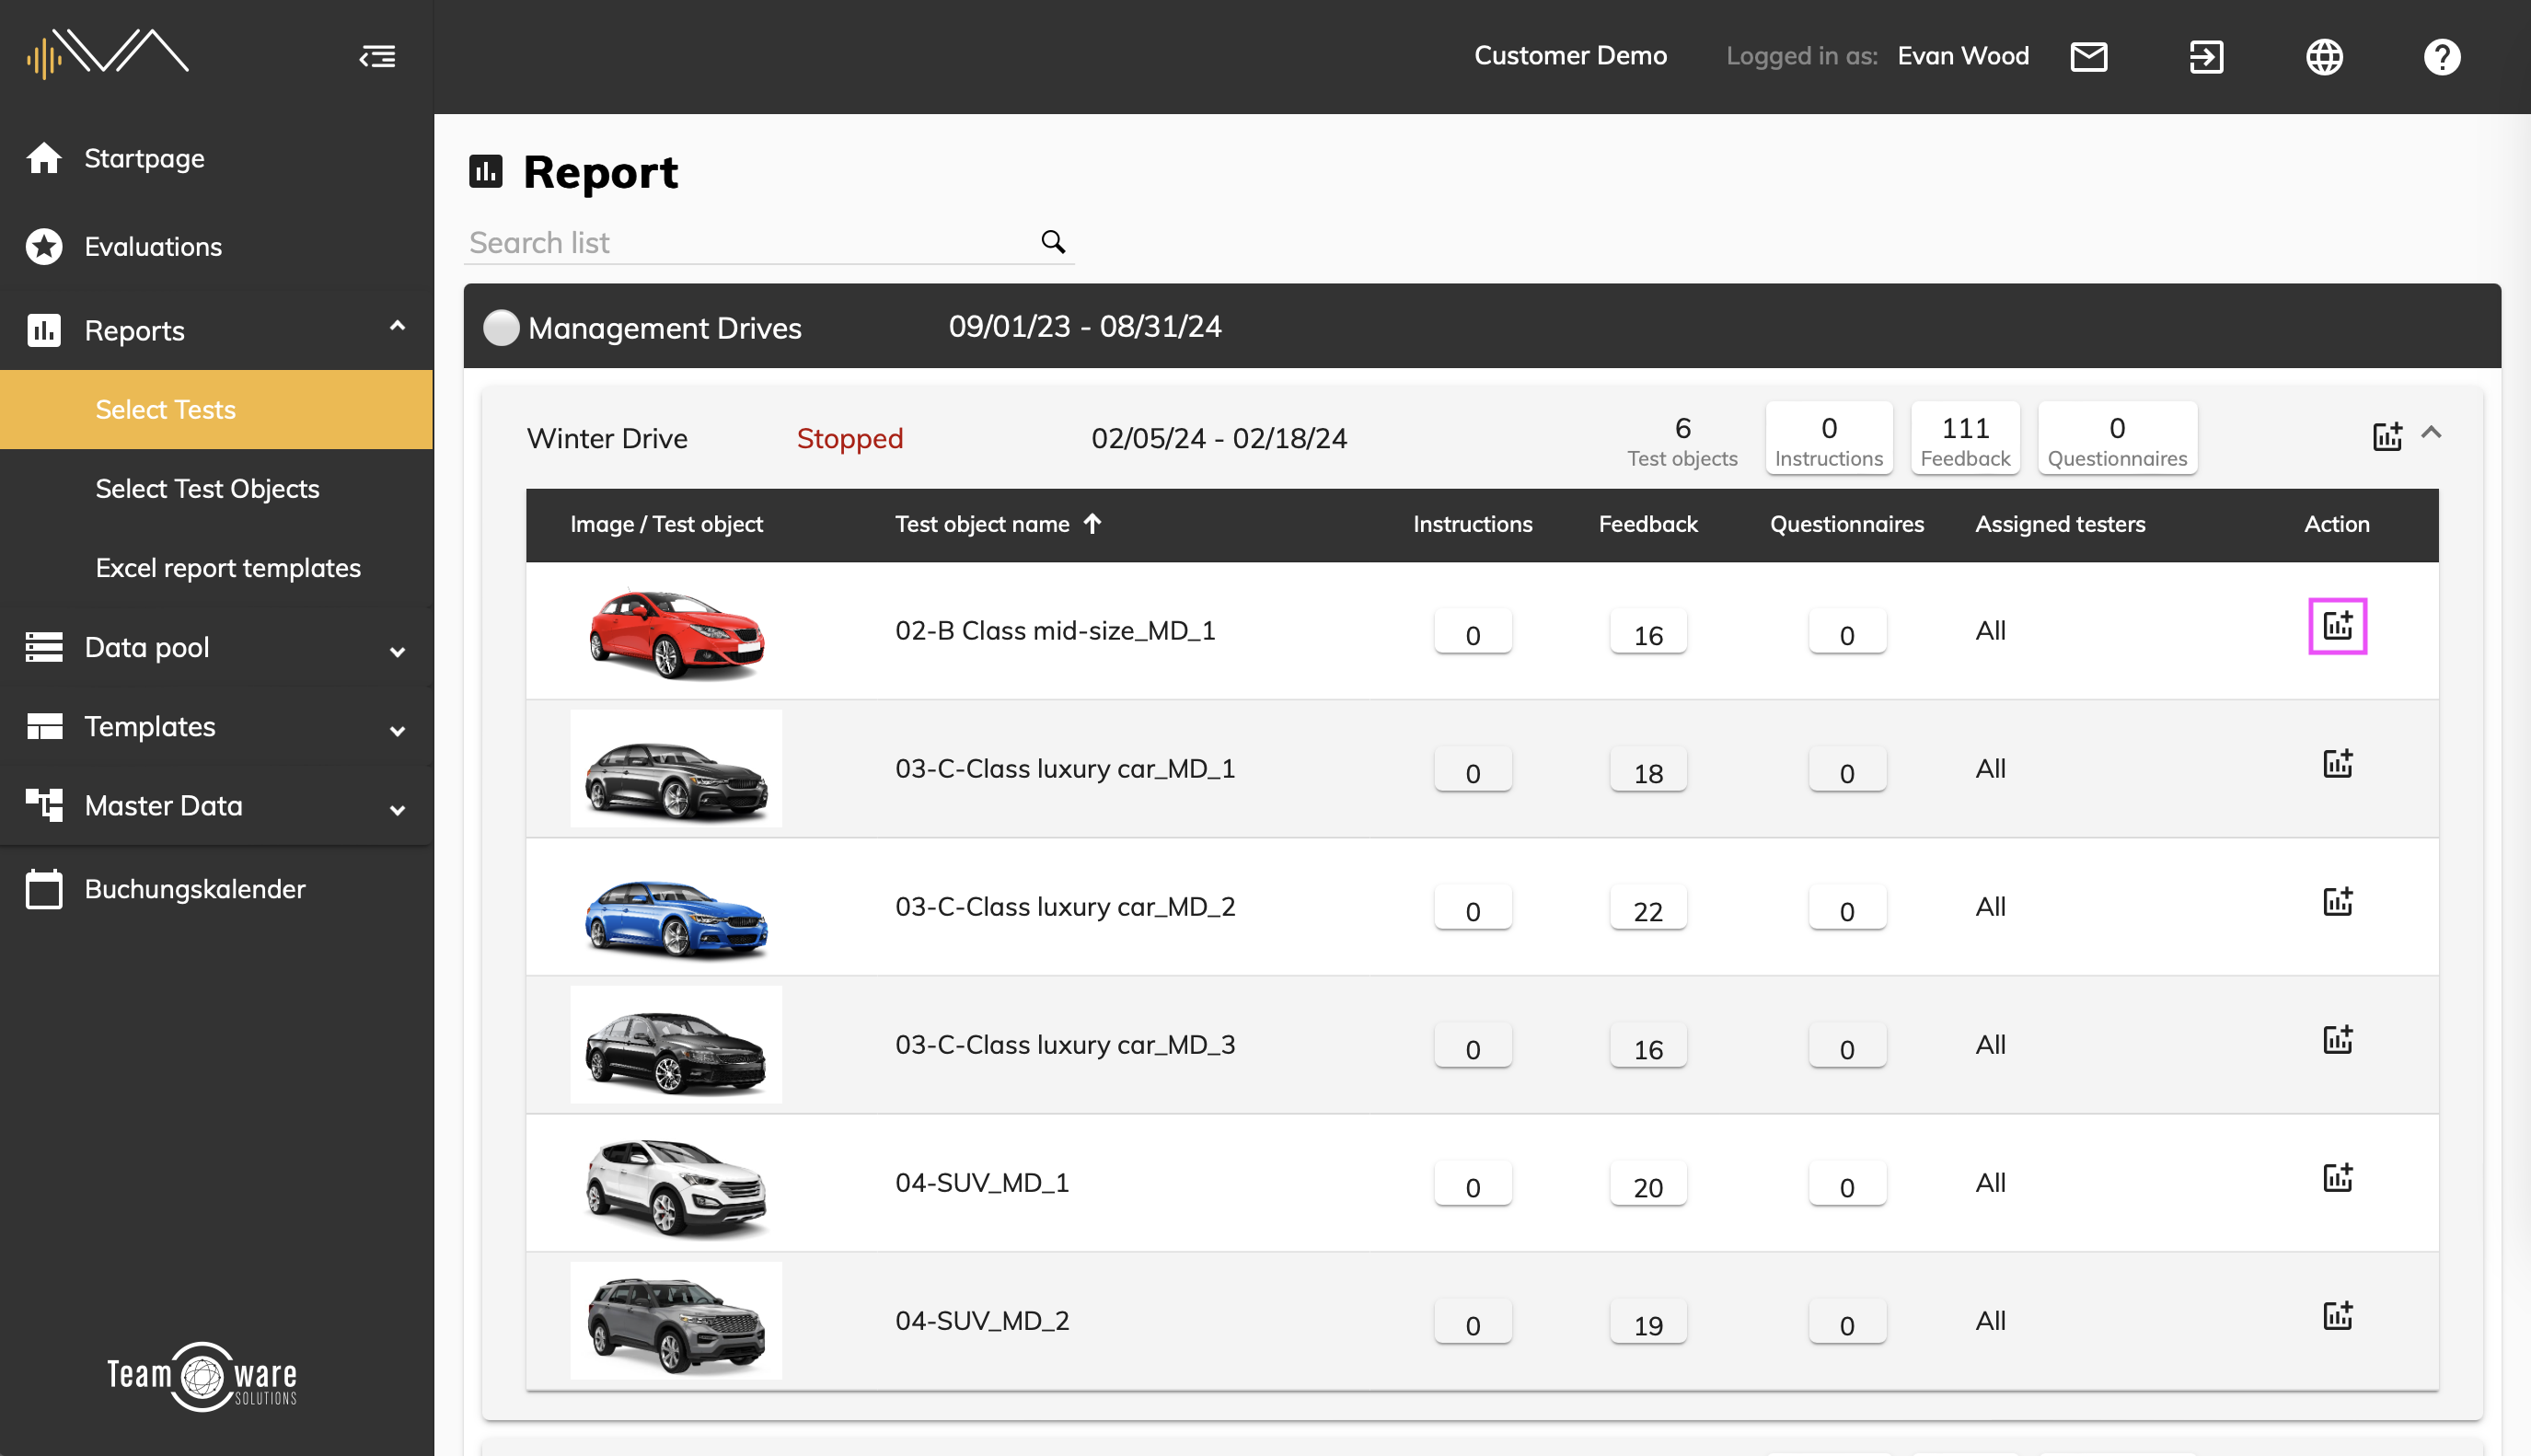
"Create report" for tests / test objects
If you want to export the results of a test, click on the “Create report” icon on the right-hand side of the corresponding tile.
If you want to export the results of an individual test object, click on the “Create report” icon on the right-hand side of the corresponding tile of the relevant test object.

Questionnaire Reports
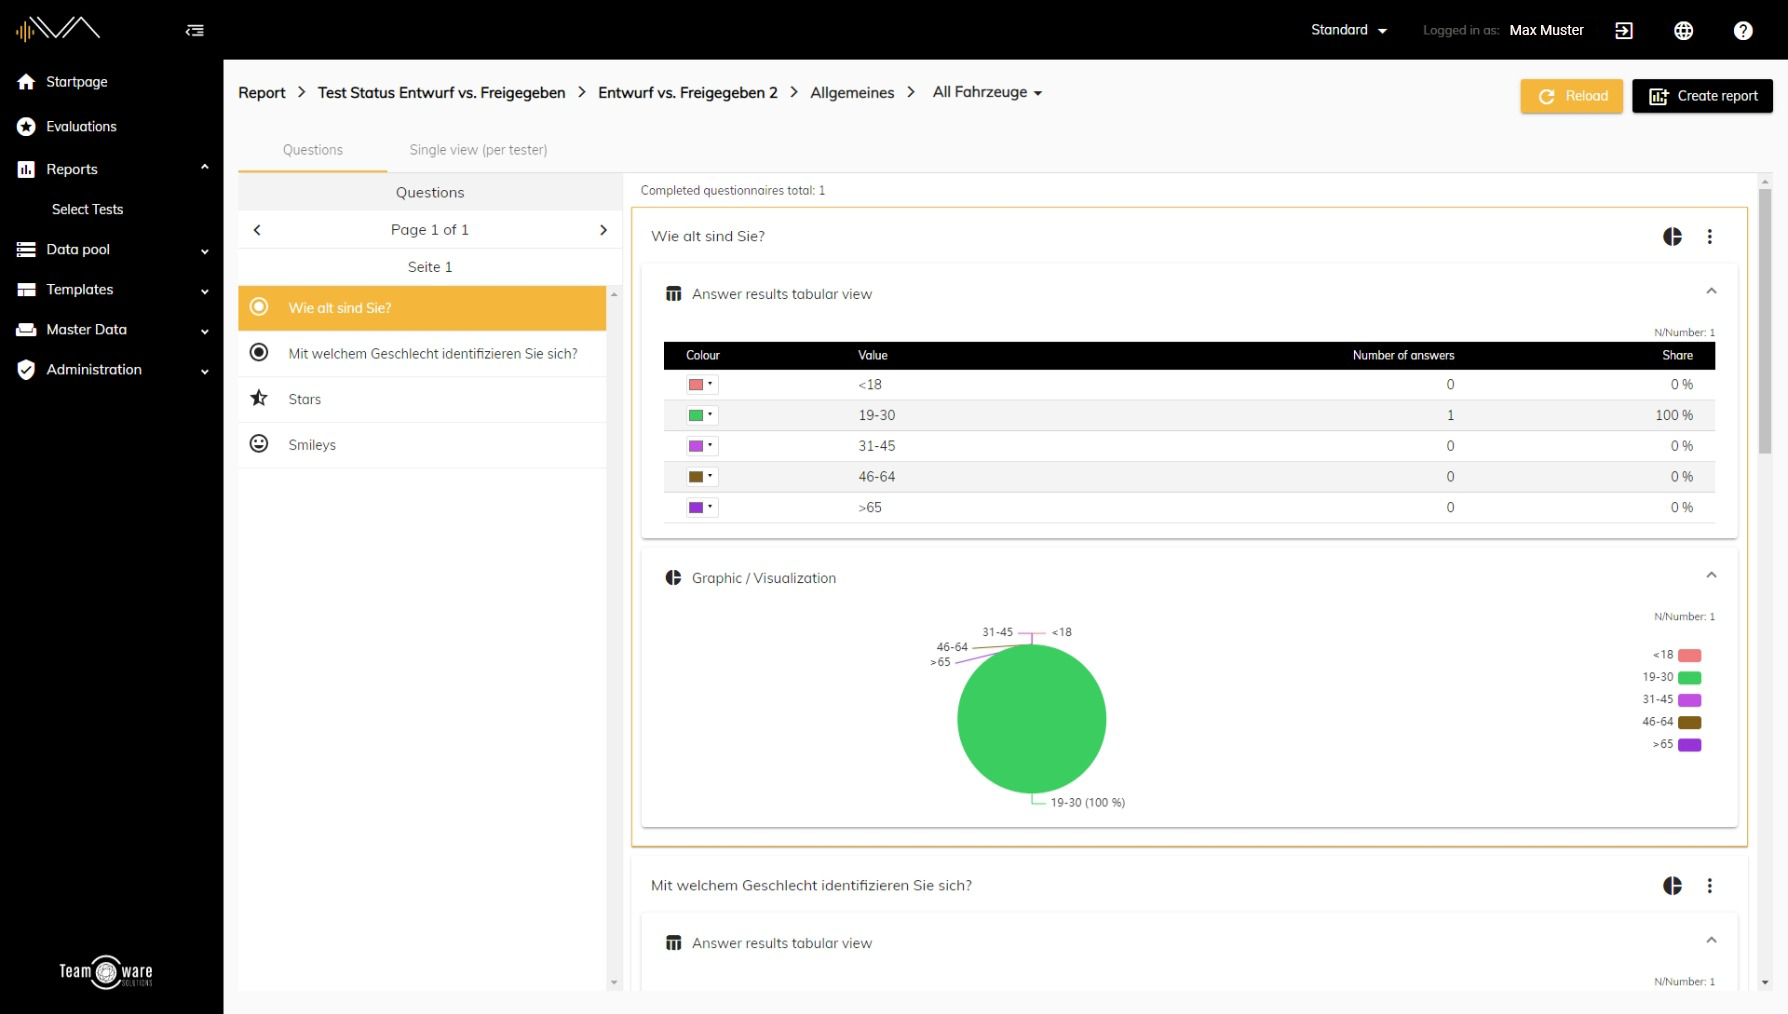
First of all, you need to navigate to the corresponding menu item. To do this, click on "Reports"->"Selected Tests" in the left navigation bar and click on the corresponding test under the corresponding evaluation. Now you can select the desired test object and click on the "Question Catalog" tile there. Now you will get to a new page. There you will see a list with the respective questions, a tabular as well as a graphical evaluation of the answers. You can change the type of the displayed diagram by clicking on the cake-like icon. Furthermore, you can copy the diagram as well as the table with a click on the three-dot icon and also hide questions.
In the left column you have the possibility to switch between the individual pages as well as the individual questions of the questionnaire. With a click on the button "Create report" in the upper right corner, you can export the data as CSV or create and download a PDF.
Instruction Reports
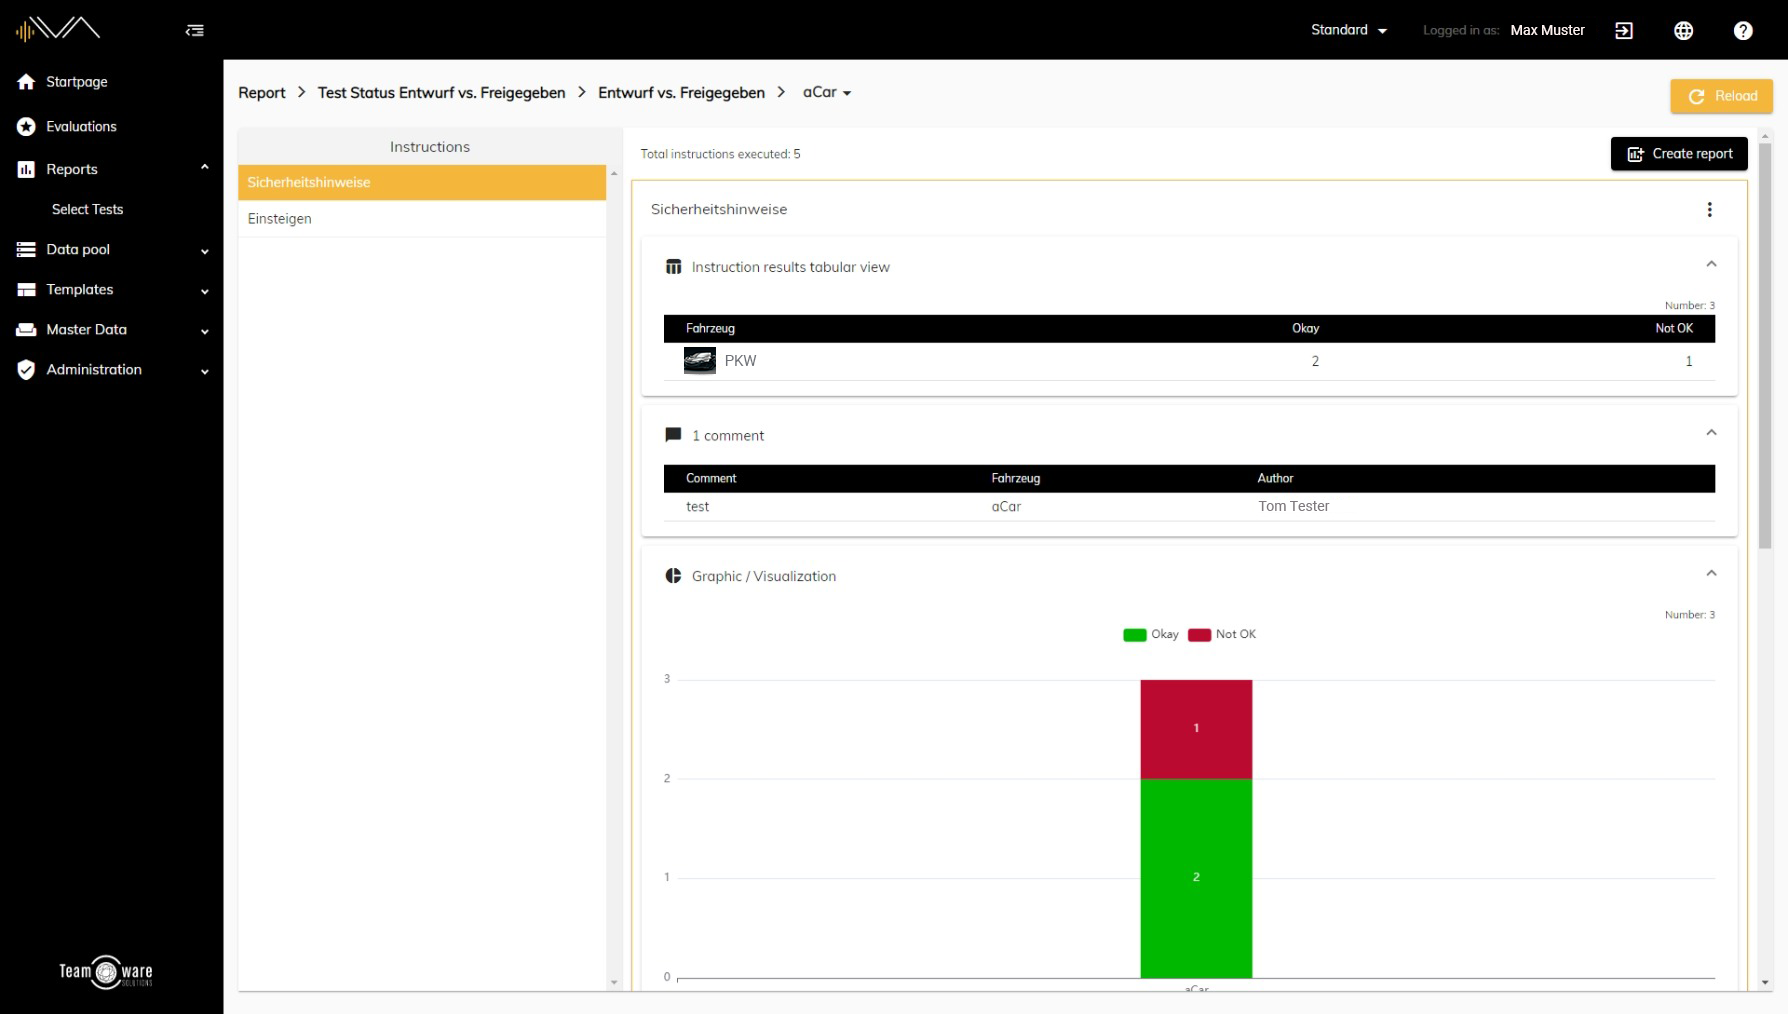
First of all, you have to navigate to the corresponding menu item. To do this, click on "Reports"->"Selected Tests" in the left navigation bar and click on the relevant test under the relevant evaluation. Now you can select the desired test object and click on the "Instructions" tile. You will now be taken to a new page. There you will see a list with instructions, a graphical and a tabular evaluation of the answers. You can copy the diagram and the tabel and also copy comments by clicking on the three-point icon.
In the left column you can switch between instructions. With a click on the button "Create report" at the top right, you can export the data as a CSV or create and download a PDF.
Feedback Reports
How do I interpret simple feedback reports?
First of all, you have to navigate to the corresponding menu item. To do this, click on Evaluation->Select Tests in the left navigation bar and click on the relevant test under the relevant evaluation. Now you can select the desired test object and click on the "Feedback" tile. You will now be taken to a new page. You will see the overview tile and the feedback tile there.
In the overview tile, you can display the feedback results by category or by test object in tabular or graphical form. To switch between tabular and graphical representation of the results, select the appropriate tab at the top left. To switch between vehicle and category view, click on the table icon at the top right.
The feedback tile includes a list of the feedbacks that have been sent and the following information:
- Name of the test object/test
- A comment
- indication of the rating
- tester's name
- time at which the feedback was given
- status
- validation
- Number of attachments (photos, videos, GPS coordinates, audio, etc.) -> Clicking on the icon opens a list of downloadable attachments
In the list under the Actions column, you can edit the corresponding feedback by clicking on the pen icon, view attachments by clicking on the paper clip icon and view and write comments on the feedback by clicking on the speech bubble icon.
In this view you have the option of creating a report. To do this, click on the "Create report" button at the top right. A popup with two columns opens. In the left column, select whether you want to create the report for the feedback, the instructions or the questionnaires. Then, in the right-hand column, determine the settings that should be valid for the report and click on the corresponding button to create the report in the desired format.
If you make any changes, remember to click the Save button at the bottom right at the end.
How do I interpret advanced feedback reports?
First you need to navigate to the appropriate menu item. To do this, click on Evaluation->Select Tests in the left navigation bar and click on the relevant test under the relevant evaluation. Now you can select the desired test object and click on the Feedback tile. You will now be taken to a new page. Click on the "Advanced reports" button at the top right. You will now be taken to a new page.
In the smaller column on the left you can select different test objects and tests from different evaluations as you wish. This can be helpful if, for example, you want to compare results from different tests. To select or deselect further evaluations, tests or test items, simply click on the checkbox to the left of the relevant evaluation, test or test item.
The larger right column shows the overview tile (top) and the feedback tile (bottom).
In the overview tile, you can display the feedback results by category or by test object in tabular or graphical form. To switch between tabular and graphical representation of the results, select the appropriate tab at the top left. To switch between vehicle and category view, click on the table icon at the top right.
The feedback tile includes a list of the feedbacks that have been sent and the following information:
- Name of the test object/test
- Description of the feedback
- Comments on the feedback
- indication of the rating
- tester's name
- time at which the feedback was given
- status
- validation
- Number of attachments (photos, videos, GPS coordinates, audio, etc.) -> Clicking on the icon opens a list of downloadable attachments
In the list, under the Actions column, you can view attachments by clicking on the paperclip icon and view and write comments on the feedback by clicking on the speech bubble icon. You can also edit or validate the feedback by clicking on the three dots.
If you make any changes, remember to click the Save button at the bottom right at the end.
The "Simple report" button takes you back to the previous page.
How do I interpret feedback validation?
First you need to navigate to the appropriate menu item. To do this, click on Evaluation->Select Tests in the left navigation bar and click on the relevant test under the relevant evaluation. Now you can select the desired test object and click on the "Feedback" tile. You will now be taken to a new page. Click on the "Validate feedback" button in the upper right corner. You will now be taken to a new page.
In this view, you can check the received free feedback and, if necessary, mark it as validated. The main part of this page is a list with all feedback on the selected test objects and a matrix at the end of the list.
The list has the following columns:
- validated
- time
- tester
- category
- Evaluation
- All configured additional columns can be edited inline
- Column with different actions
- Show/hide feedback by clicking the eye icon
- View comments on feedback using the speech bubble icon
- See tester's attachments for feedback by clicking the paperclip icon
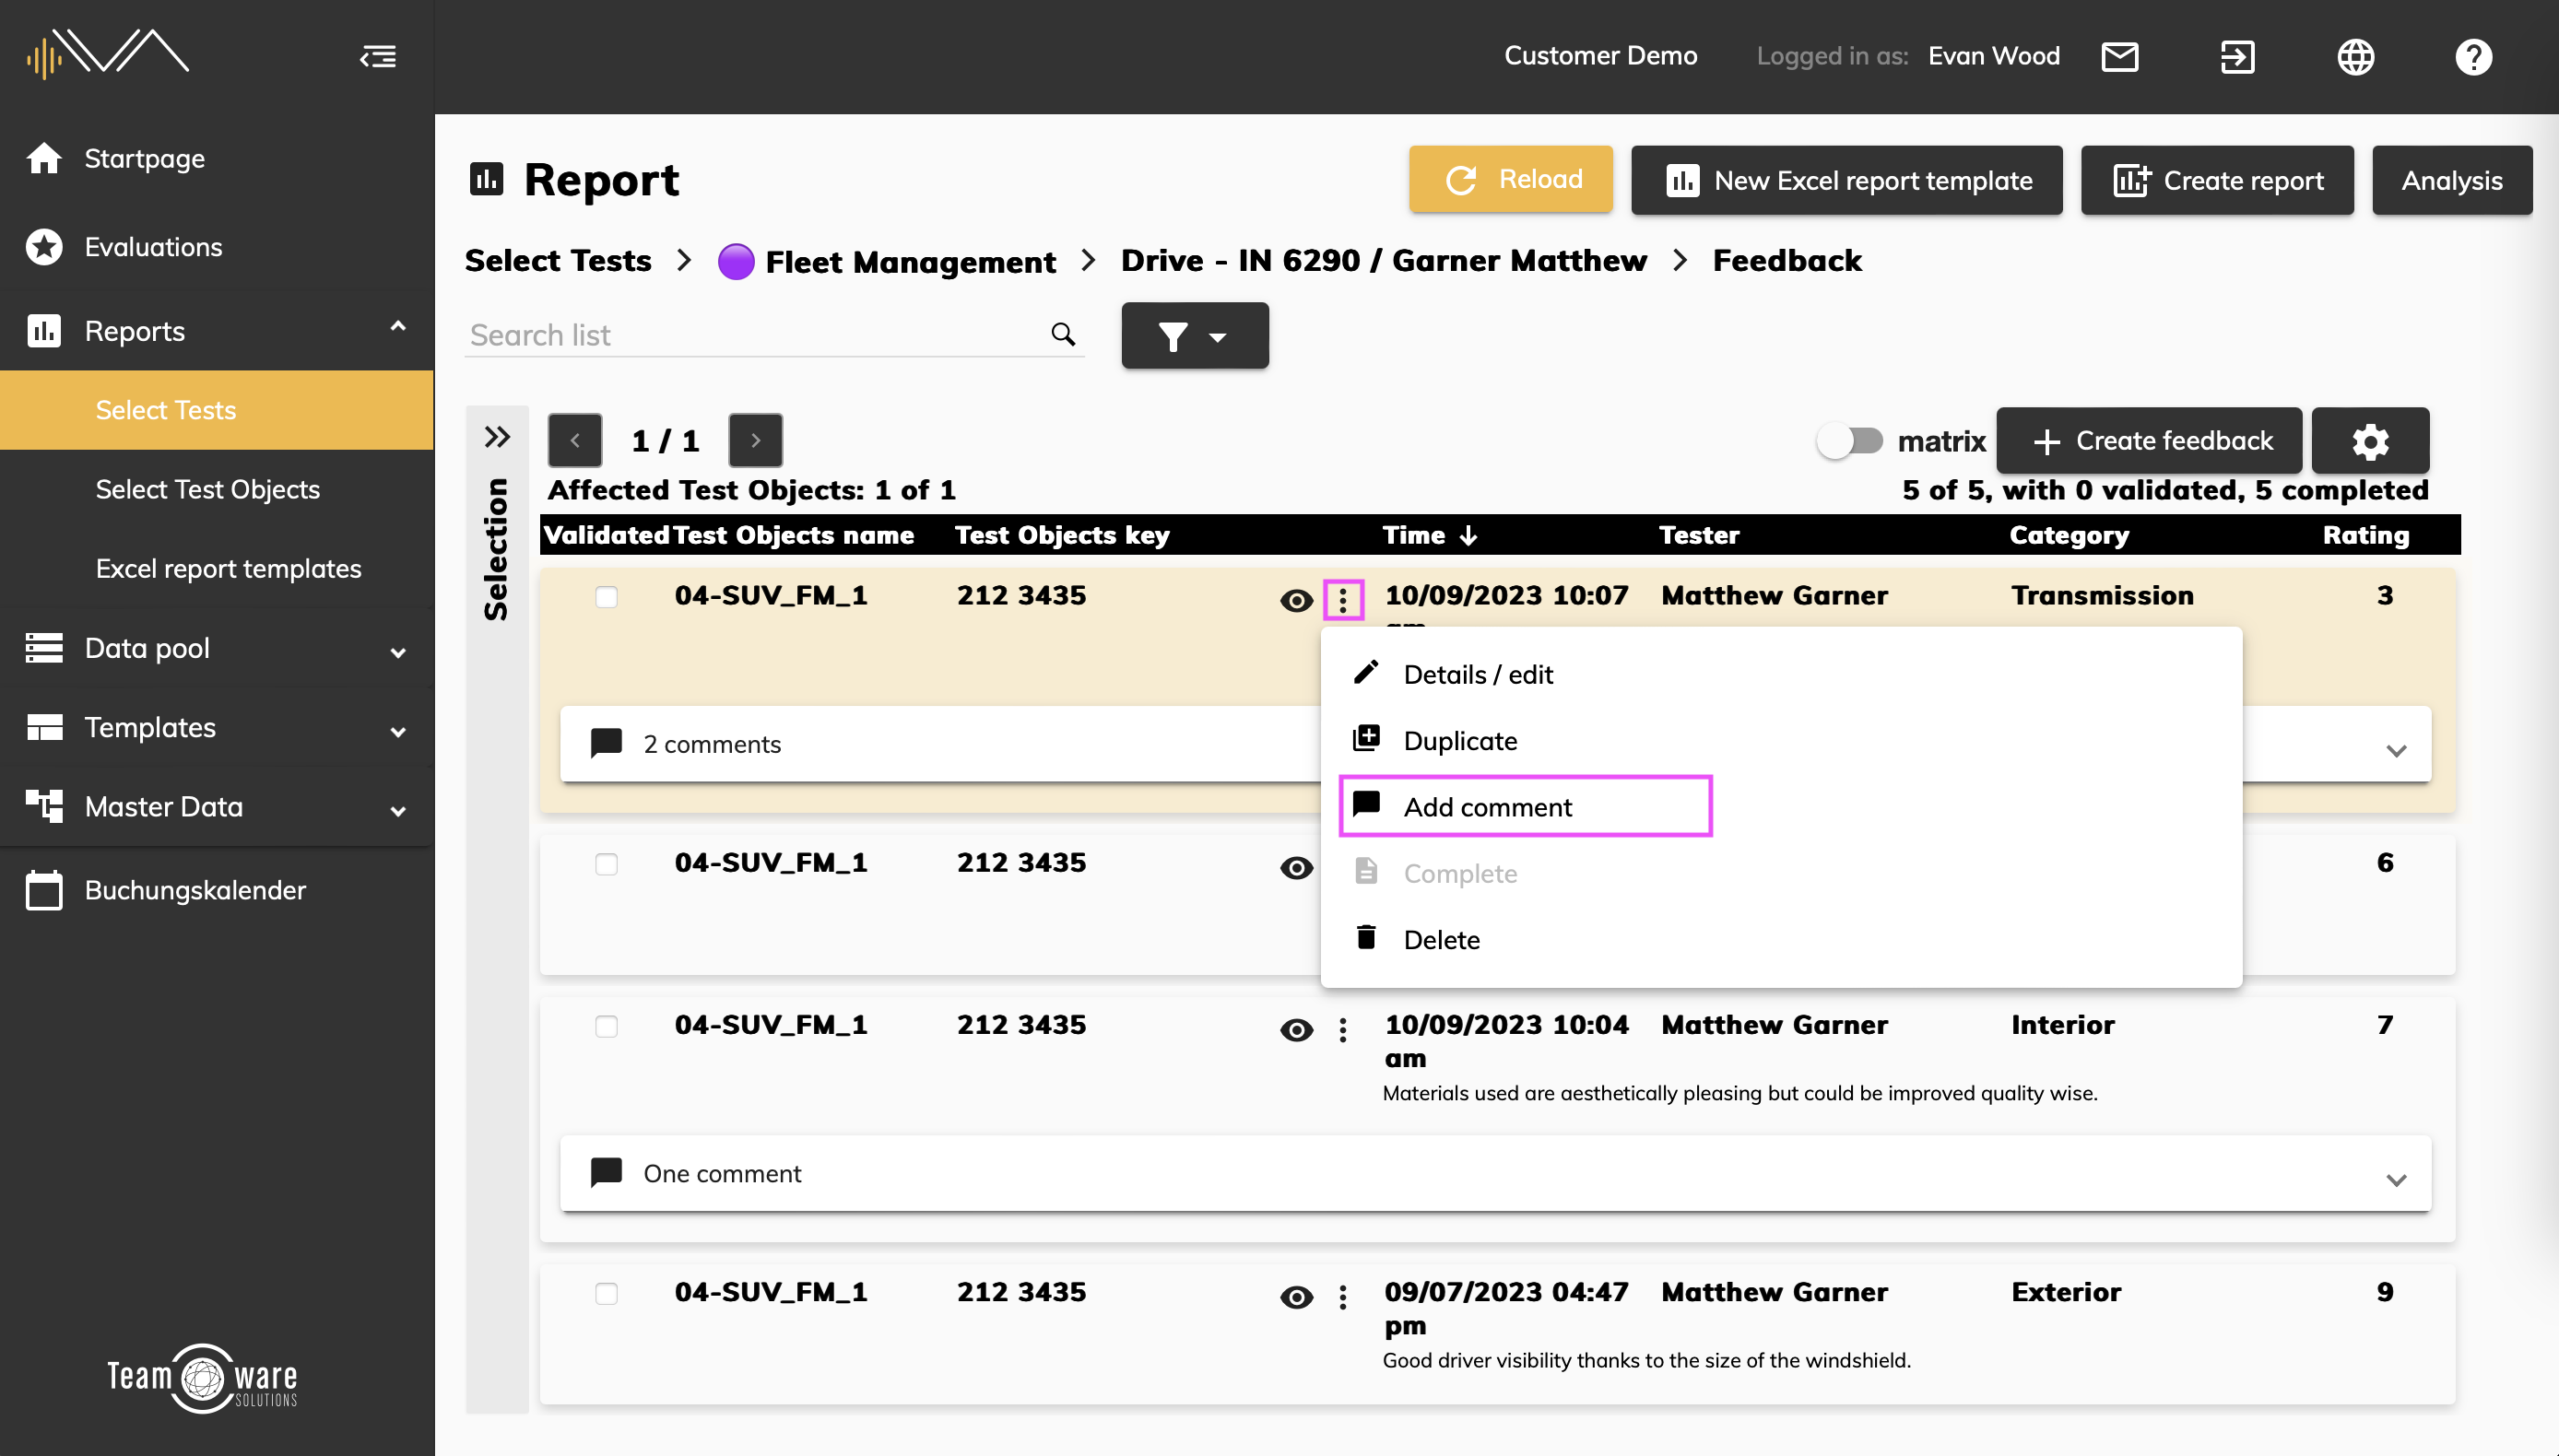
- Delete, complete or duplicate feedback by clicking the three points
- View details of the feedback by clicking the three points
- Add comments by clicking the three points
- Across multiple columns: Feedback from tester
At the top right above the table you can scroll through the various feedback pages and edit all additional columns inline.
At the right end of the list is a checkbox matrix. Here, feedback can be assigned to other test objects by clicking on the respective checkbox. The matrix can be hidden using the "Hide matrix" button on the right above the list.
In this view you have the option of creating a report. To do this, click on the "Create report" button at the top right. A popup with two columns opens. In the left column, select whether you want to create the report for the feedback, the instructions or the questionnaires. Then, in the right-hand column, determine the settings that should be valid for the report and click on the corresponding button to create the report in the desired format.
If you make any changes, remember to click the Save button at the bottom right at the end.
The "Simple report" button at the top right takes you to the previous page.
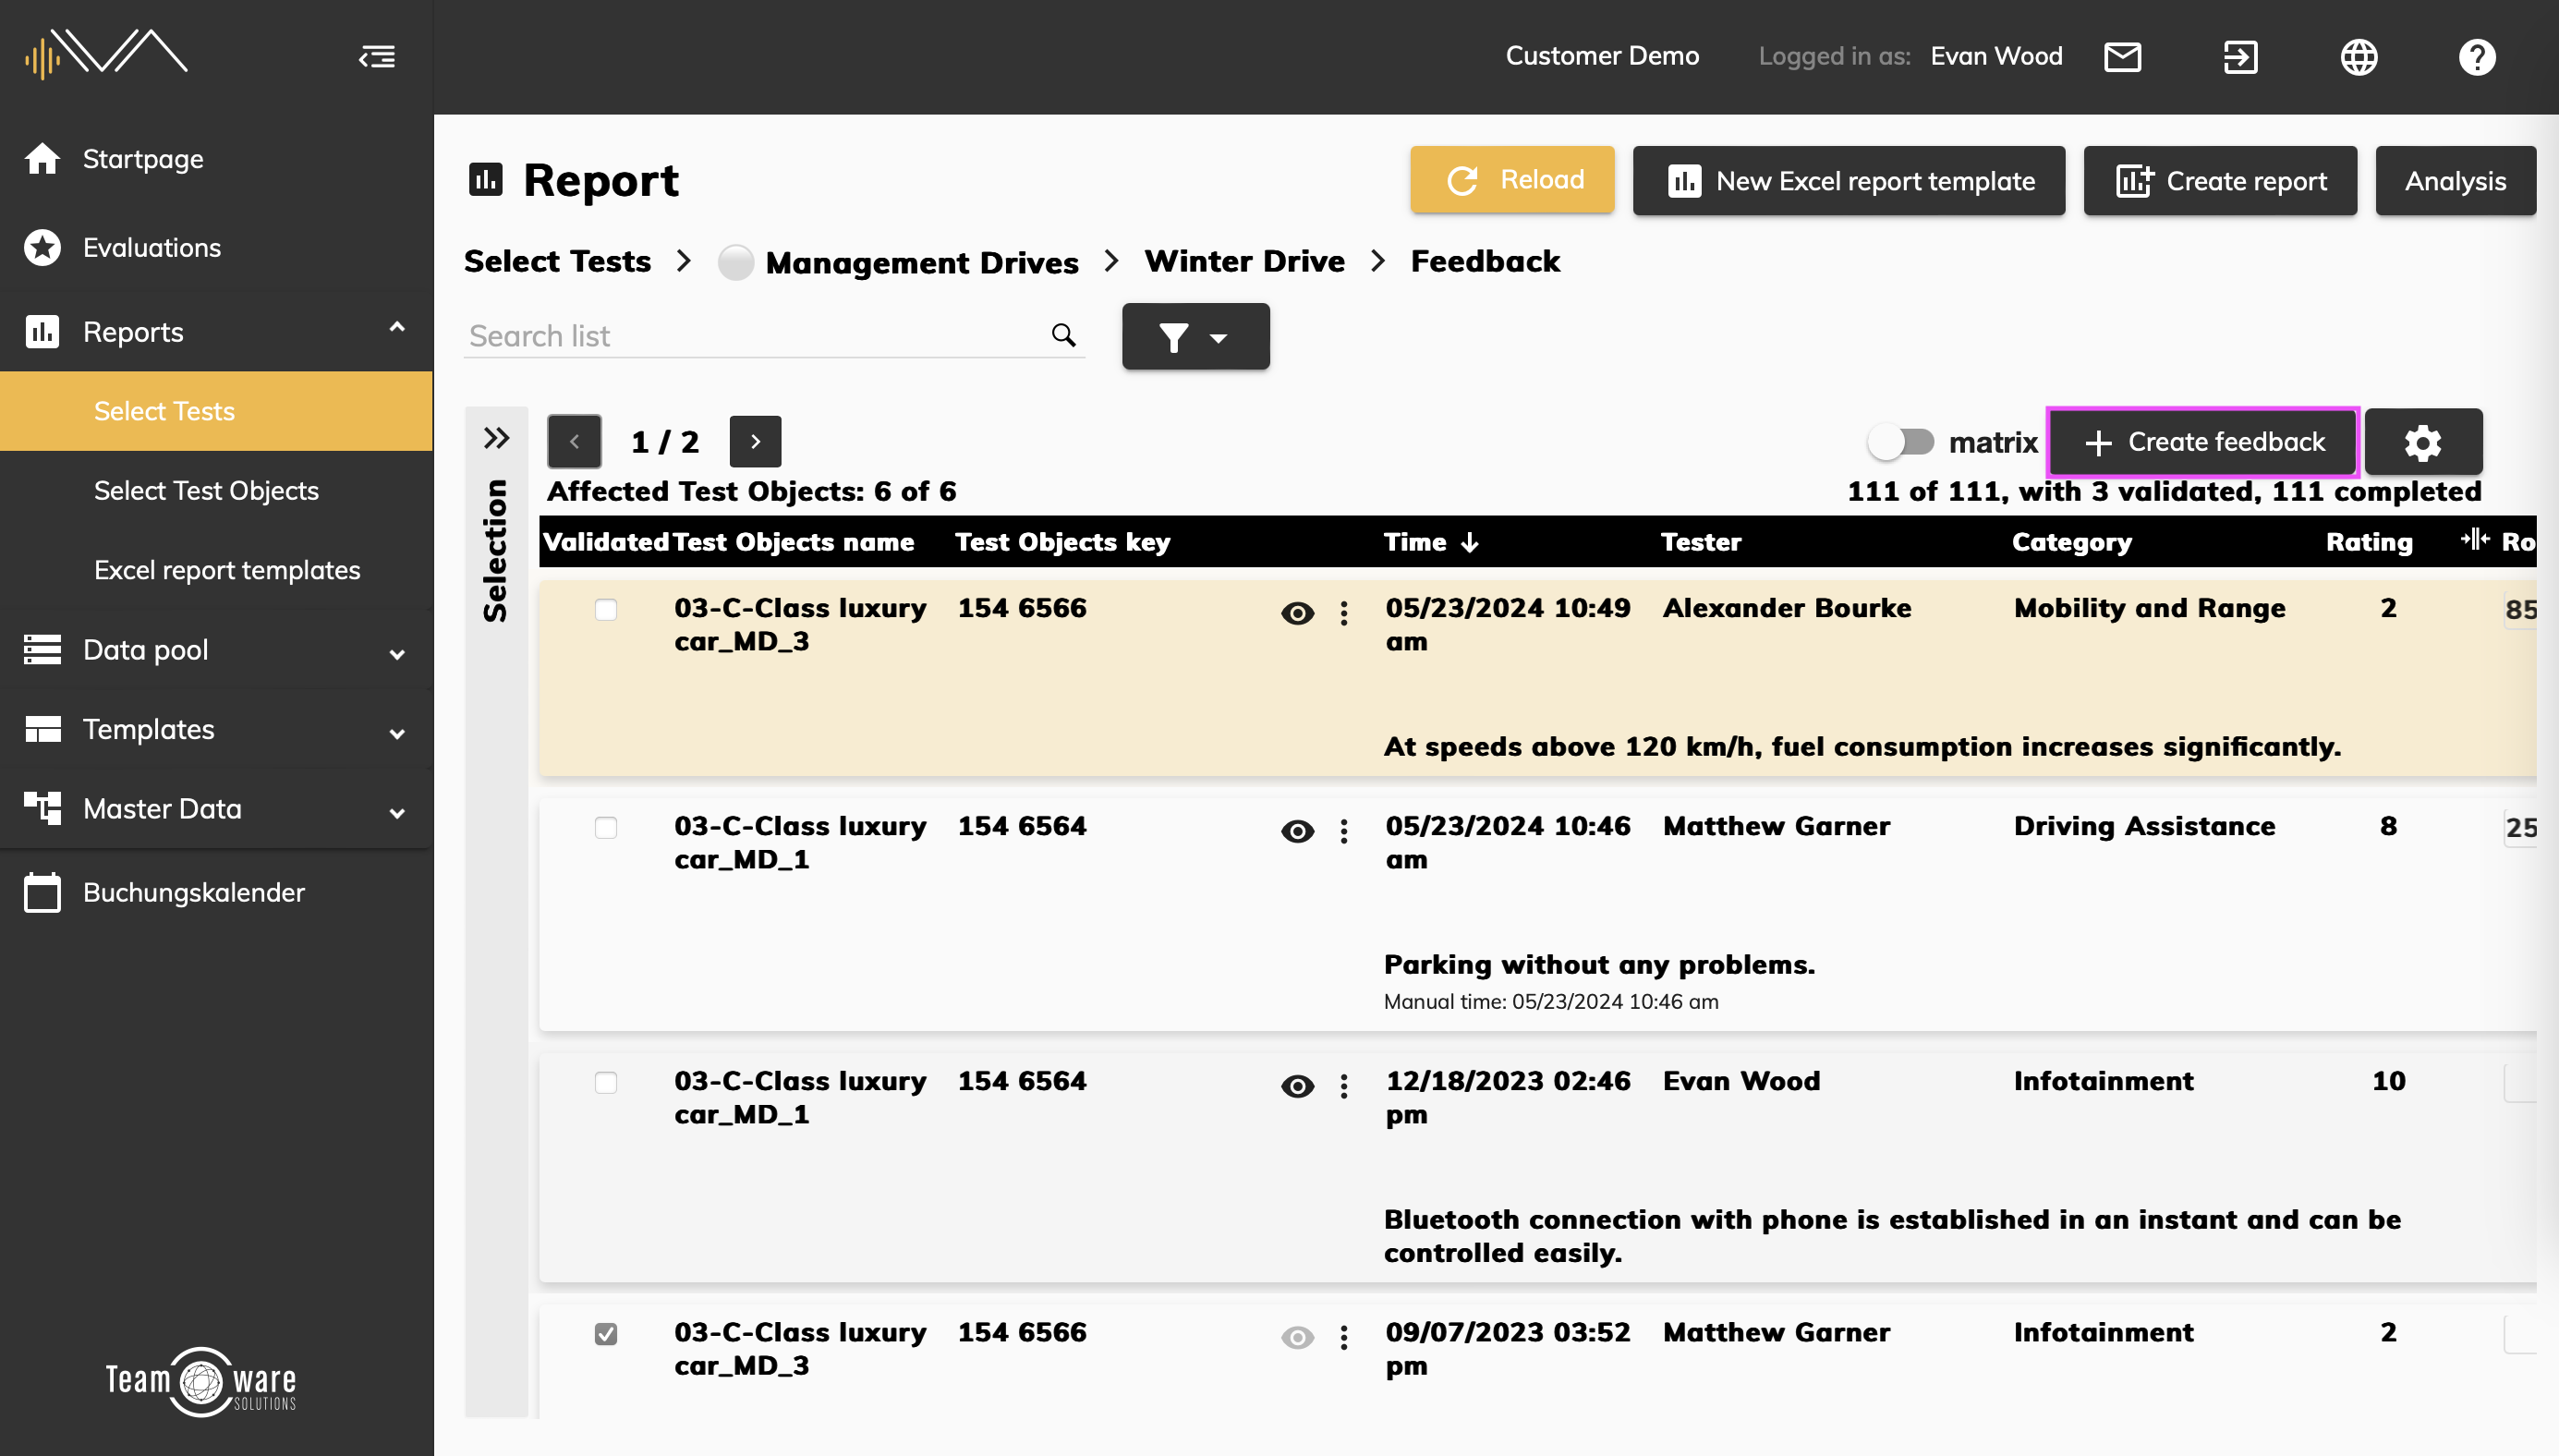
How do I create feedback?
First you need to navigate to the appropriate menu item. To do this, click on Evaluation->Select Tests in the left navigation bar and click on the relevant test under the relevant evaluation. Now you can select the desired test object and click on the "Feedback" tile. You will now be taken to a new page. Click on the "Validate feedback" button in the upper right corner. You will now be taken to a new page.
Click on the "+ Create feedback" button above the list of feedbacks. A pop-up window will open where you can describe the feedback, choose a rating, category, tester, set a manual time, and add attachments. You can also create a new tester directly using the "Create as tester..." button instead of selecting an existing tester. Then click on "Apply" to create the feedback.
When you're done, don't forget to hit the save button.
How do I add (additional) columns to the feedback list?
First you need to navigate to the appropriate menu item. To do this, click on Evaluation-> Select Tests in the left navigation bar and click on the relevant test under the relevant evaluation. Now you can select the desired test object and click on the "Feedback" tile. You will now be taken to a new page. Click on the "Validate feedback" button in the upper right corner. You will now be taken to a new page.
Then click on the button with the gear symbol in the top right above the feedback list.
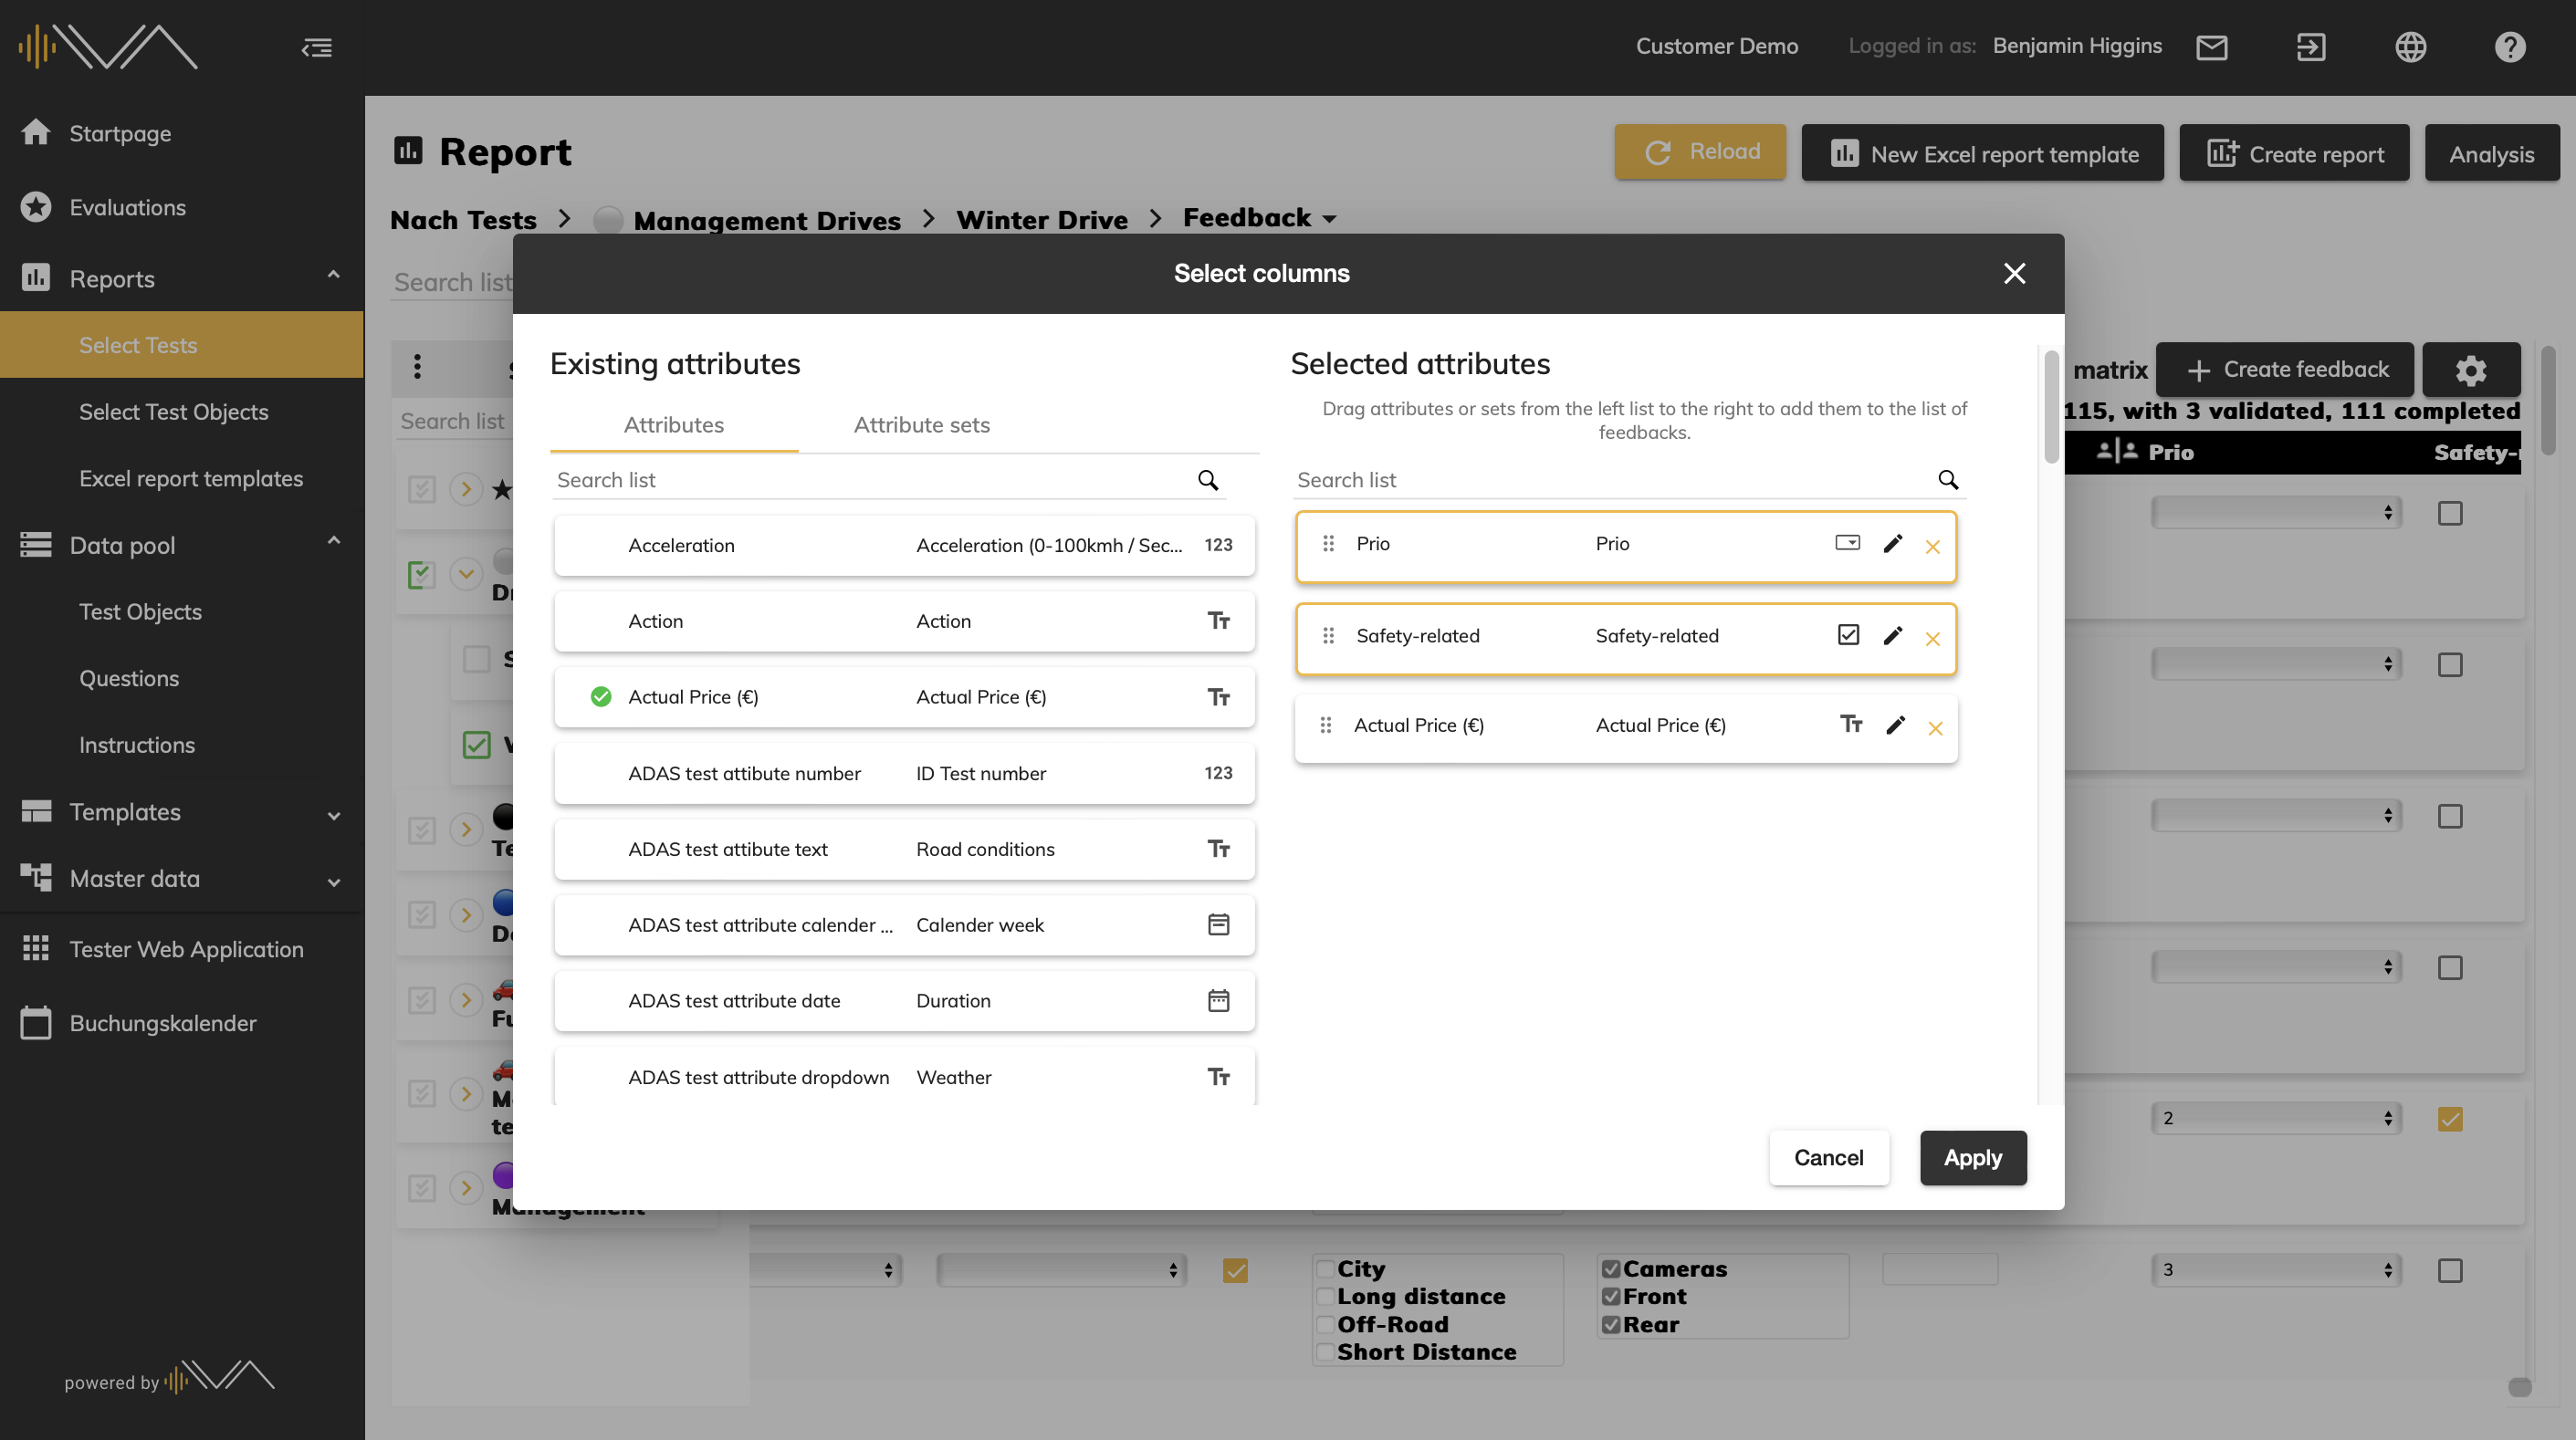
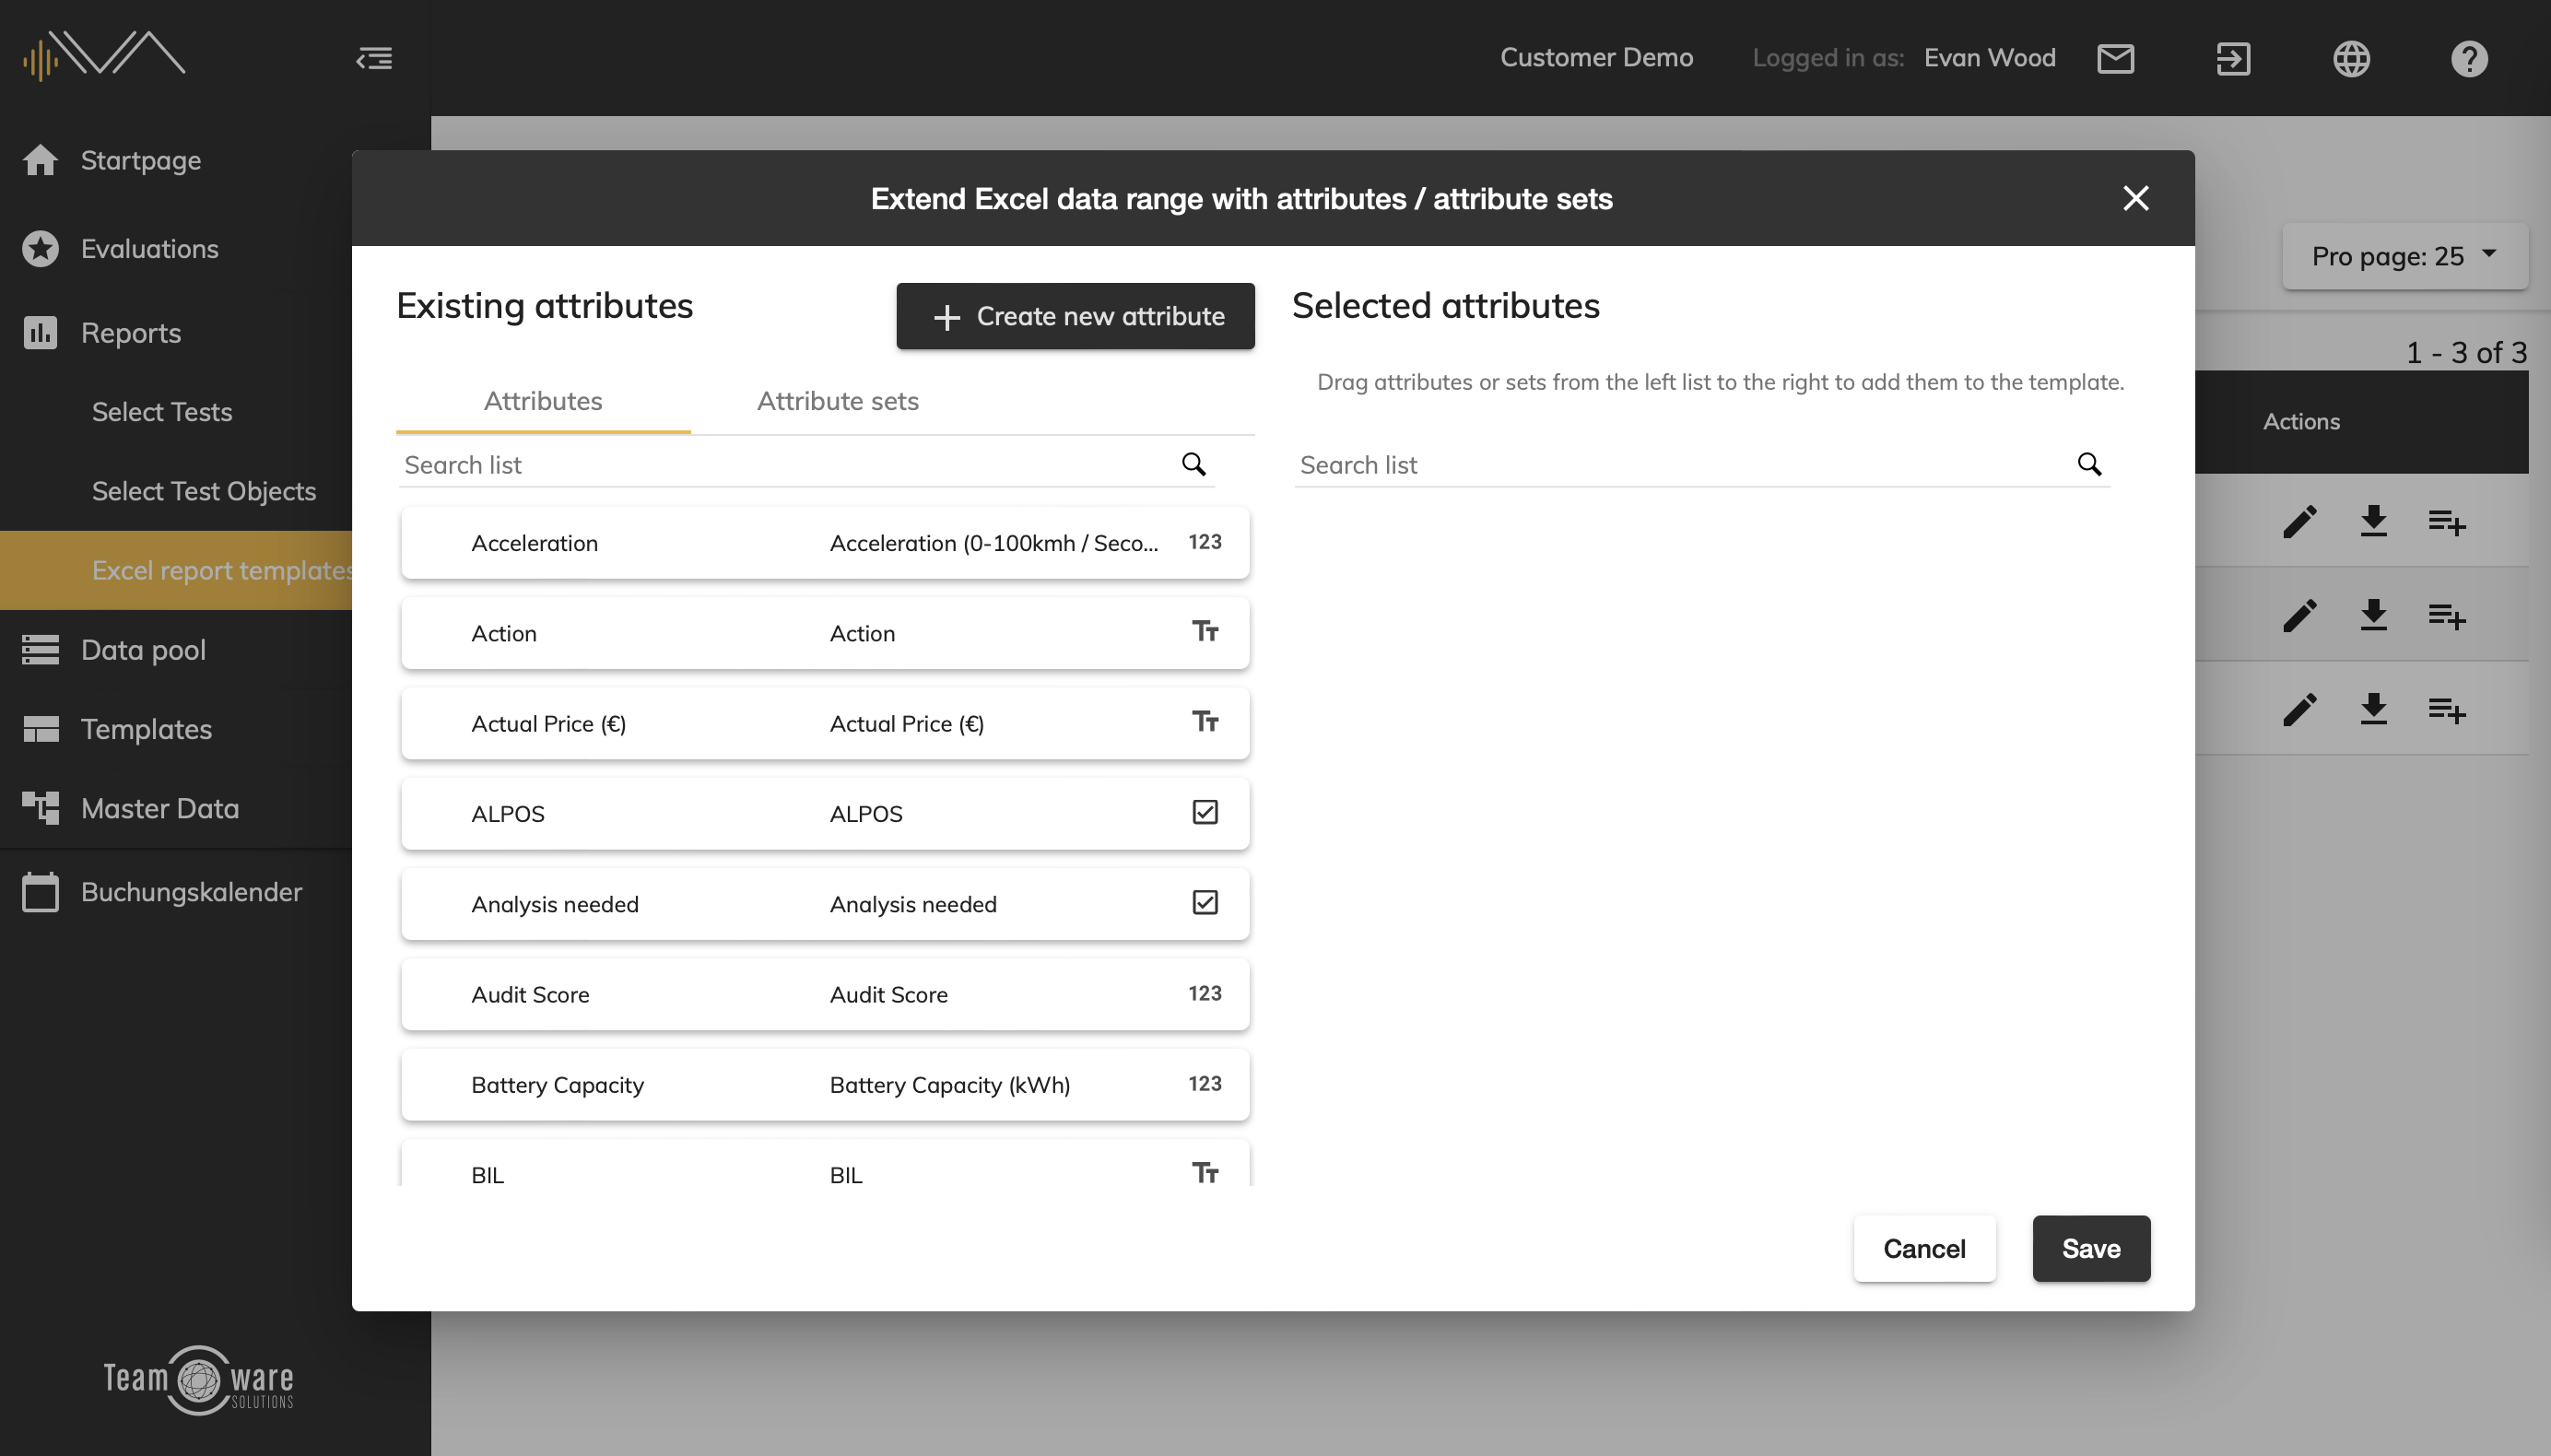
A pop-up with two columns opens. In the left column you see a searchable list with all attributes or attribute sets available in the system. If you would like to adopt an attribute as an additional column, simply double-click on the corresponding row or drag and drop it to the right-hand side. To add an attribute set as columns, drag and drop the set to the right side. Then click on "Apply".
You can configure additional attributes here as required and add, delete or edit them. These attributes are then displayed in the additional columns.
To make it easier to distinguish the overview of attributes used in the additional columns, a new label with six states has been introduced in the left-hand column:
| not assigned | assigned and without value | assigned and with value | |
| Tester Attribute |
No change | grayed out | Border with accent color |
| Planer Attribute |
No change | ✅ green check Icon |
✅ green check Icon and border with accent color |
How do I validate feedback?
Validated feedback shows future testers that they don't need to report that specific point again. First you need to navigate to the appropriate menu item. To do this, click on Evaluation->Select Tests in the left navigation bar and click on the relevant test under the relevant evaluation. Now you can select the desired test object and click on the "Feedback" tile. You will now be taken to a new page. Click on the "Validate feedback" button in the upper right corner. Now you get to a new view with a list of all feedbacks for the selected test items.
To mark feedback as validated, first find the relevant feedback in the list. You can either use the search bar at the top left or the filter next to it to find it faster.
Once you have found the right feedback, you can check the Validated column. If the feedback is to be validated for other test objects, simply check the box on the far right under the corresponding test objects. The validated feedback is displayed in the app under the 'Validated Feedback' tab.
When you're done, don't forget to hit the save button.
How do I assign feedback to other test objects?
First you need to navigate to the appropriate menu item. To do this, click on Evaluation->Select Tests in the left navigation bar and click on the relevant test under the relevant evaluation. Now you can select the desired test object and click on the "Feedback" tile. You will now be taken to a new page. Click on the "Validate feedback" button in the upper right corner. You will now be taken to a new page.
Then, in the matrix next to the table, click on the checkbox in the row of the feedback and in the column of the test object to which you want to assign the feedback.
When you're done, don't forget to hit the save button.
Edit Feedbacks
Create/edit manual time
In the feedback validation, you can create new feedback using the “+ Create feedback” button.
Here you are able to:
- create
- save and
- delete
the feedback’s manual time.
The manual time can also be changed for a existing feedback.
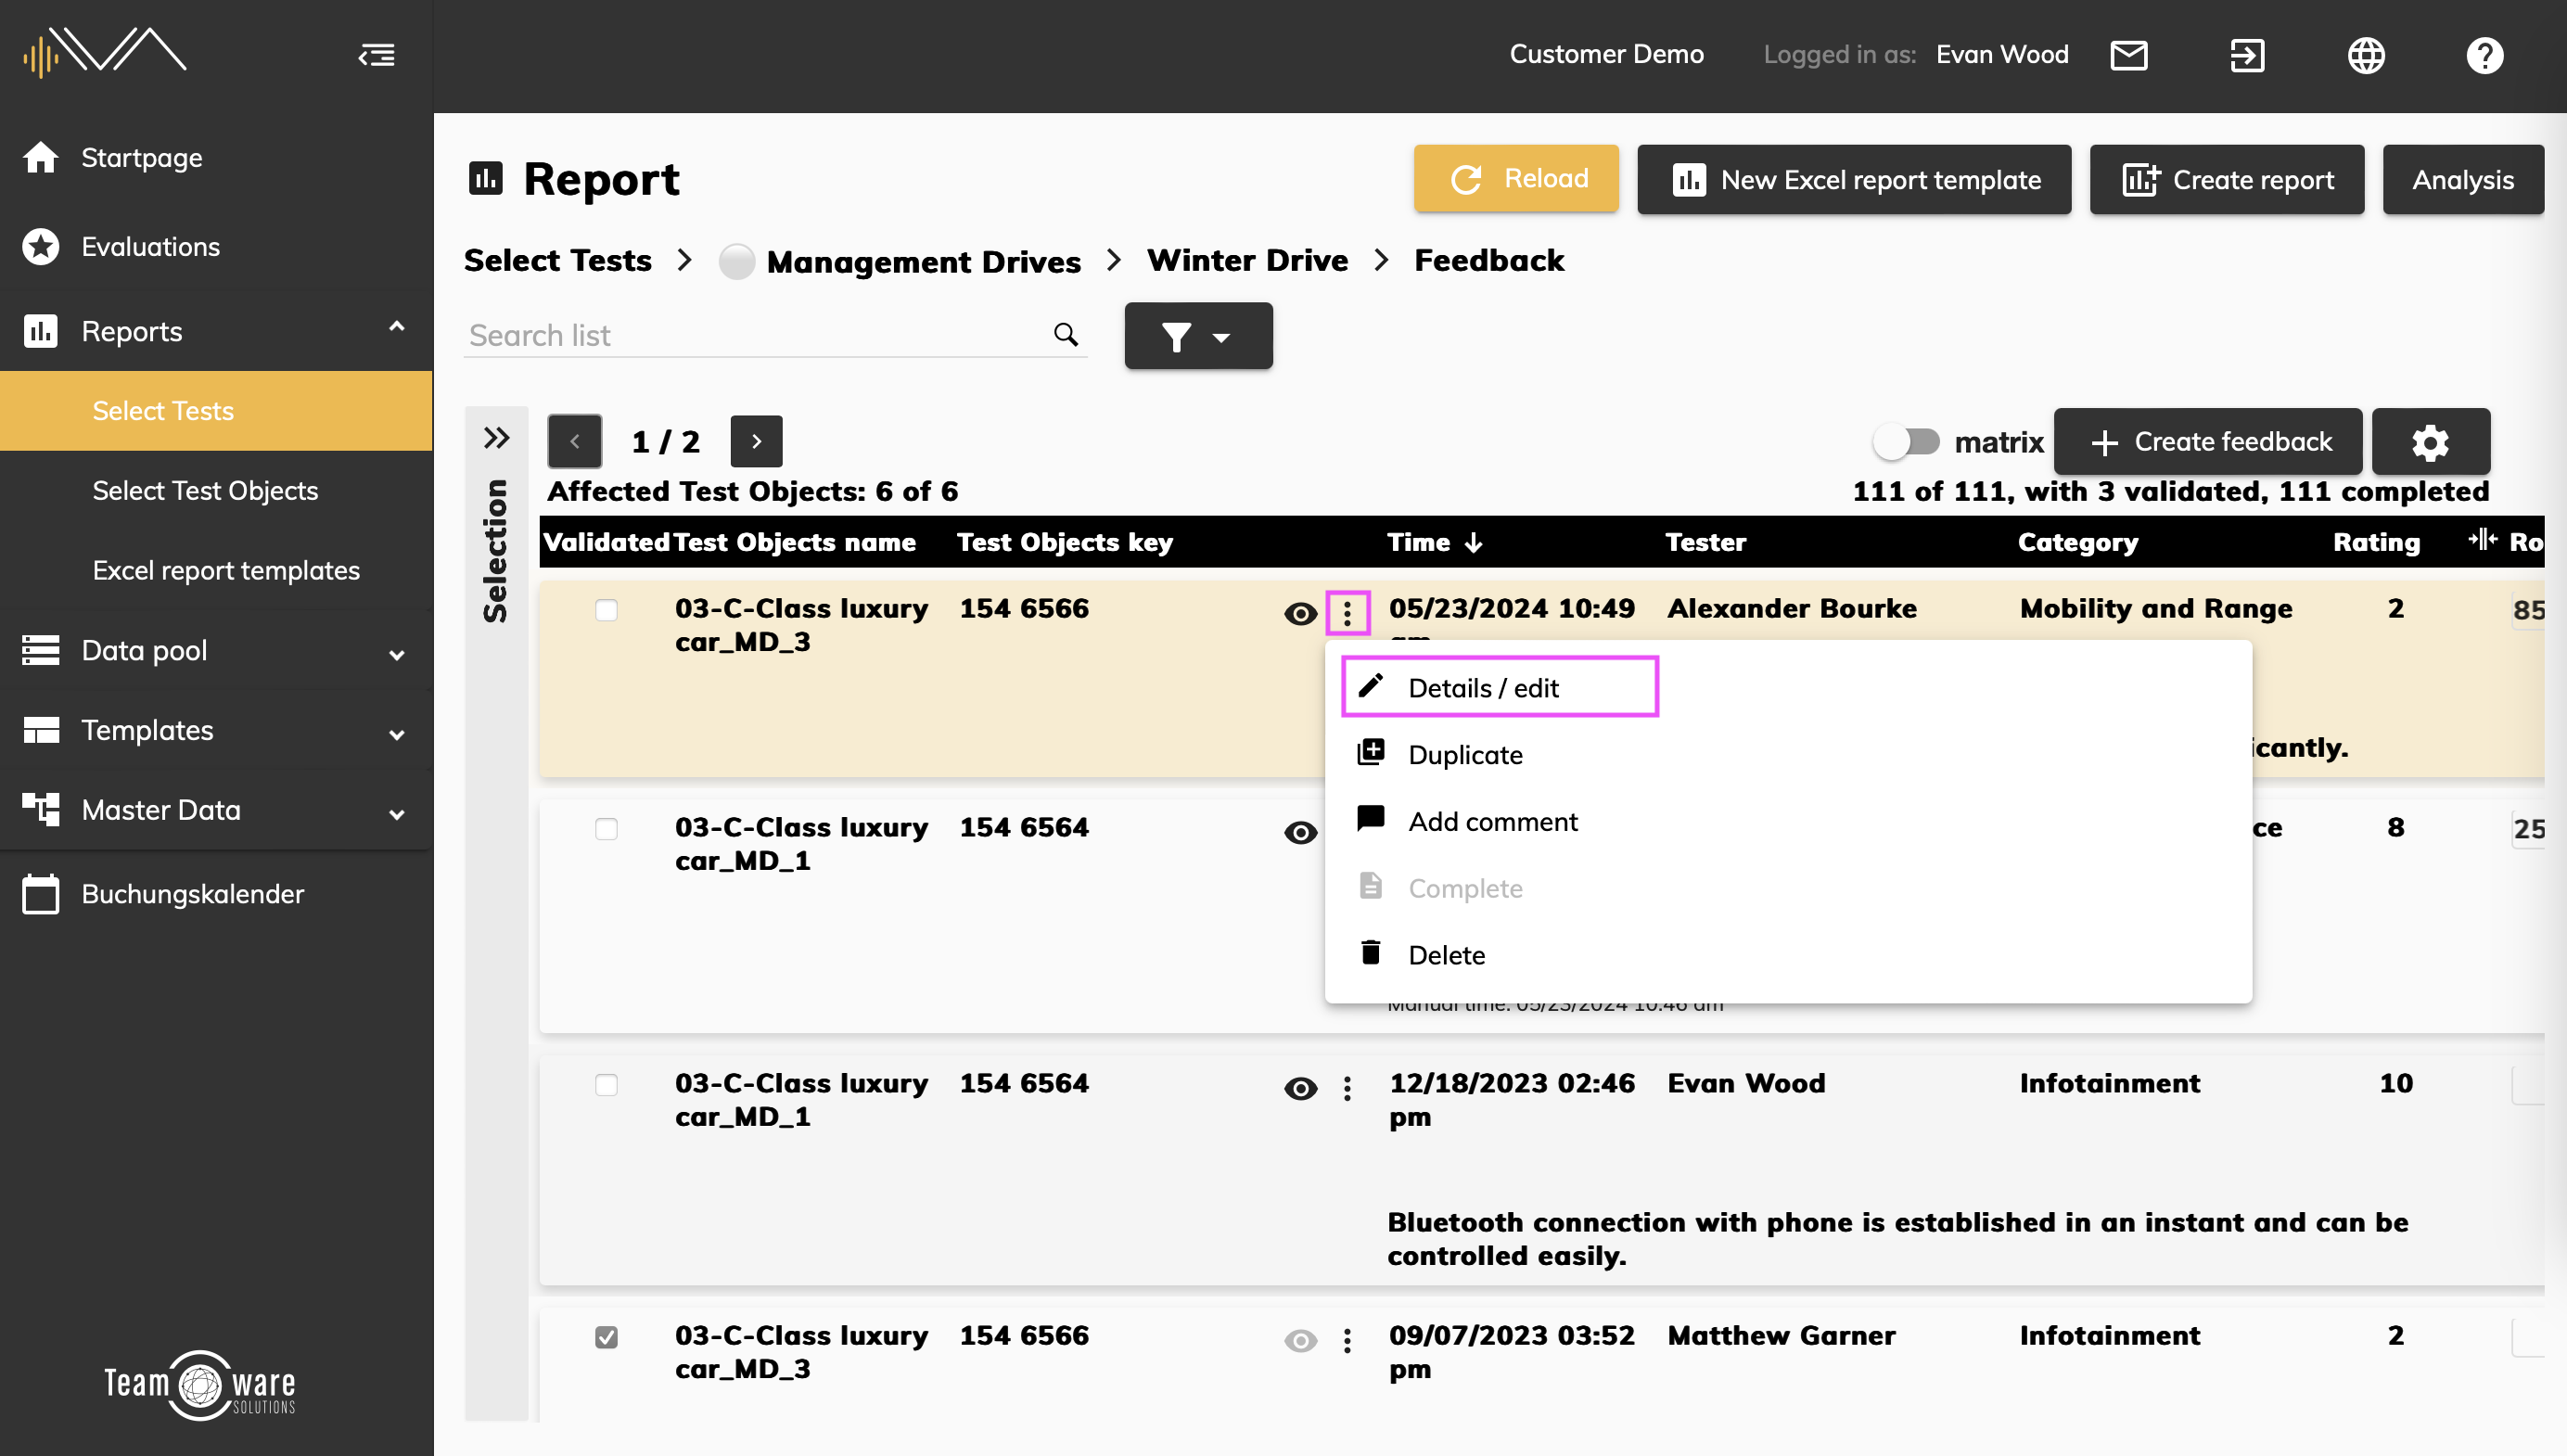
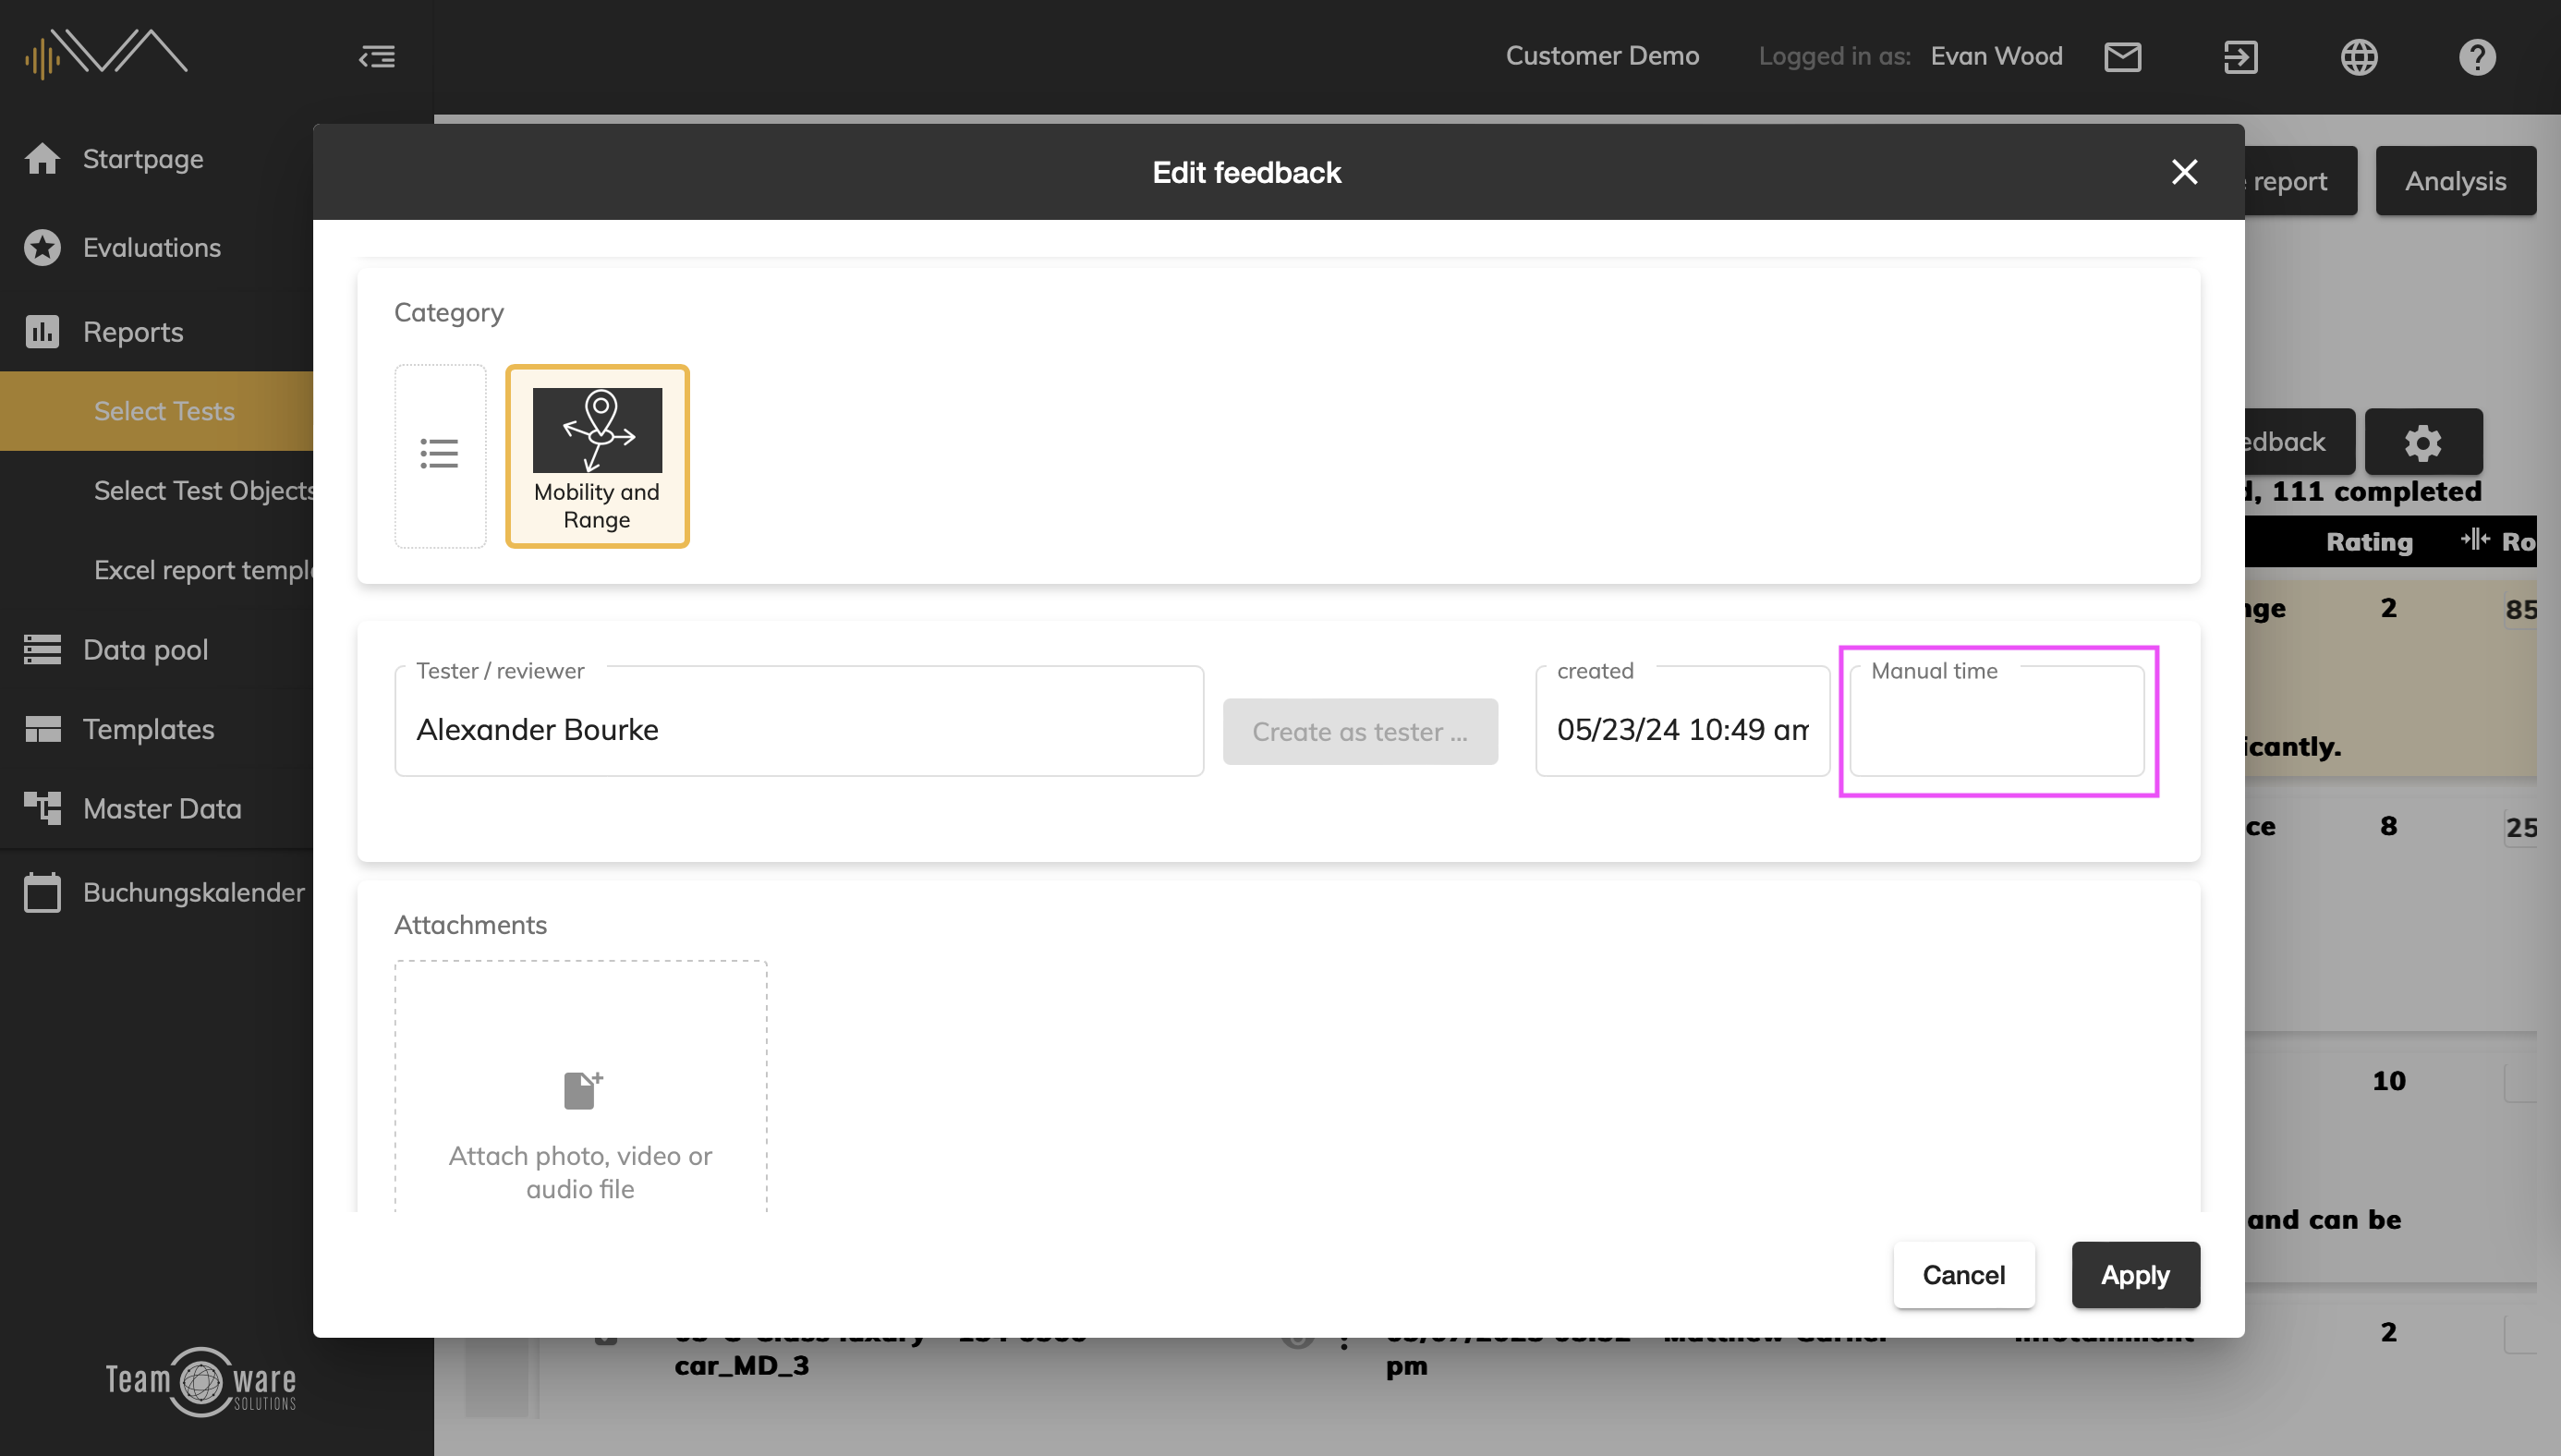
To do this, open the detailed view of a feedback by clicking on the 3-dot icon (“More” symbol) and select “Details / edit”. A new window “Edit feedback” will open. Here you will find the input field for the “Manual time” to the right of the “Tester / reviewer” input field.
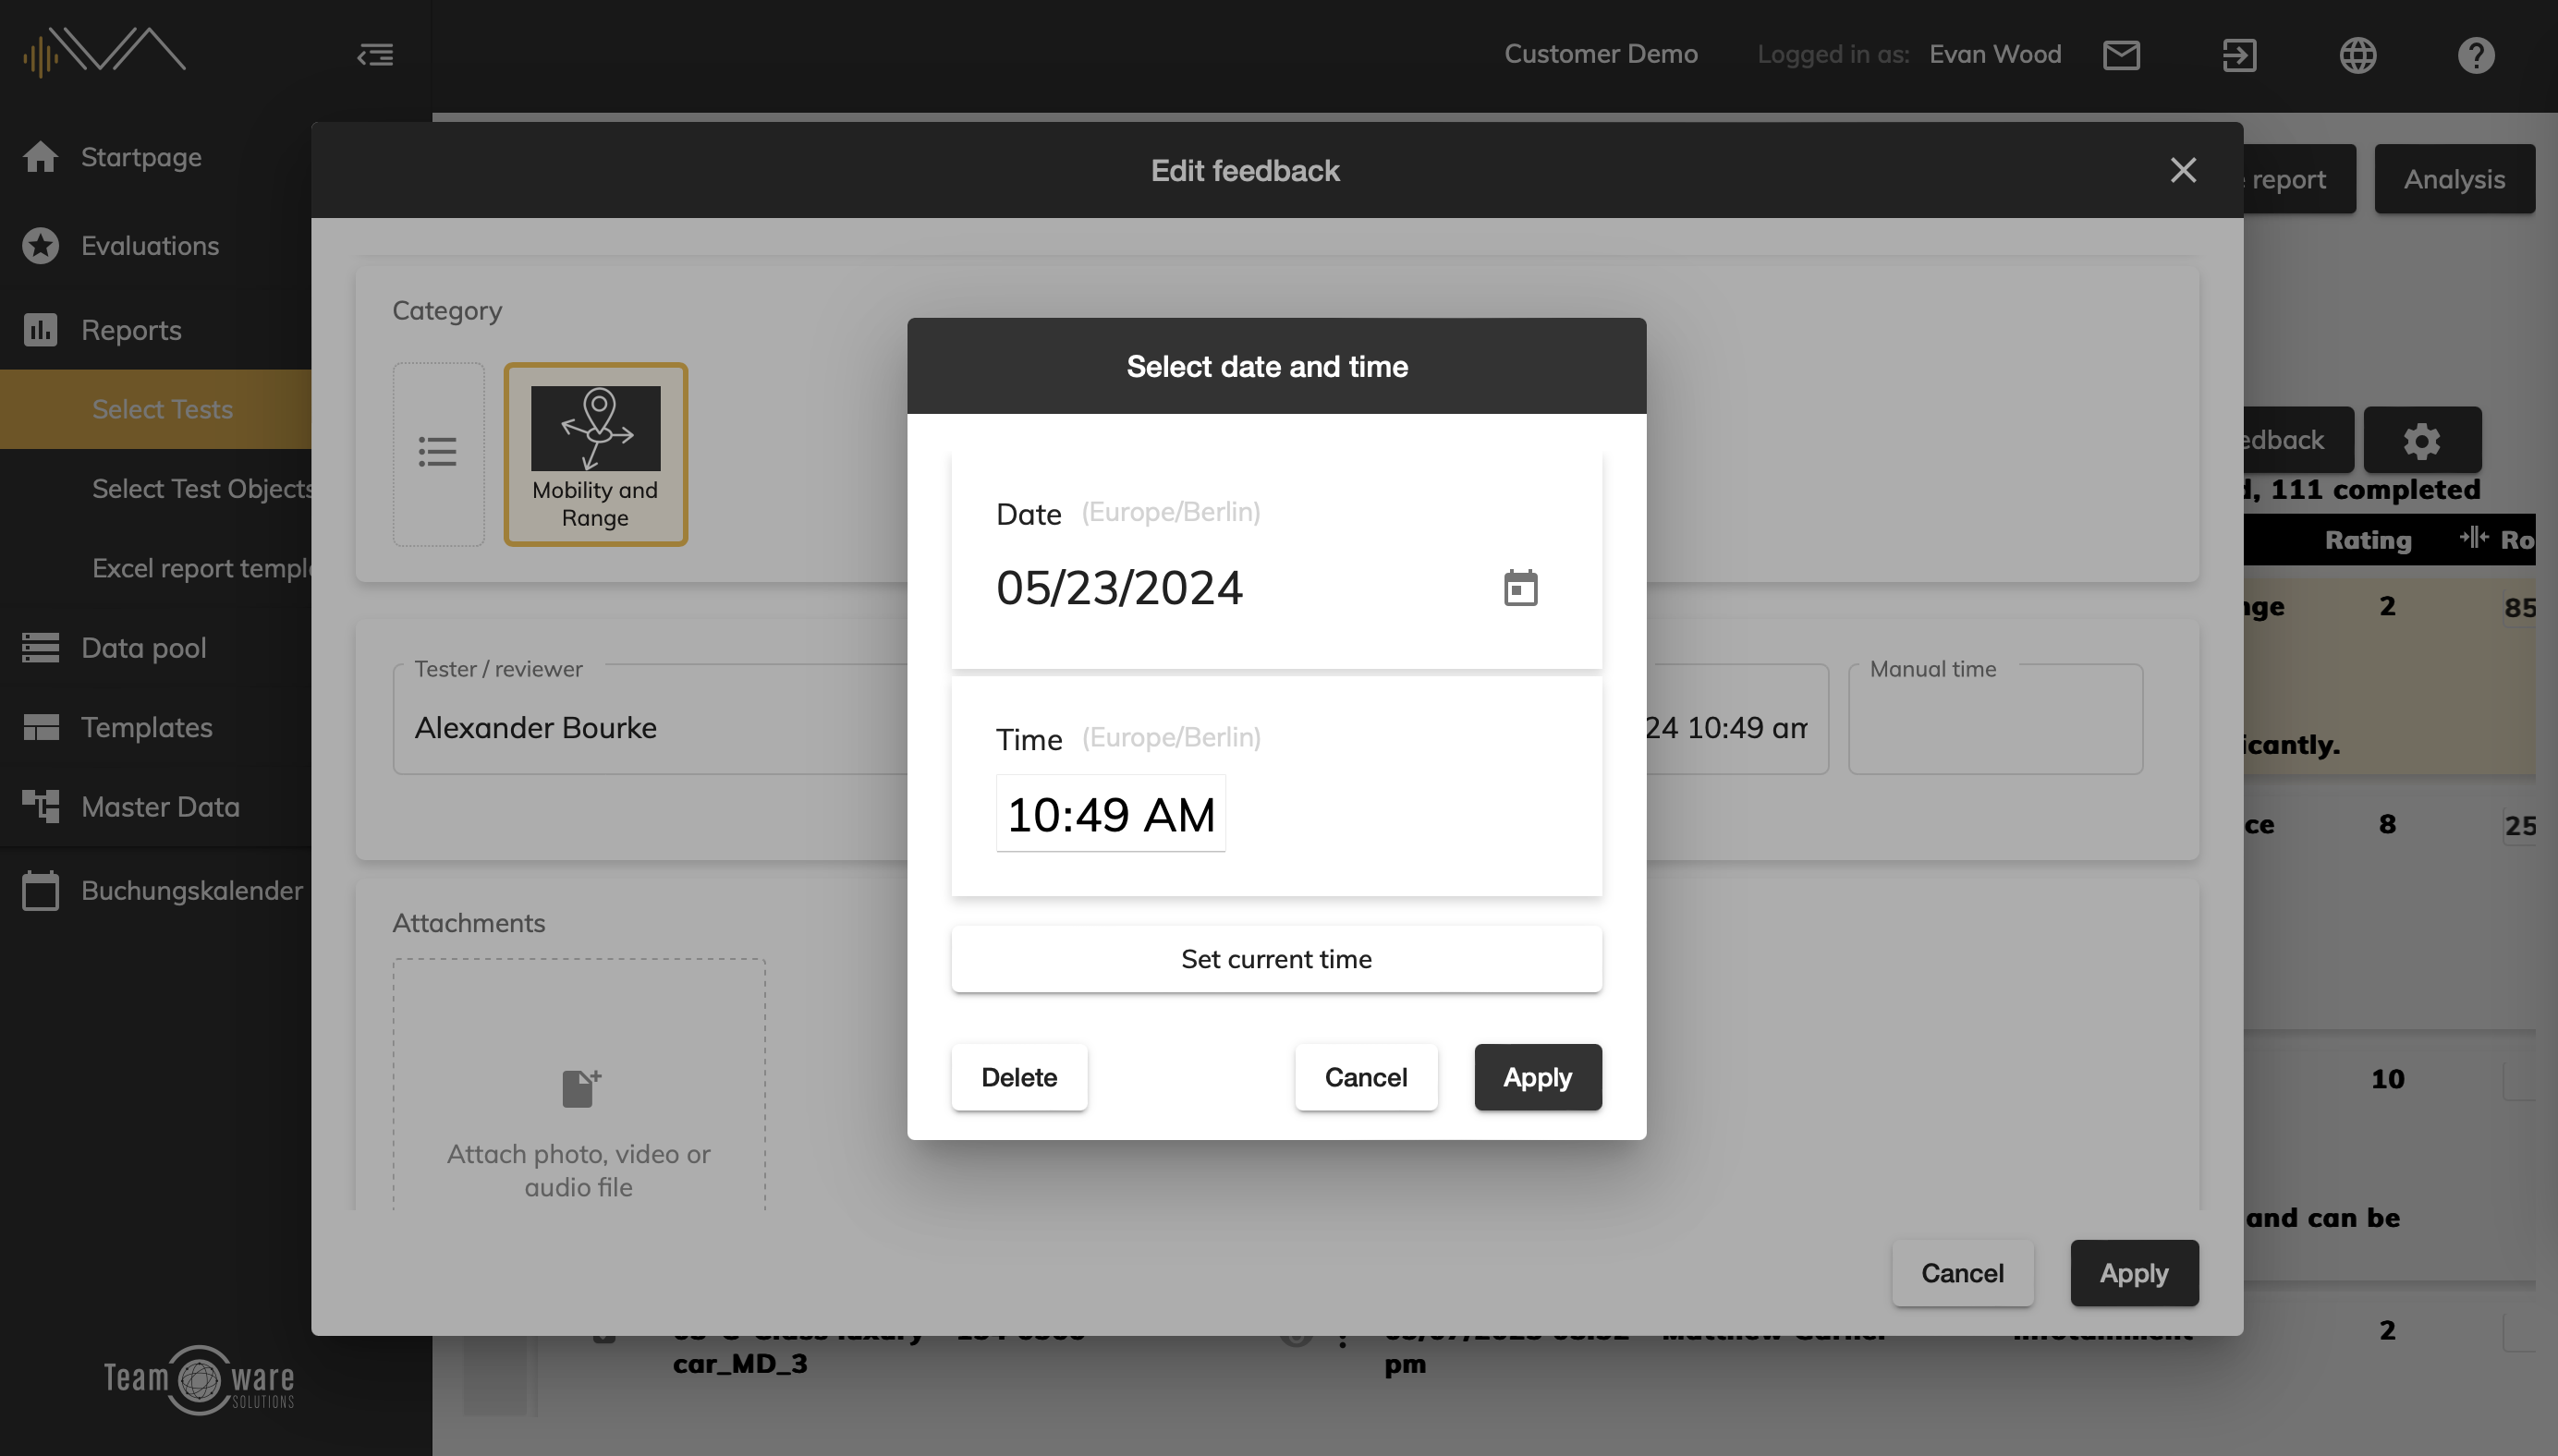
Click on the input field to open the “Select date and time” pop-up window. Here you can use the “Calendar” icon to set a specific date and the “Clock” icon to set a specific time.
If instead you want to set the current time, click on the “Set current time” button. Continue by clicking the “Apply” button and then again click "Apply" in the "Edit feedback" window . Complete the editing by using the “Save” button.
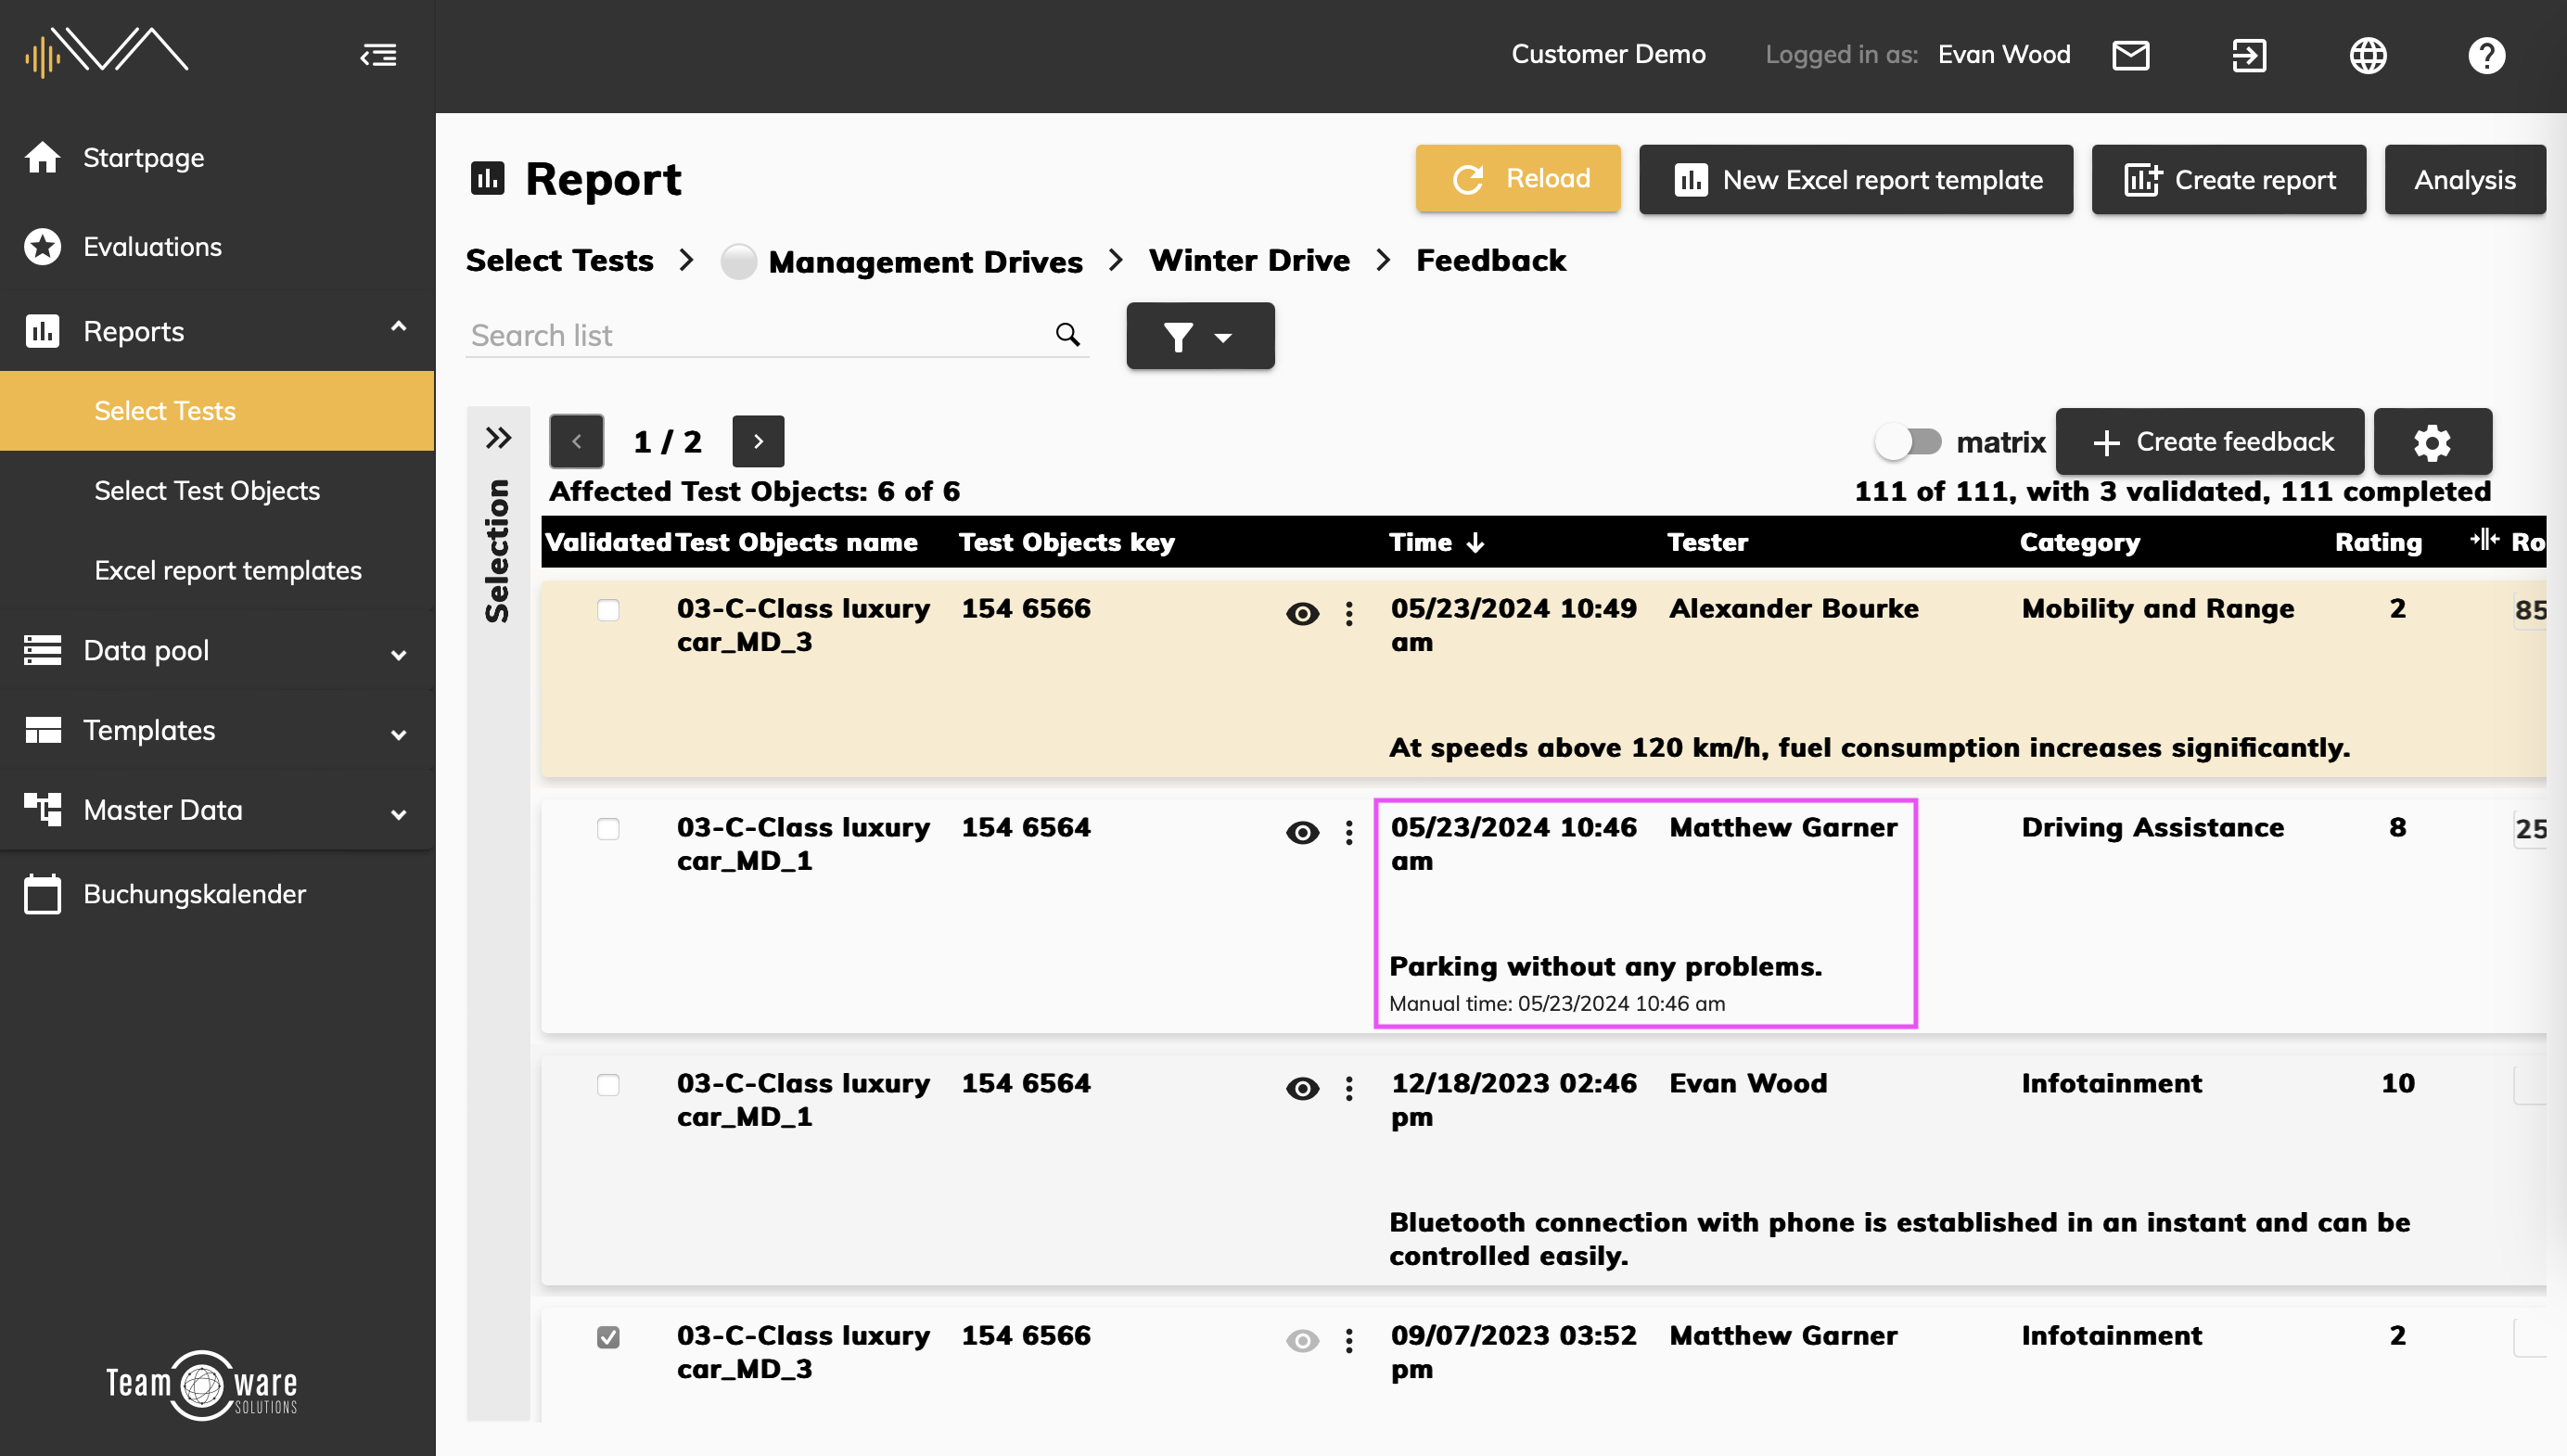
Once the new time you have set has been saved, you will see the following two things in the corresponding feedback tile:
- the time of creation
- the manual time that was added
There is a special case when you create new feedback and set a manual time at the same time, in which case the time set is the same as the time of creation.
Excel Report Templates
Creating an Excel report template
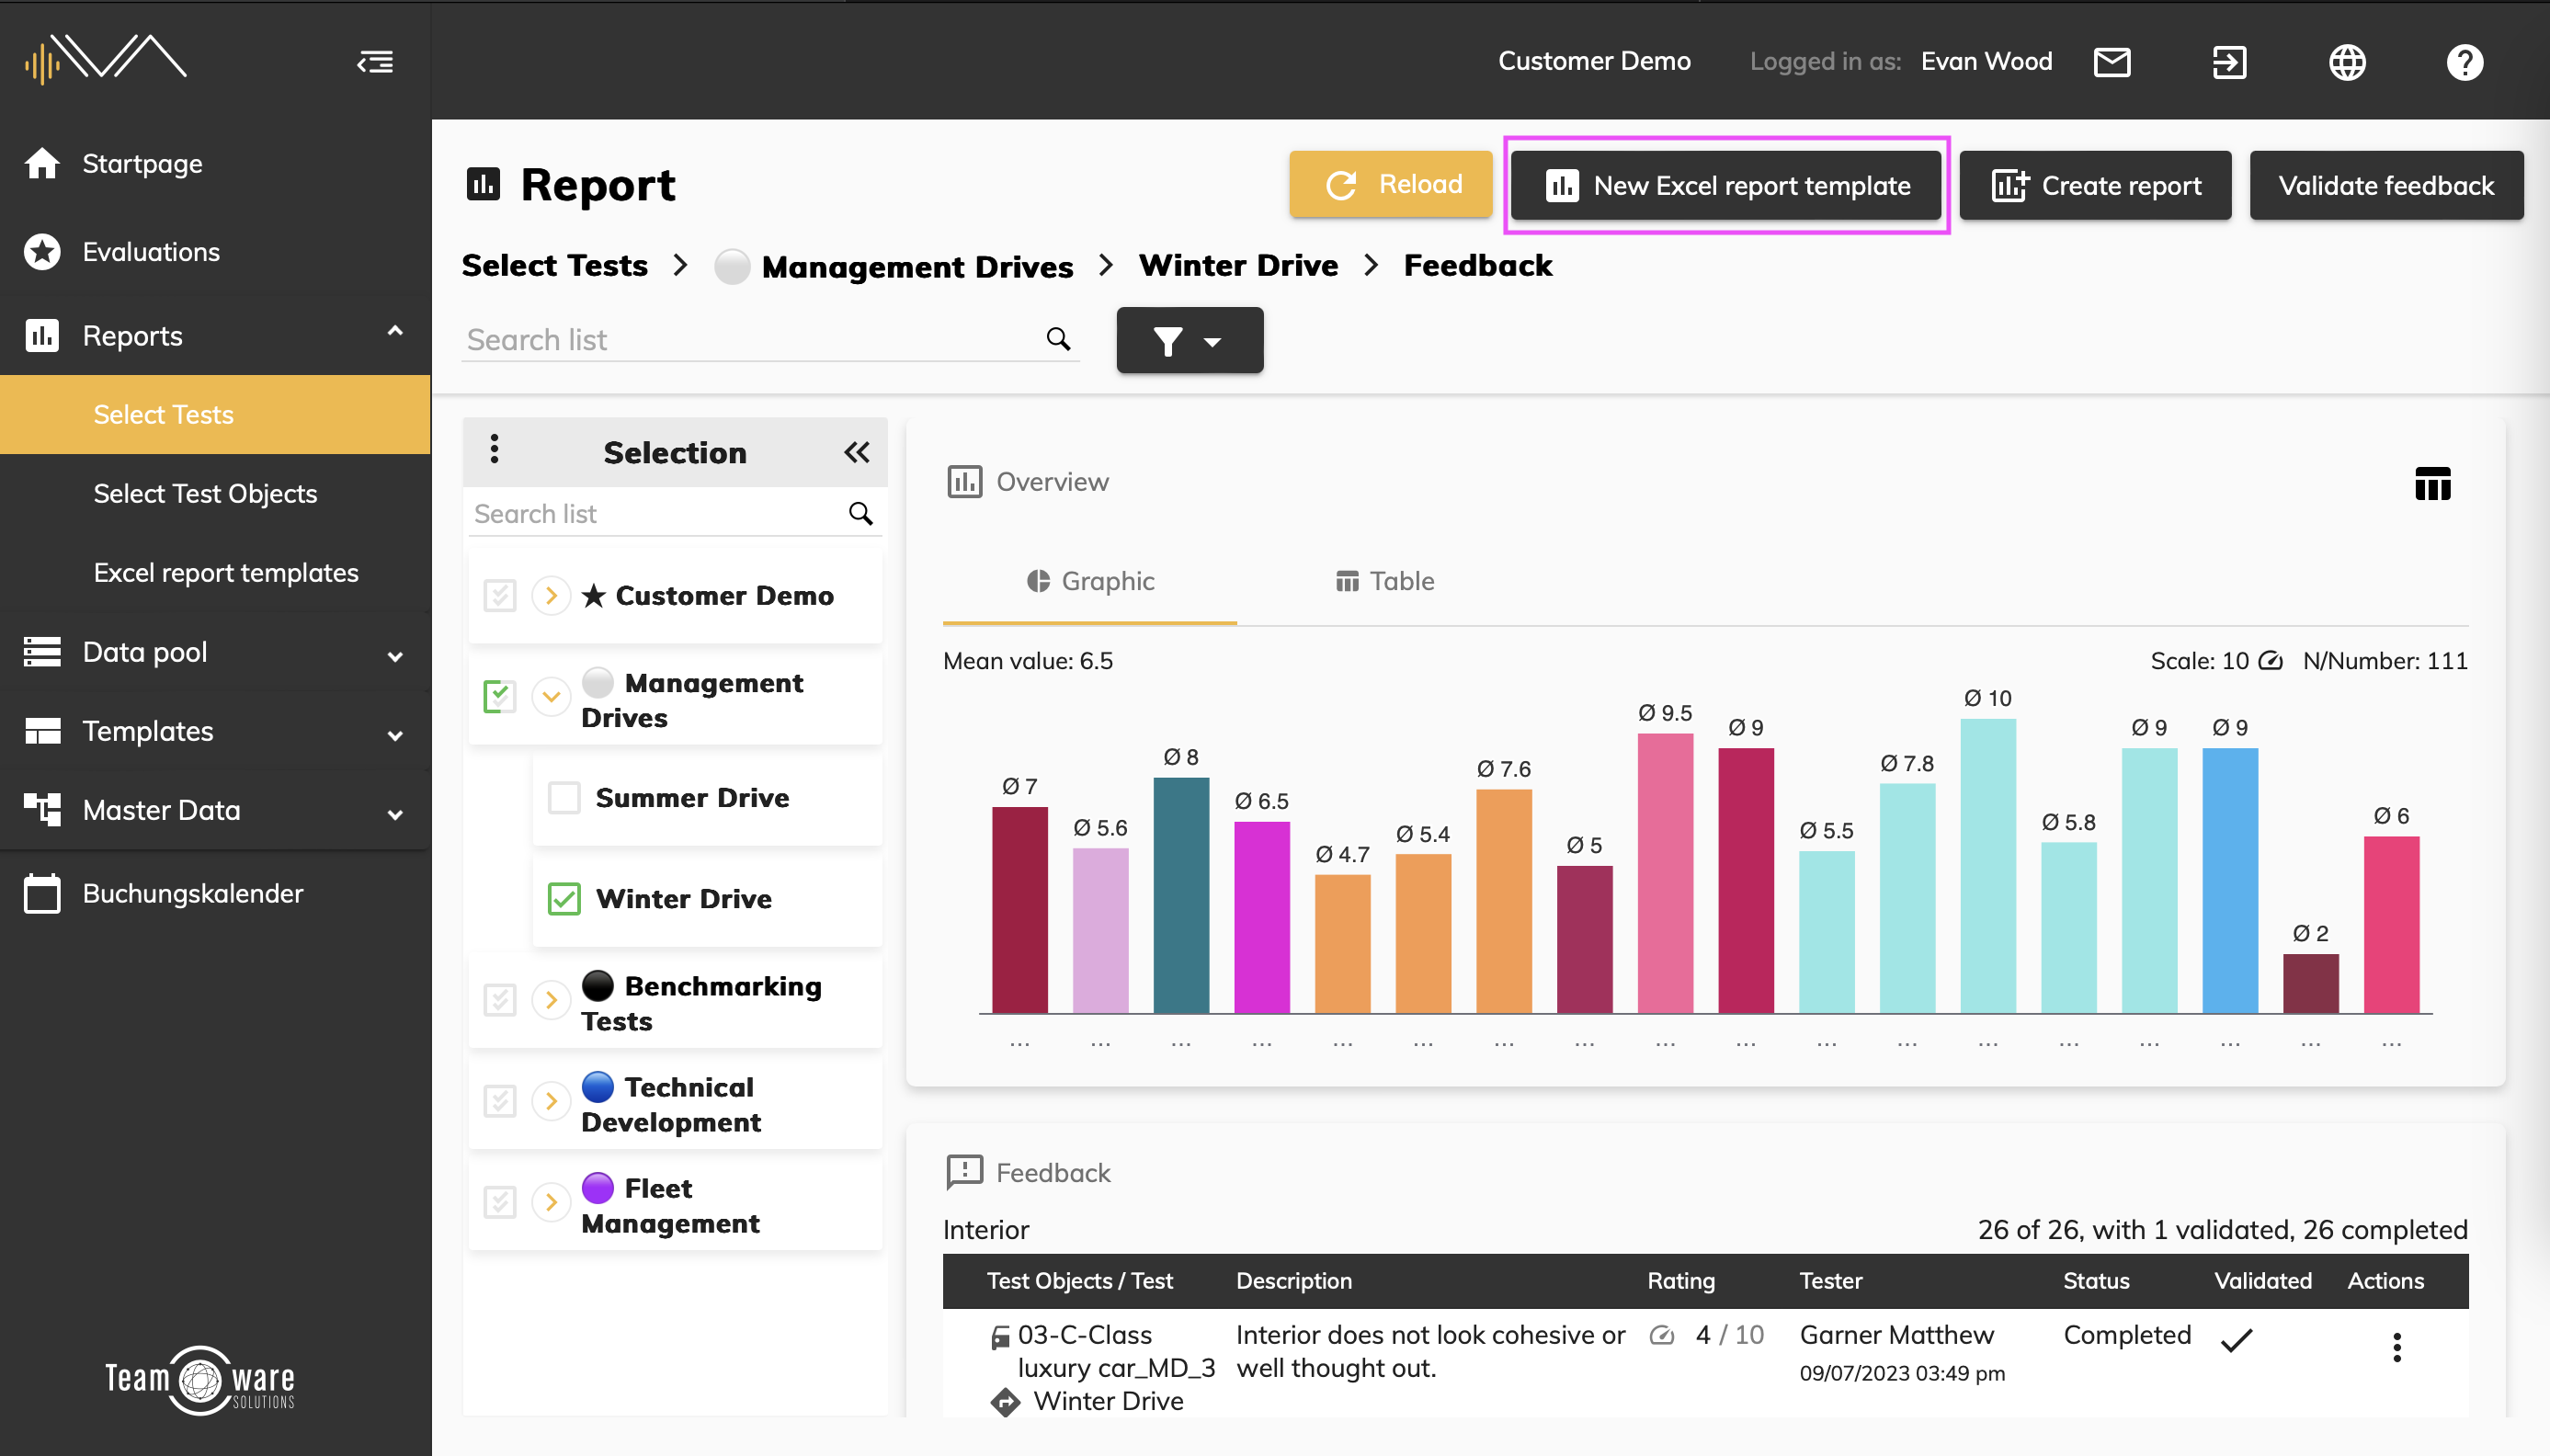
To create a new Excel report template, first navigate to the menu item “ Reports” -> “Select tests”. Search for the relevant test or the relevant test object for which an Excel report template is to be created. Then click on the corresponding result tile “Feedback”.
This will take you to the detailed feedback analysis and you will see four buttons above it.
Click on the “New Excel report template” button to open a pop-up window in which you can assign a name for the new template. Then click on “Save template & download Excel file”.

After downloading the file, you have the option of switching to the list of Excel report templates. To do this, click on the corresponding button or click on “Close” if you want to remain in the feedback analysis. You can view the list of Excel report templates at any time under “ Reports” -> “Excel report templates”.
If you make any changes, remember to click on the “Save” button at the bottom right.
You can also edit the Excel file locally and then upload it again in IVA using drag & drop.
More information: Editing Excel report templates
Editing an Excel report template
To edit an Excel report template, navigate to the menu item “ Reports” -> “Excel report templates”
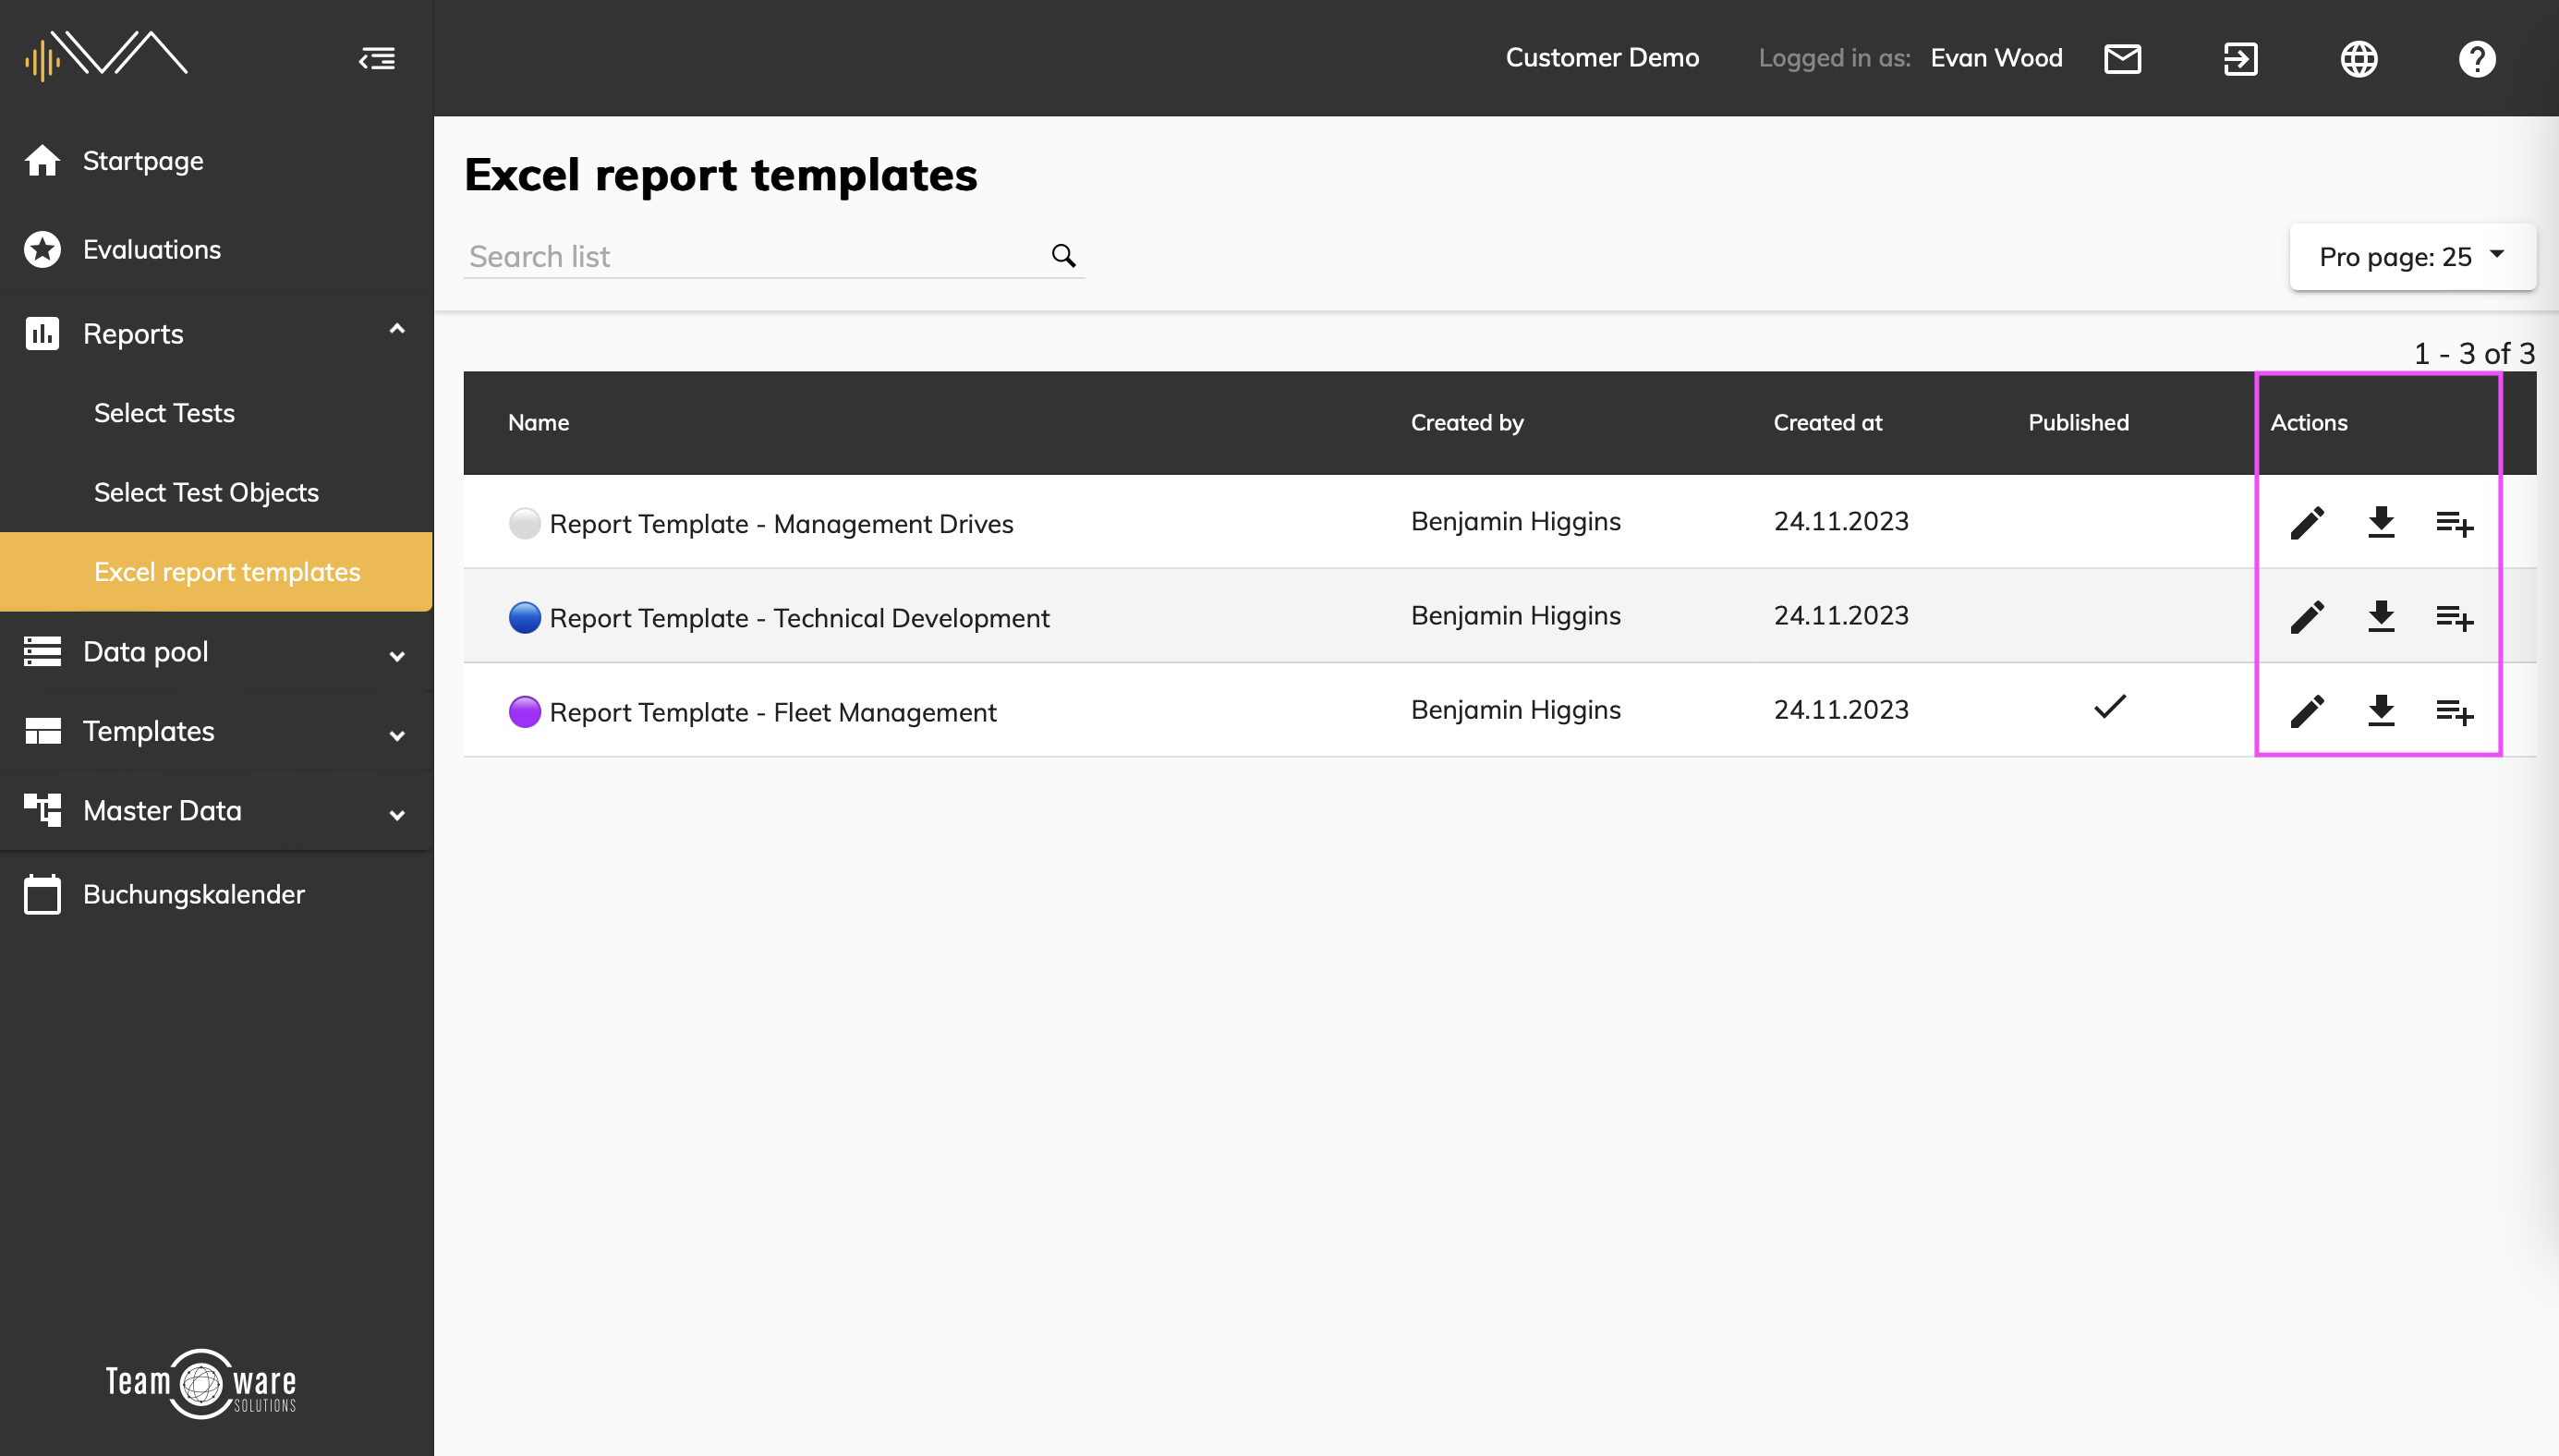
You will now see an overview of all Excel report templates in the currently selected division.
Here you can:
- edit and download the template
- change the attributes used
To change the name of the template or upload a template that you have extended, click on the pencil icon under the "Actions" column. A pop-up will then open in which you can make the desired change. If you upload an extended template, it will be used for future Excel reports and filled with data from the respective test. Here you can also delete the template using the "Delete template" button.
You can also edit the Excel file outside of IVA and then upload it again via drag & drop in the editing dialog. When uploading a template, the system checks whether all attributes are already present or whether they still need to be added.
Publishing a Excel report template
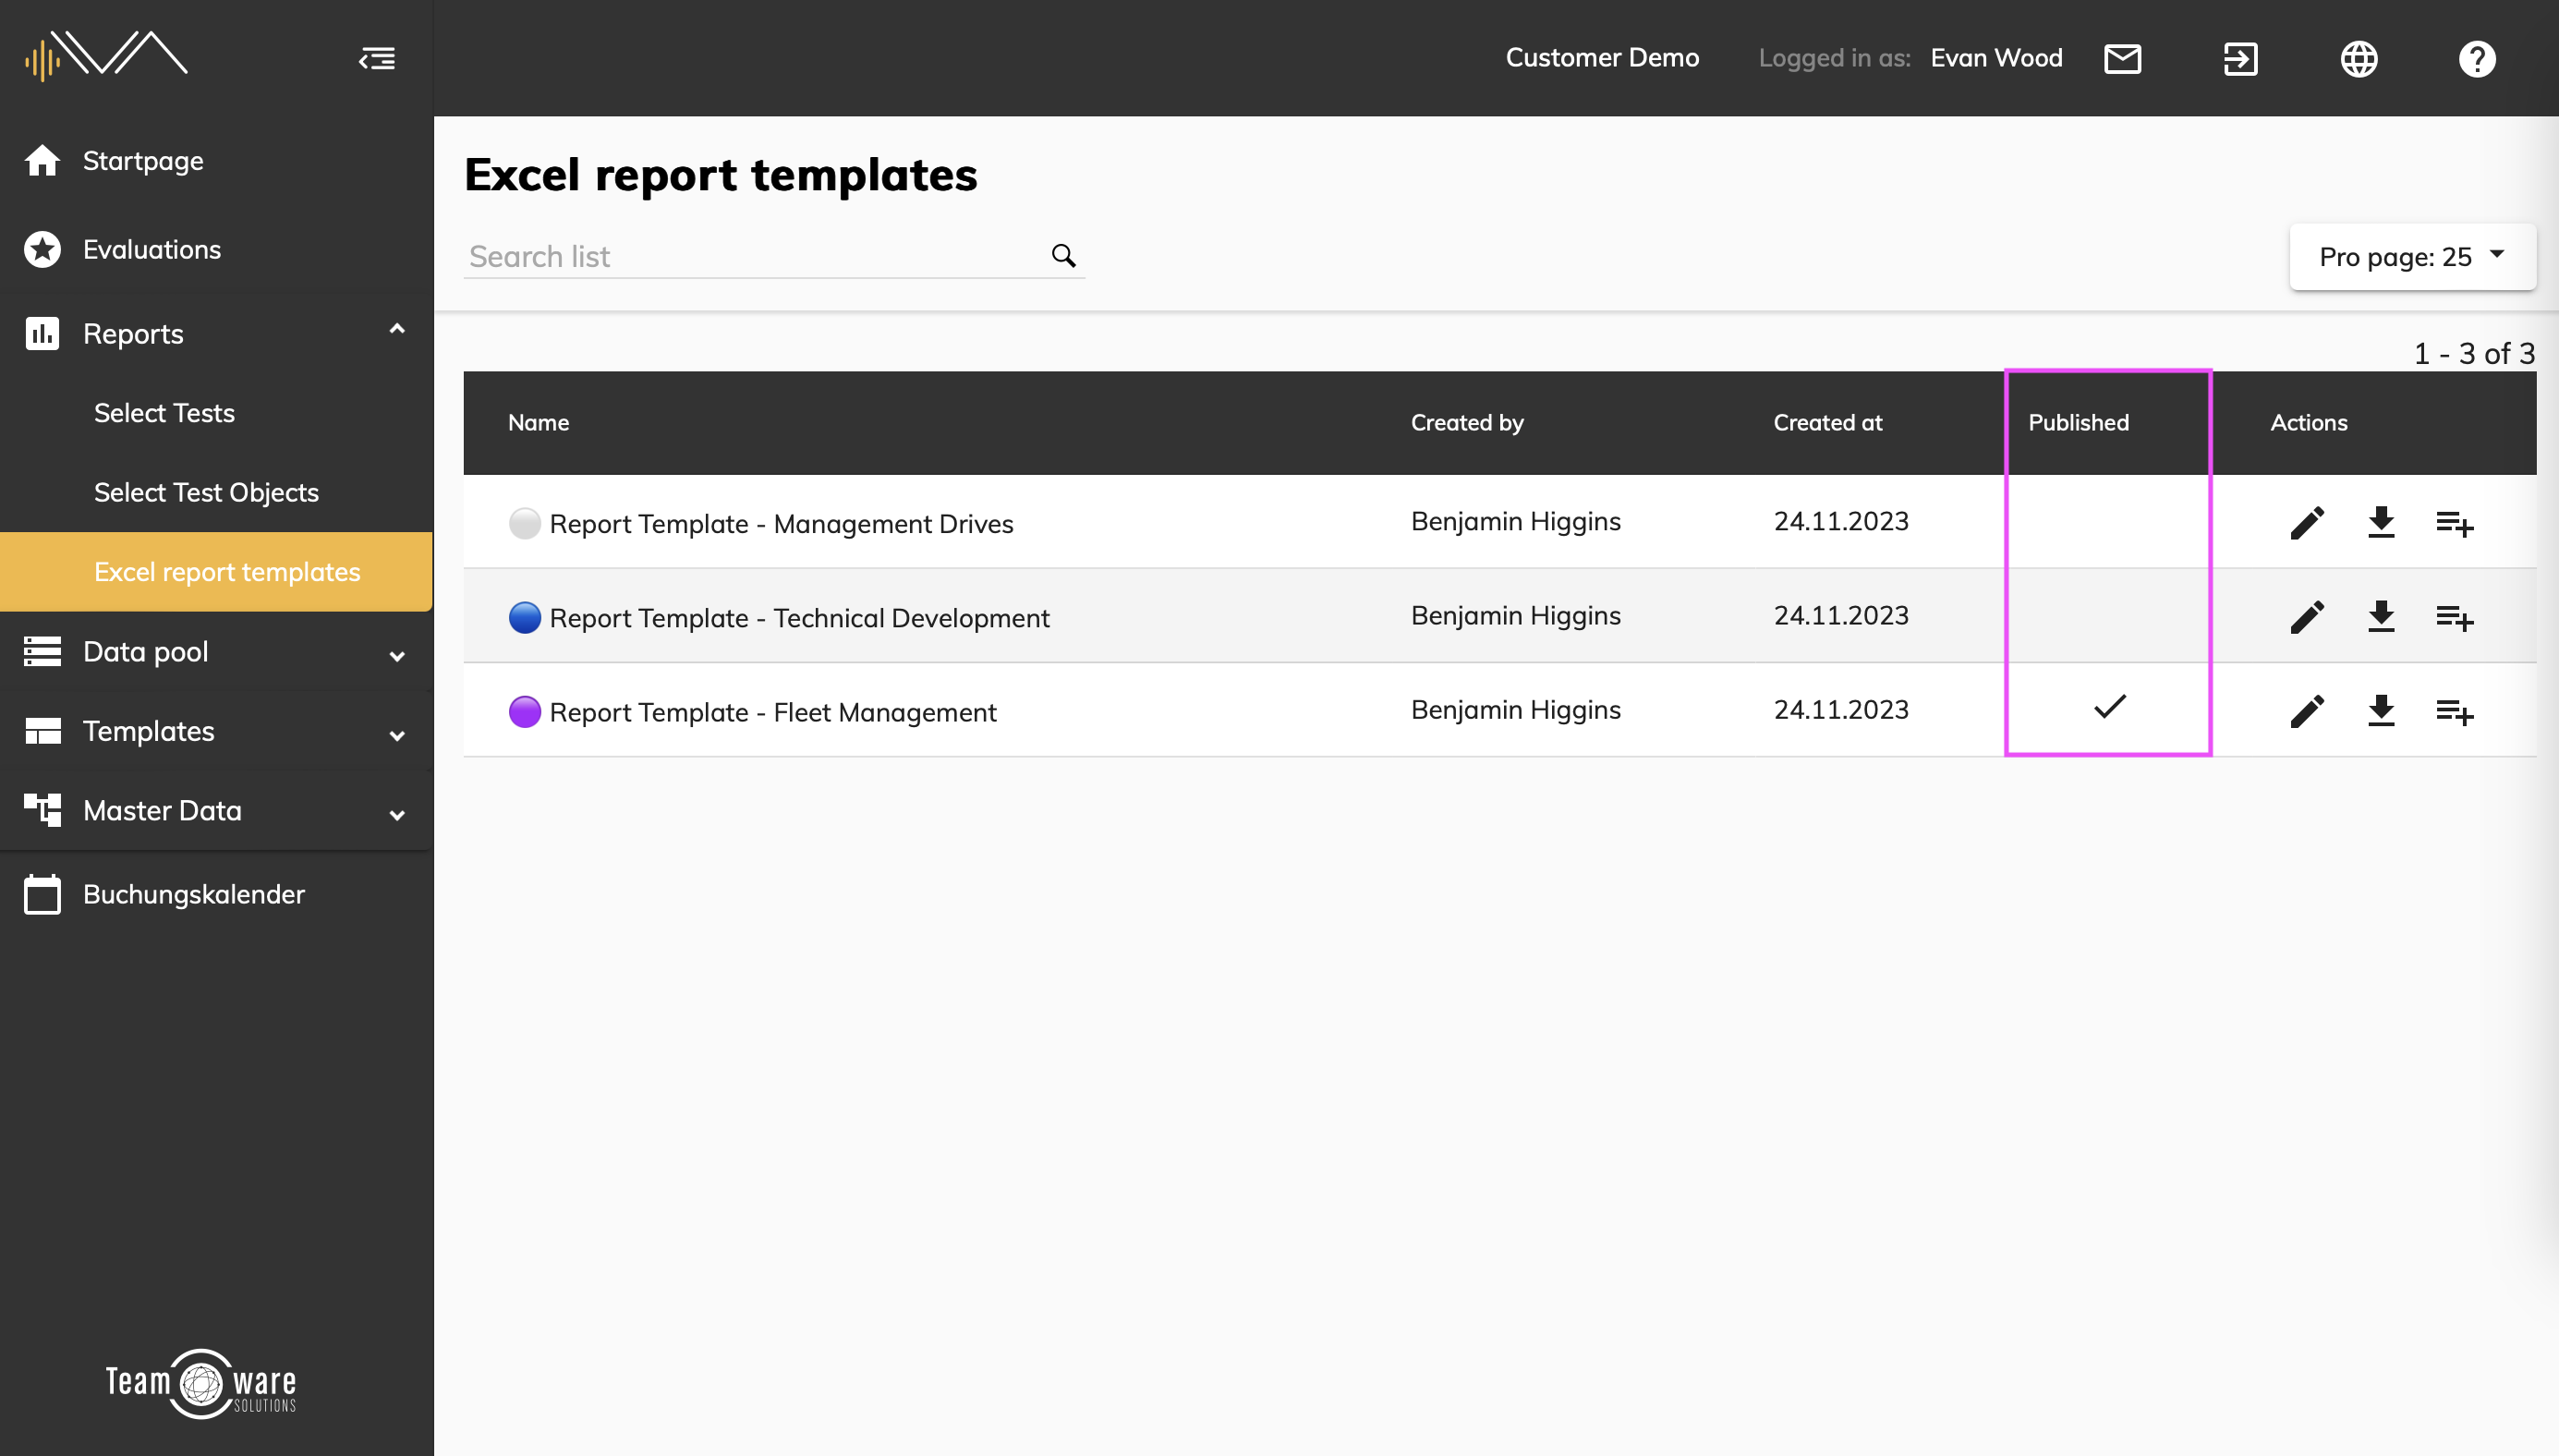
You can create and publish templates under “ Reports” -> “Excel report templates”. This allows you and other users to use these templates for faster test analyses in the future.
To publish an Excel report template, click on the “pencil” icon under “Actions”. A new pop-up “Edit Excel report template” opens. Provided that a customized report template has already been uploaded, the template can be released via the “Publish report template” toggle.
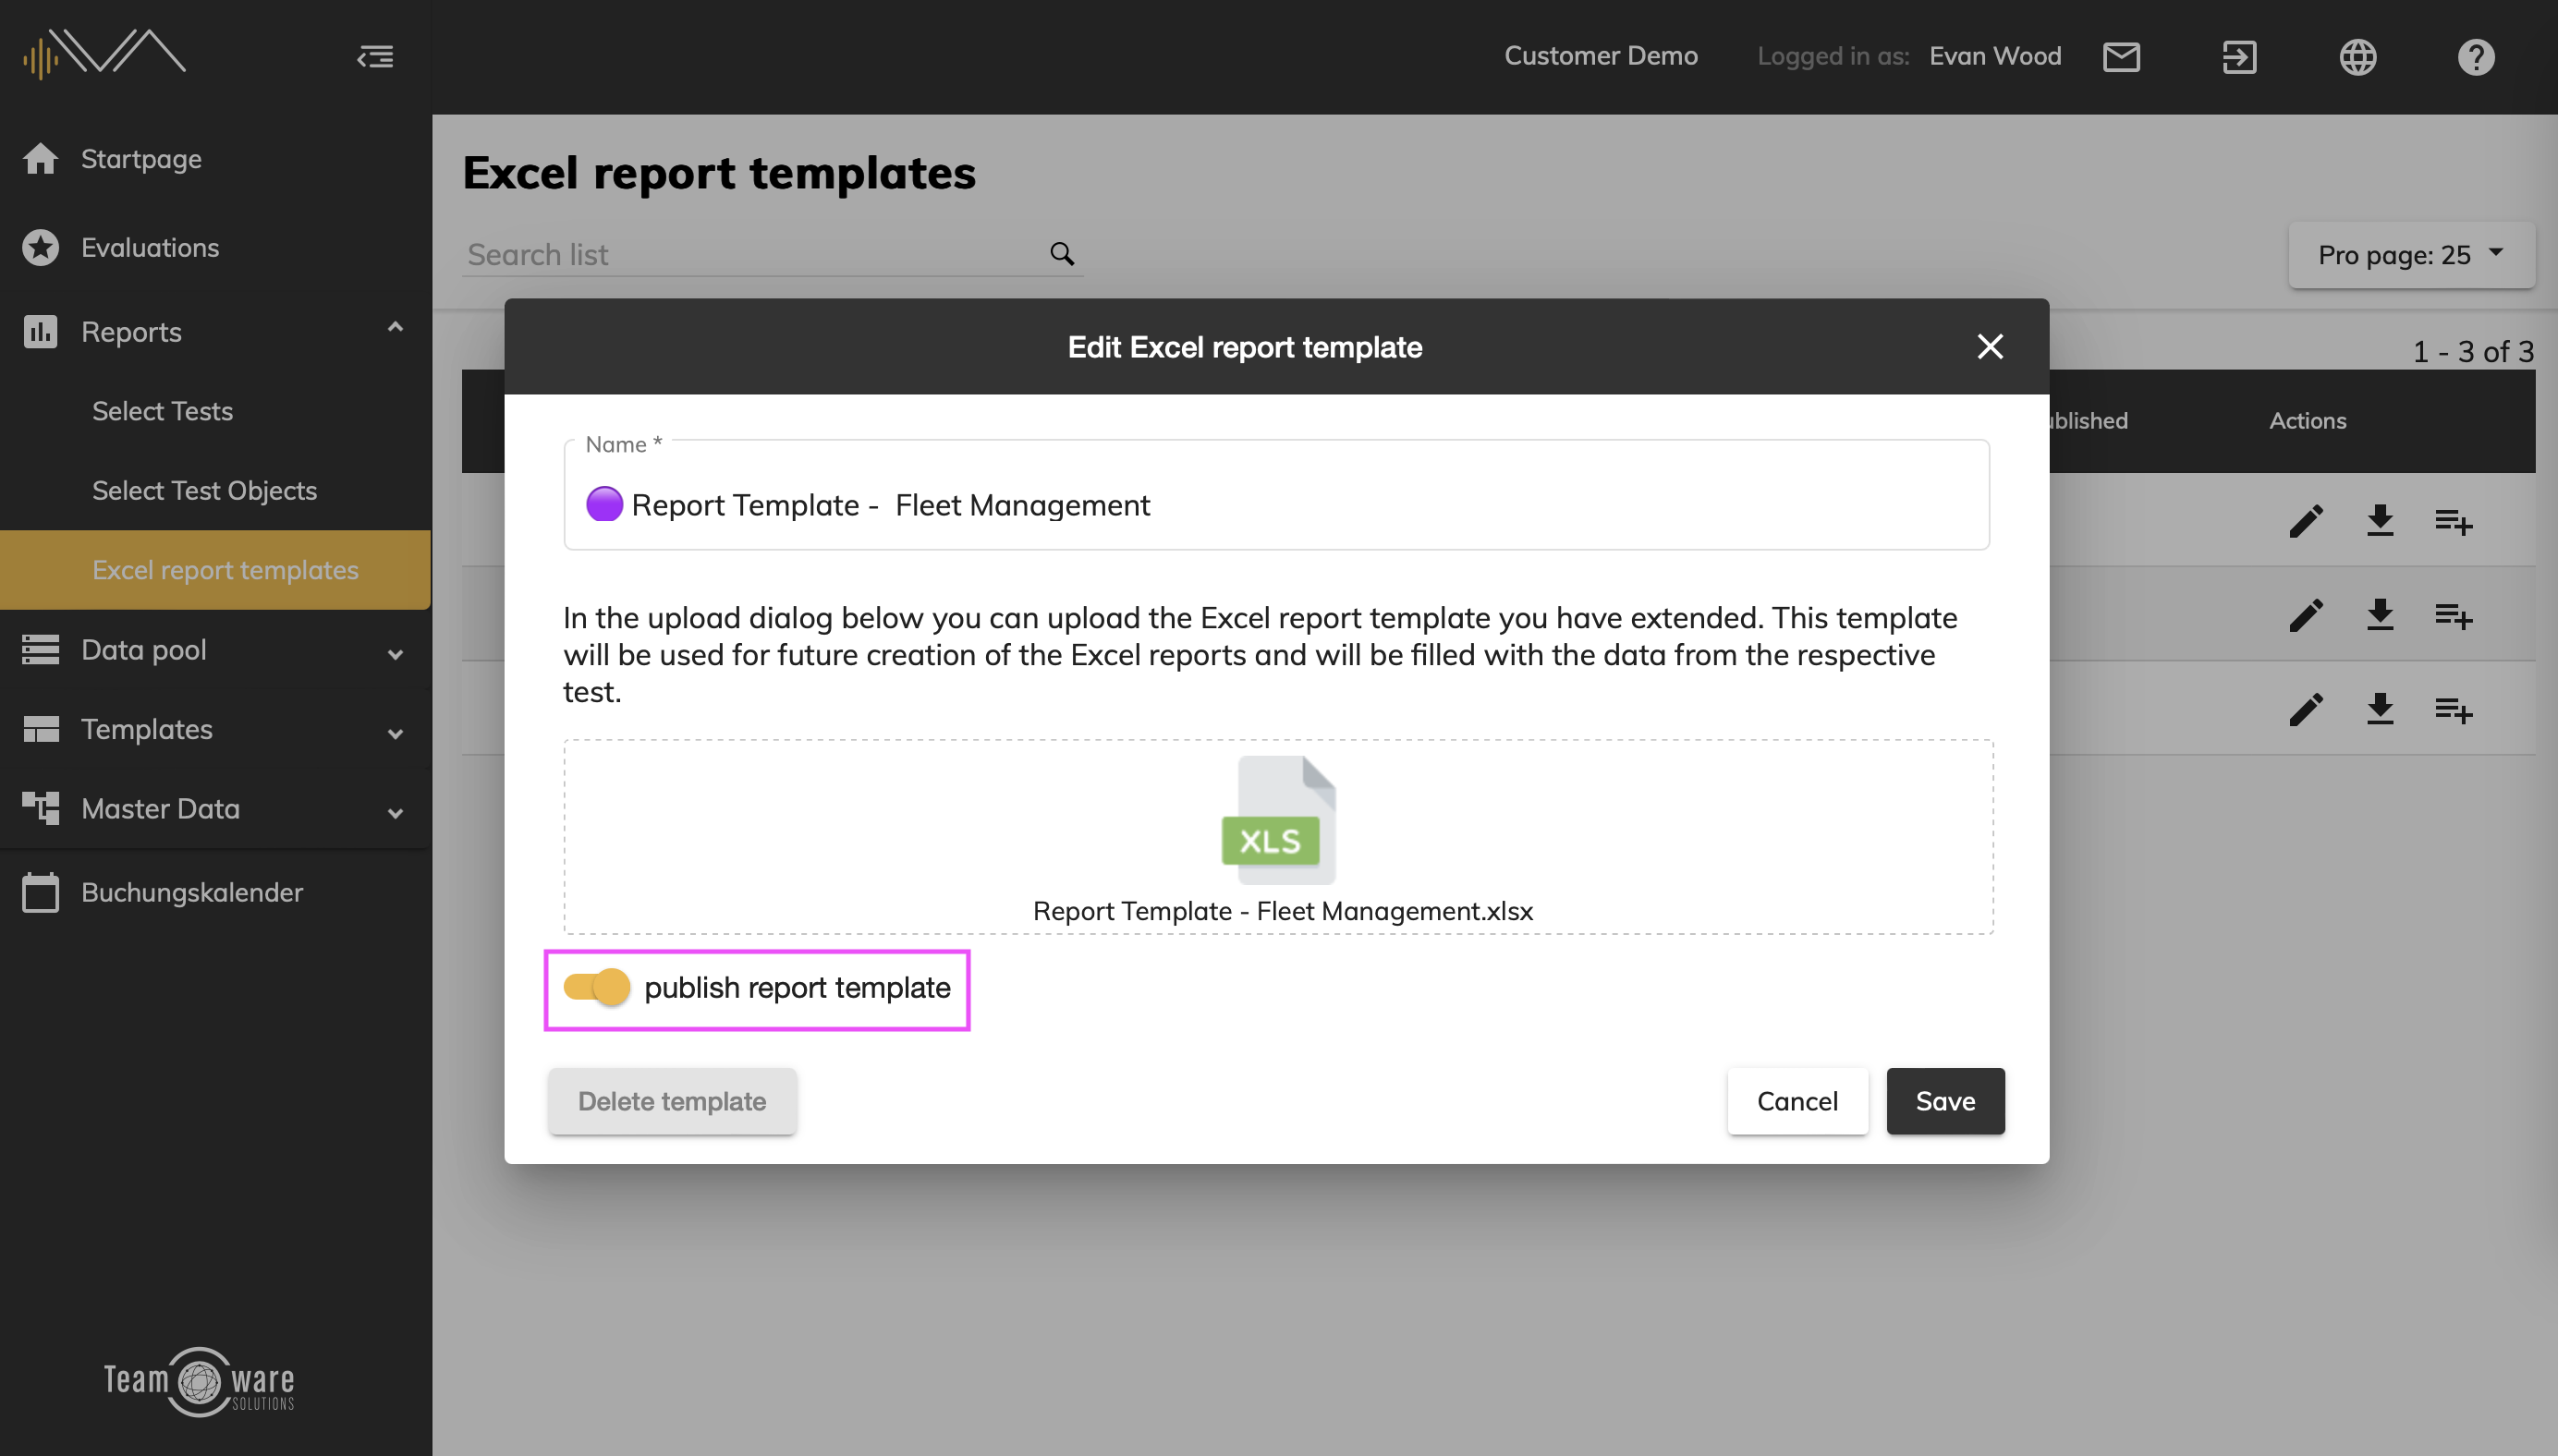
The data is then verified in a new pop-up and in the “Check” column you can see whether an entry still needs to be made in the “Data Source” worksheet or whether you should adjust an incorrect attribute in the configuration.
You can save this action and also reverse it later.
Downloading an Excel report template

To download an Excel report template, click on the “Download” icon in the “Actions” column.
A pop-up opens where you can decide whether the template should be filled with sample data from a test. Proceed by clicking on “Download”.
Extending Excel data range with attributes / attribute sets
You can change the data range of a Excel report template under “ Reports” -> “Excel report templates”.
To do this, click on the icon on the far right in the “Actions” column. With this the pop-up “Extend Excel data range with attributes / attribute sets” opens. In the lefthand column, you will see all existing attributes and attribute sets. You can add a set or attribute to your template using drag & drop or double-click. Of course, you can also create a new attribute. In the right-hand column, you can see all the attributes already selected for the template. You can remove these again using the red cross icon.
IVA checks whether the attributes already exist or whether they should be added.
Communication with the Tester
Add a comment
To start a communication, first navigate to the corresponding menu item. Click on "Evaluation" > "Select tests" in the left-hand navigation bar and click on the "Feedback" tile of a test under the corresponding evaluation.
This will take you to the detailed feedback analysis. Click on the "Validate feedback" button in the top right-hand corner to access the list of all feedback for the selected test objects.
To add a comment, click on the three dots in the “Actions” column and then on "Add comment".
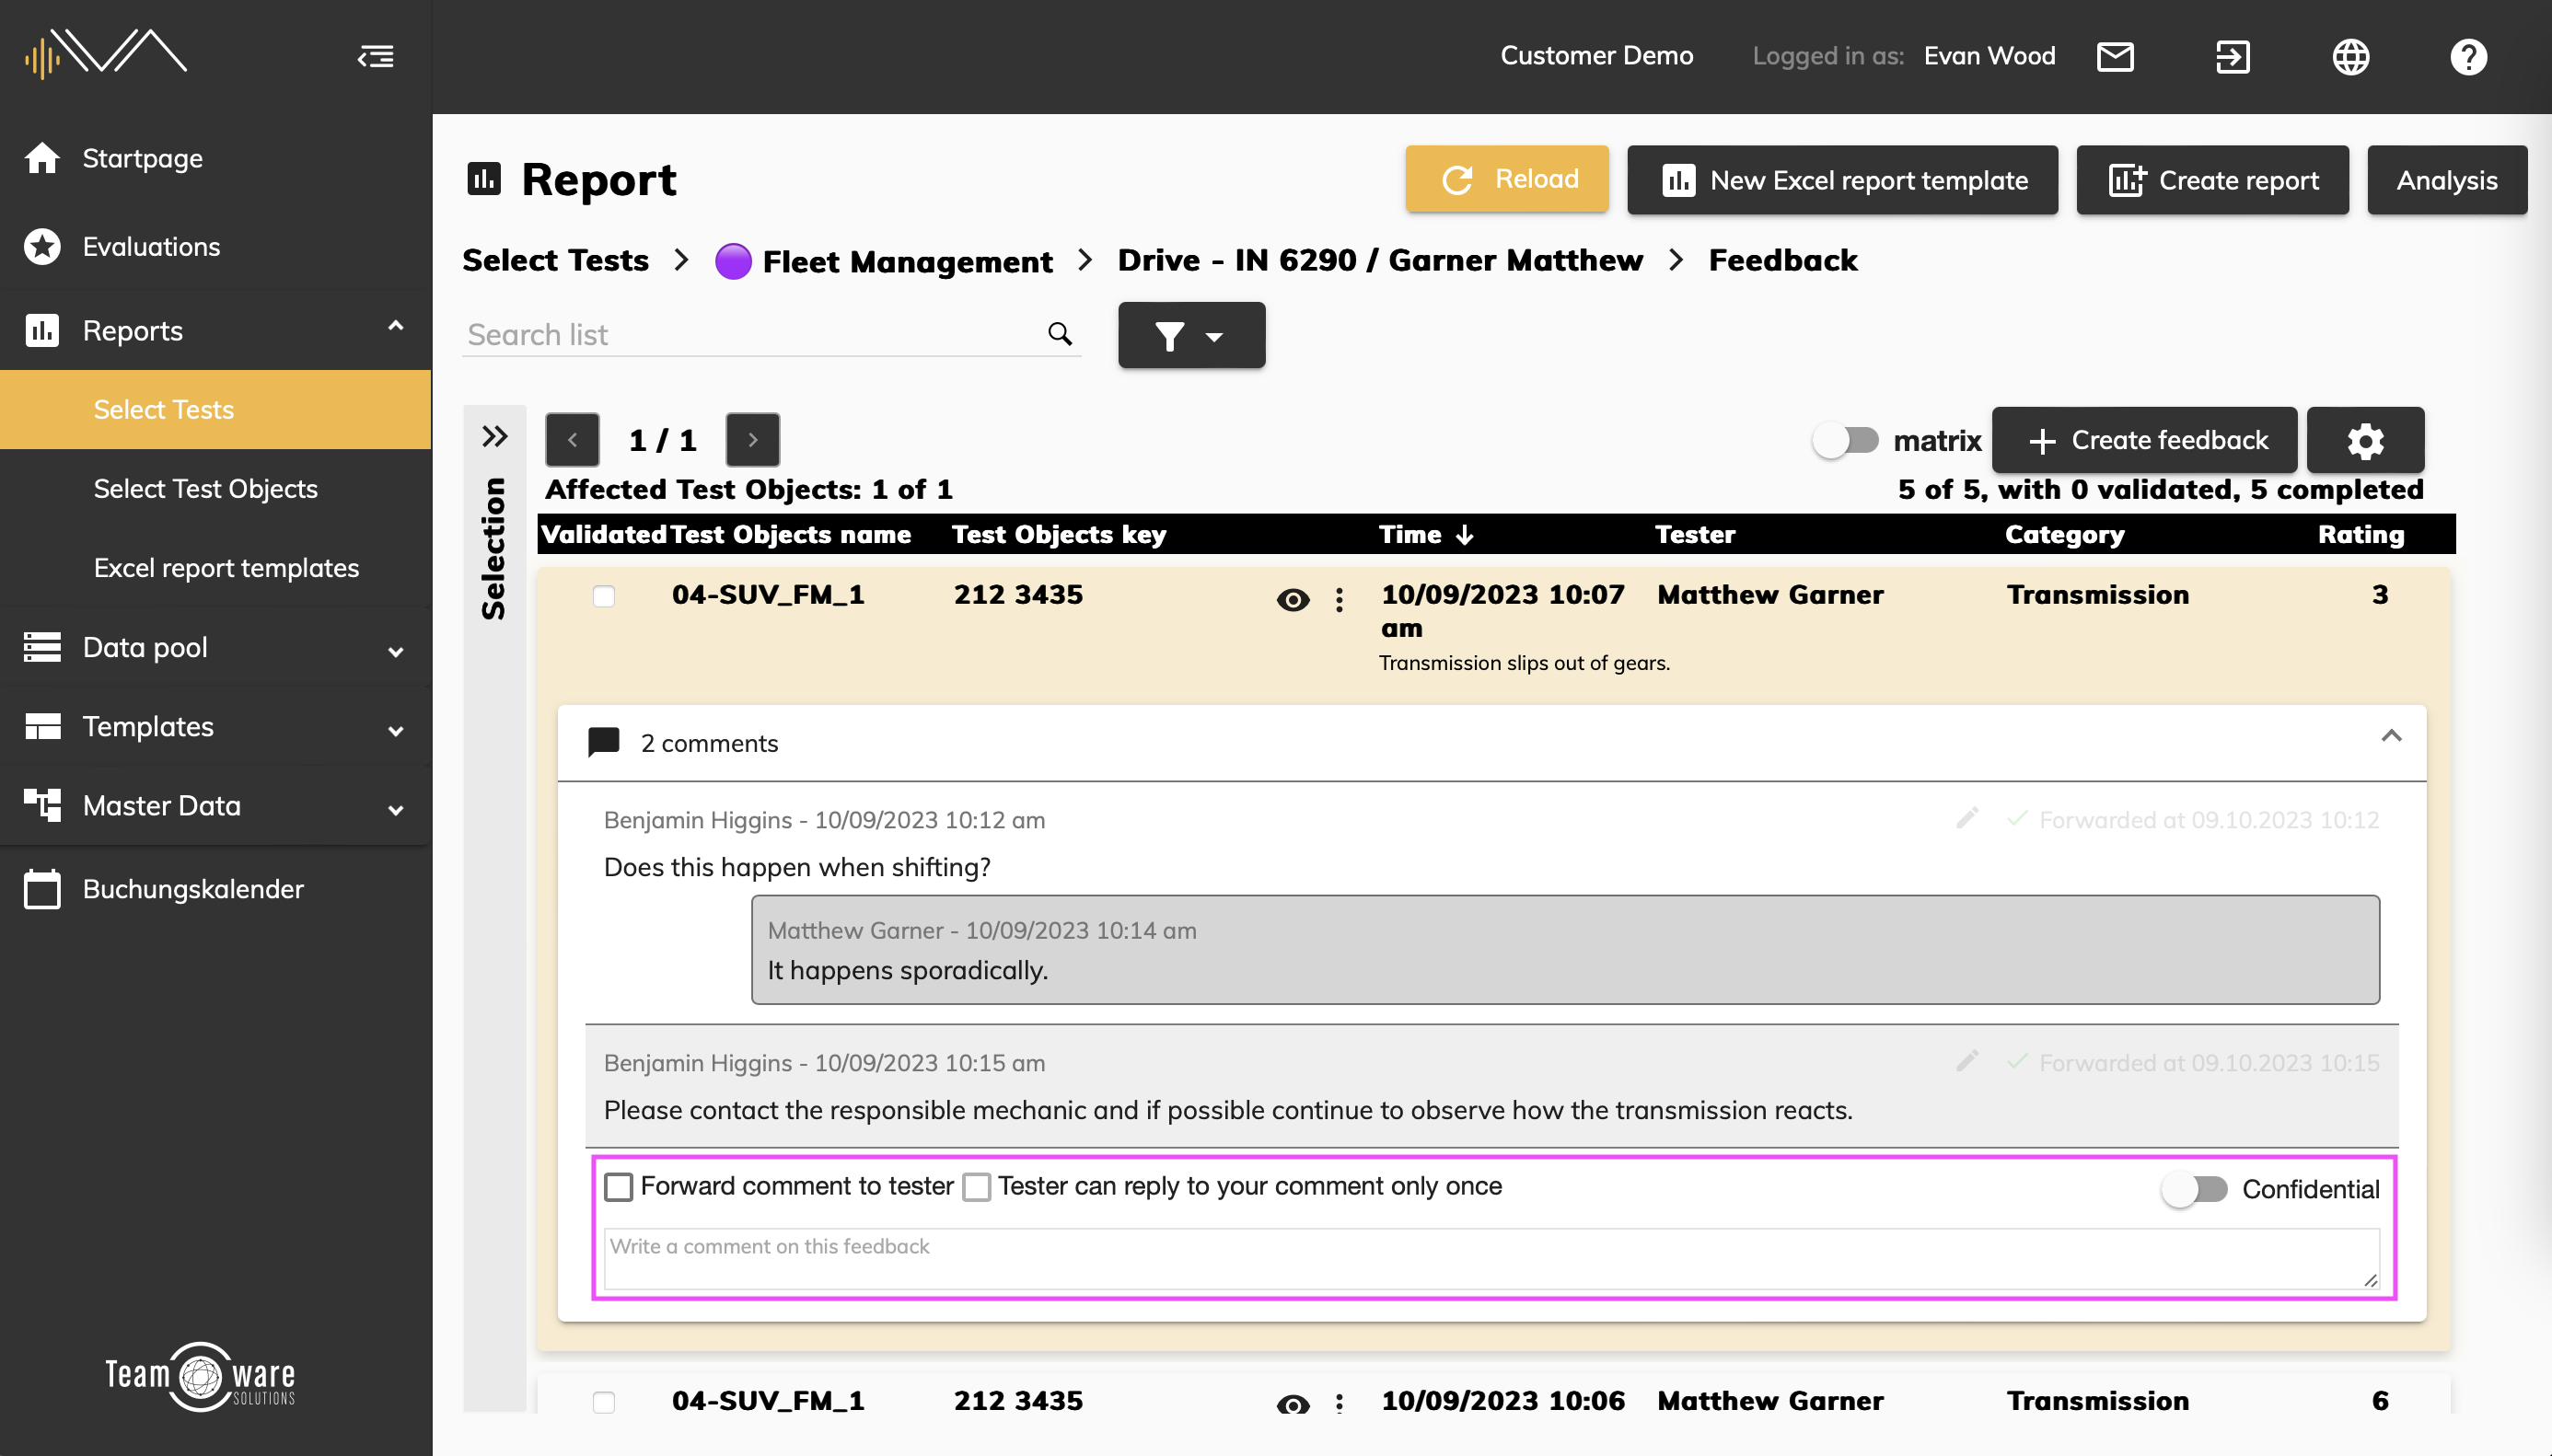
Select from the following three options directly above the text field:
- Toggle Confidential – signals to other users that the comment should not be forwarded
- Tester can reply to your comment only once
- Forward comment to tester - means that the comment will be sent to the tester and the iOS app. This option can only be used for completed feedback
Click on the respective checkbox to activate the relevant function for your comment. Then use the input field below the checkboxes to add your comment and proceed by saving it.
You can delete and edit your own comments as long as they have not yet been forwarded to the iOS app.
For other’s comments:
Notification in the menu
Response from a tester
There is an envelope icon in the navigation bar next to your username. The icon will have a red dot on it when there is a reply from the tester to one of your comments. Click on the envelope to view the replies. Then click on the corresponding message to be forwarded directly to the reply and your associated comment in the feedback validation.