EN-Booking calendar for planners
In the settings for a specific division, you will see three long tiles arranged vertically. You can configure 3 components here: 5.1. System 5.2. Test objects 5.3. Bookings
- 1. Homepage for planners
- 2. Booking calendar for planners
- 2.1. Overview "Booking calendar" for planners
- 2.2. Making a booking as a planner
- 2.3. Test object tile for planners
- 2.4. Legend
- 2.5. Date picker
- 3. Booking list for planners
- 4. Booking planning
1. Homepage for planners
1.1. Menu and page navigation
You are on the homepage of the booking calendar and see the menu bar at the top and the page navigation on the left.
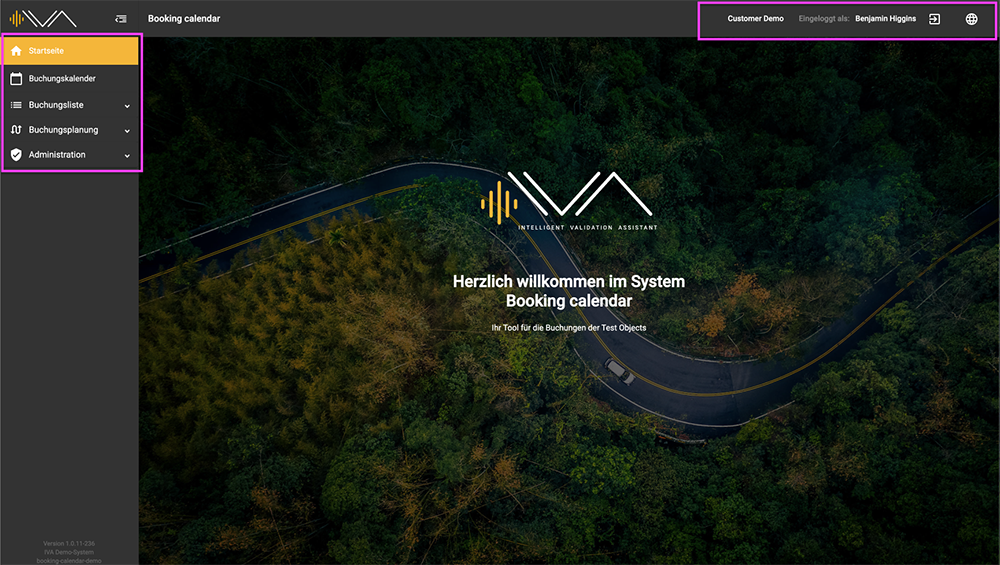
-
- Division name (with a dropdown menu if there are several divisions available)
- Username
- “Logout” icon
- “Change Language” icon
Planners can see the following menu items under the page navigation:
-
- Home
- Booking calendar
- Booking list
- My bookings
- Approvals
- All bookings
- Reports
- Tax export
- Booking planning
- Test objects
- Questionnaires / -series
- Administration
- Settings
2. Booking calendar for planners
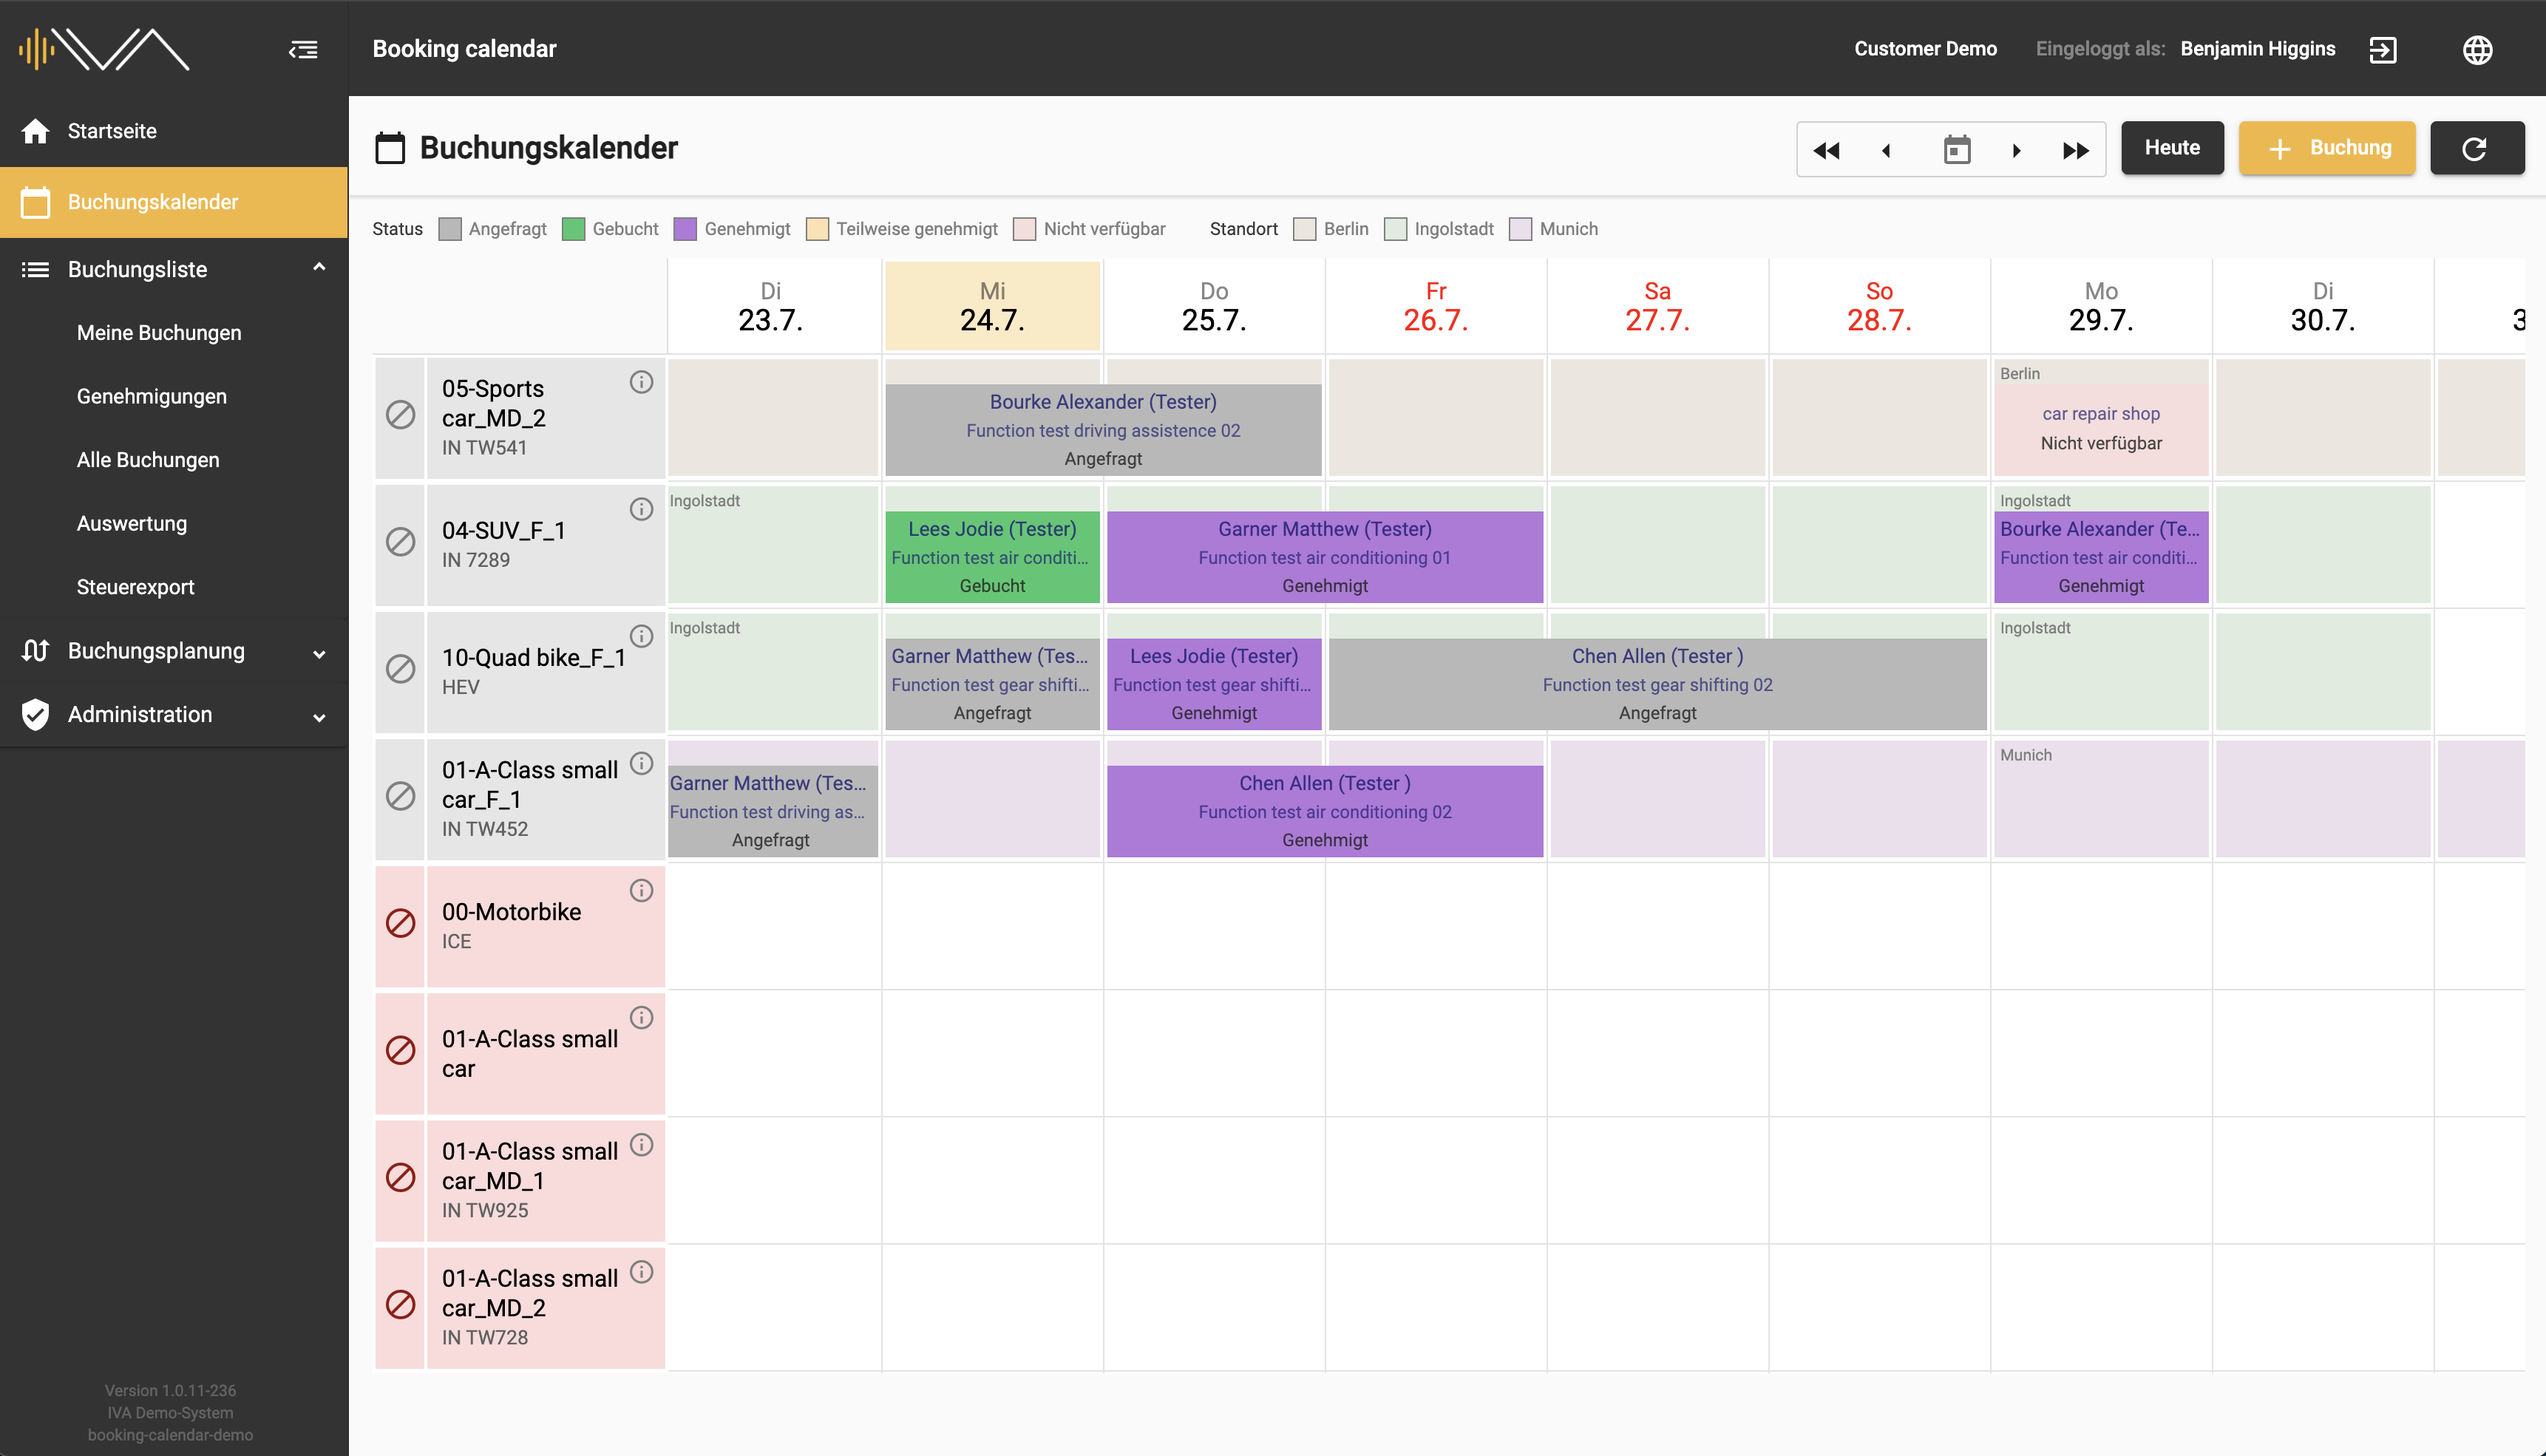
The booking calendar view is made up of: 1.the calendar view in the center consisting of: 1a. test object tiles (with the test object’s information) in the first column 1b. columns for one day each and the corresponding tiles to make the booking 2. the legend at the top left 3. the action buttons at the top right
2.1. Overview "Booking calendar" for planners
This is the view of the booking calendar for the planner.
DAILY VIEW
As a planner, you can see all booked, requested, approved and unavailable drives as well as all important information about the testers and the drive.
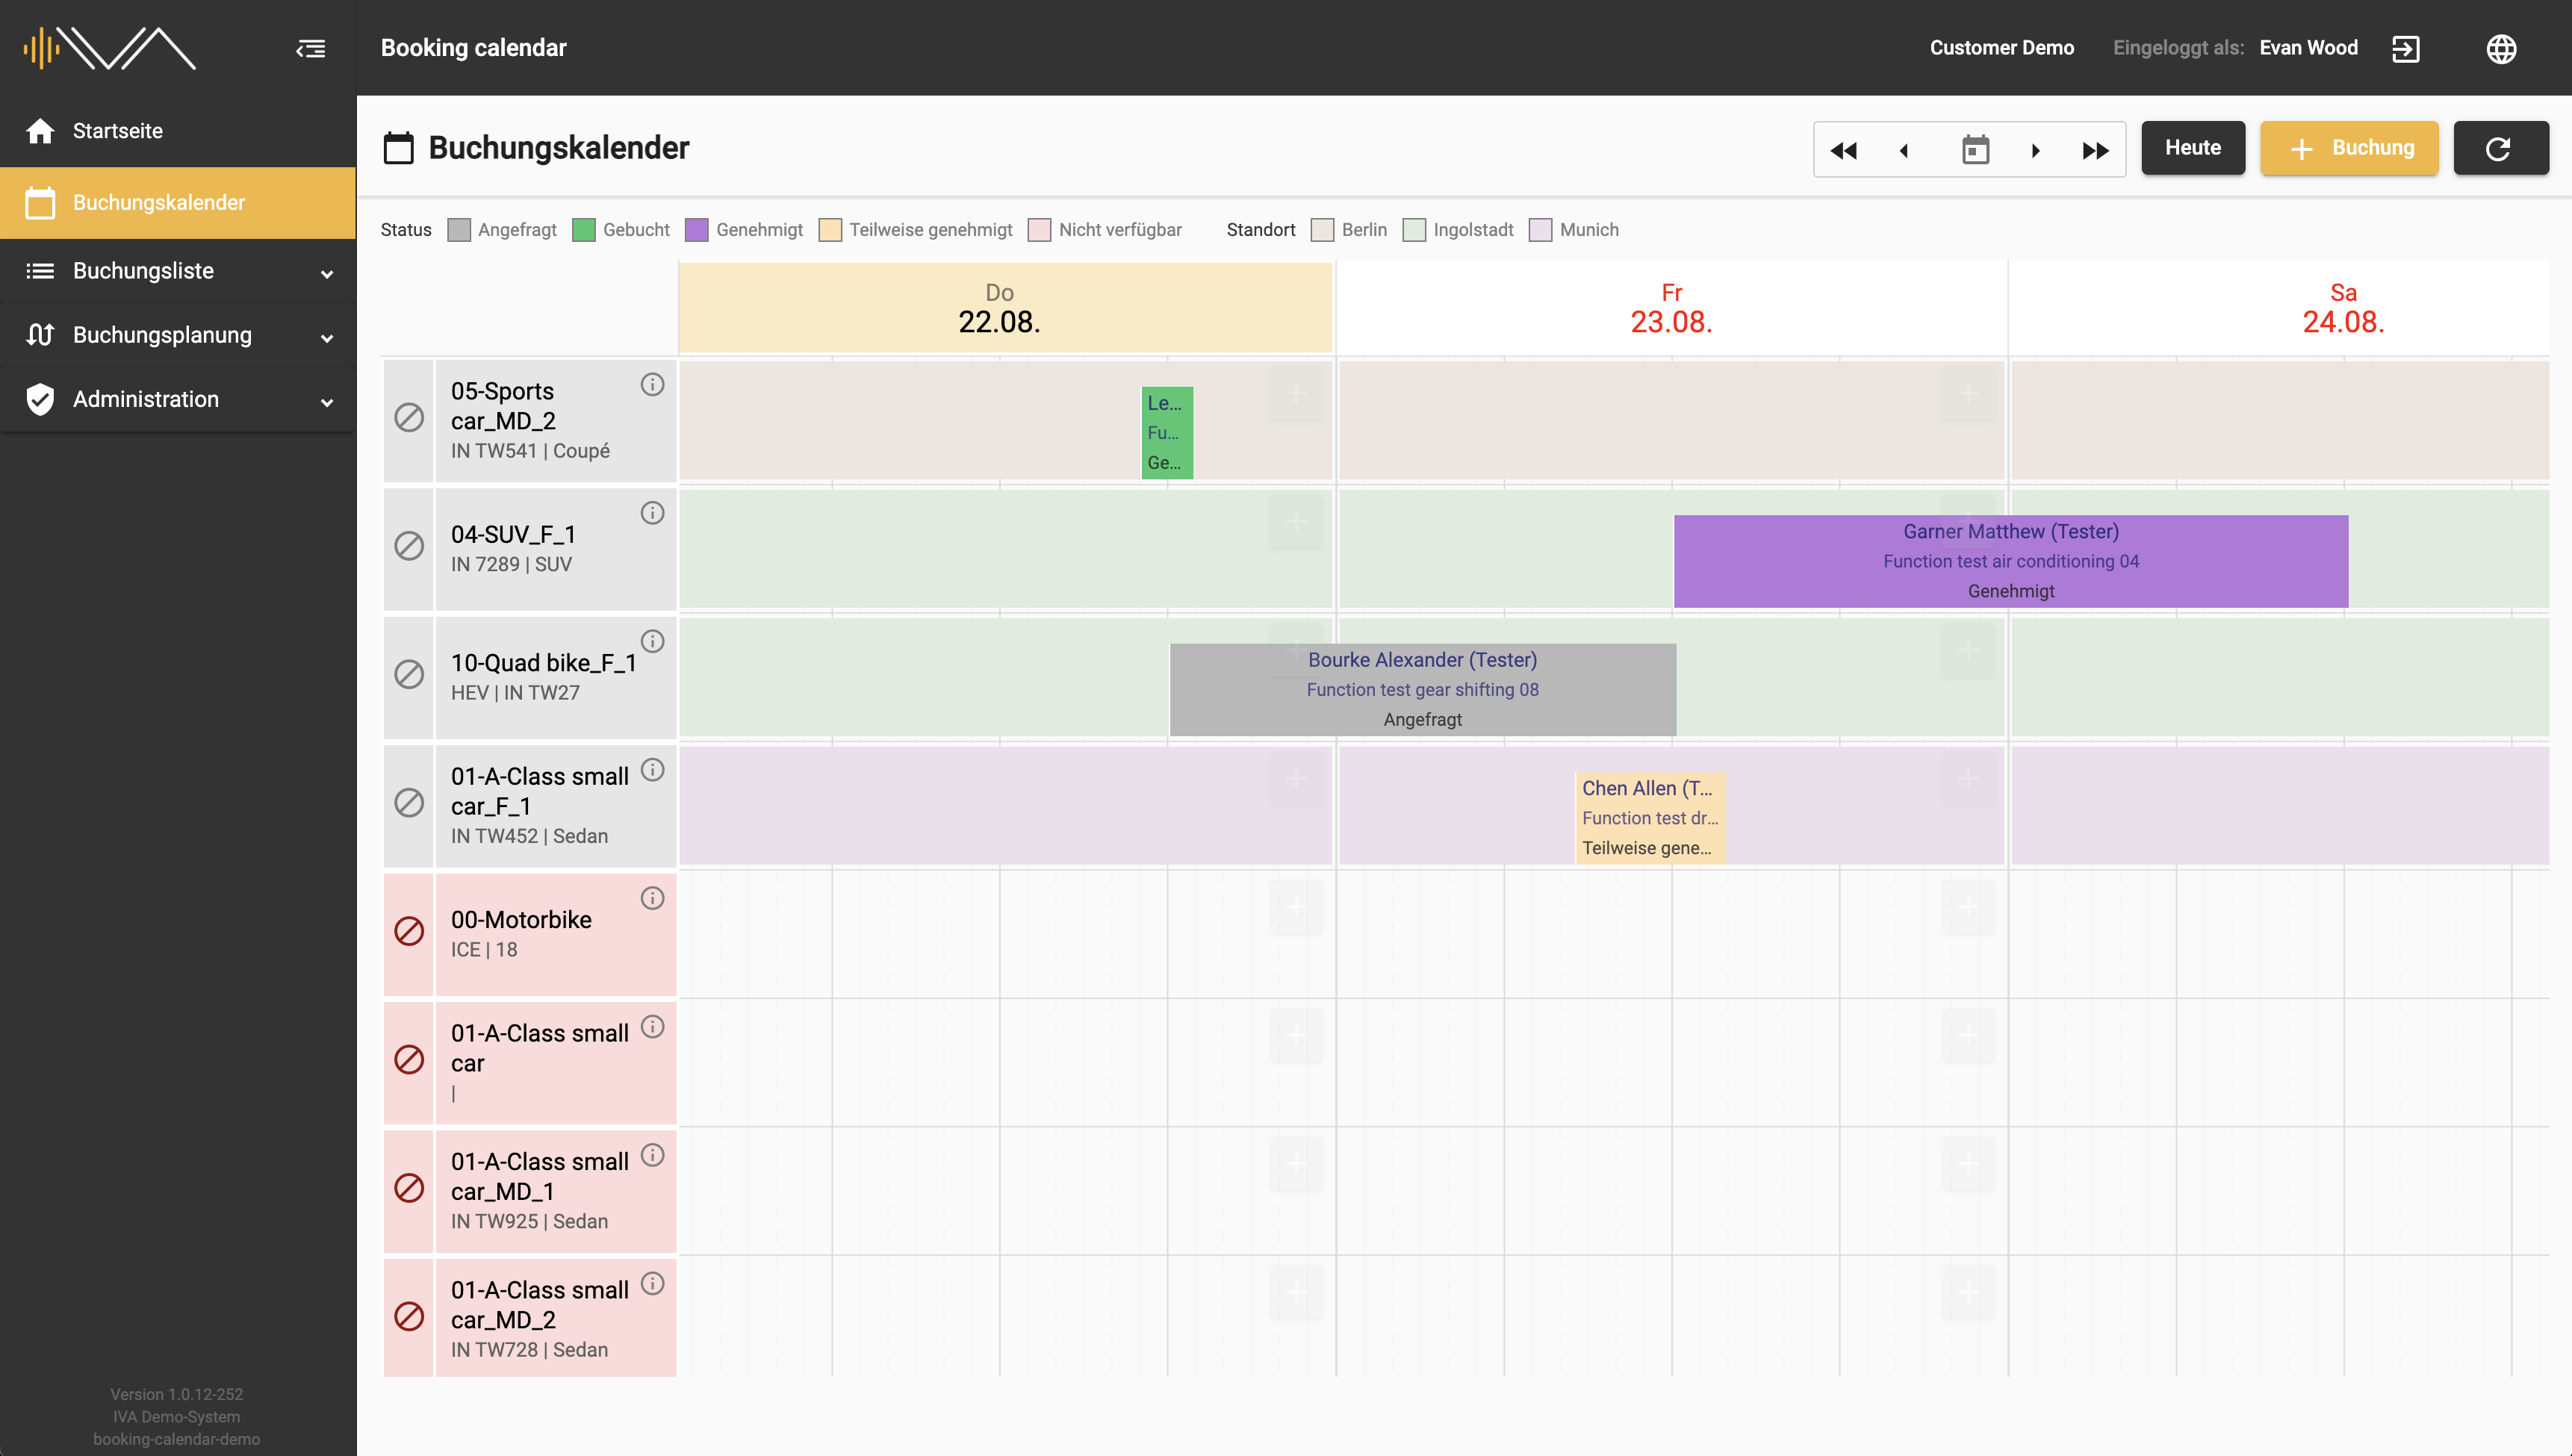
QUARTERLY VIEW
The column for each day is wider here than in the “Daily view”. It is possible to book a test object for a day in a quarter-hourly cycle.
2.2. Making a booking as a planner
DAILY VIEW
The current day, weekday and date are always highlighted with a color.
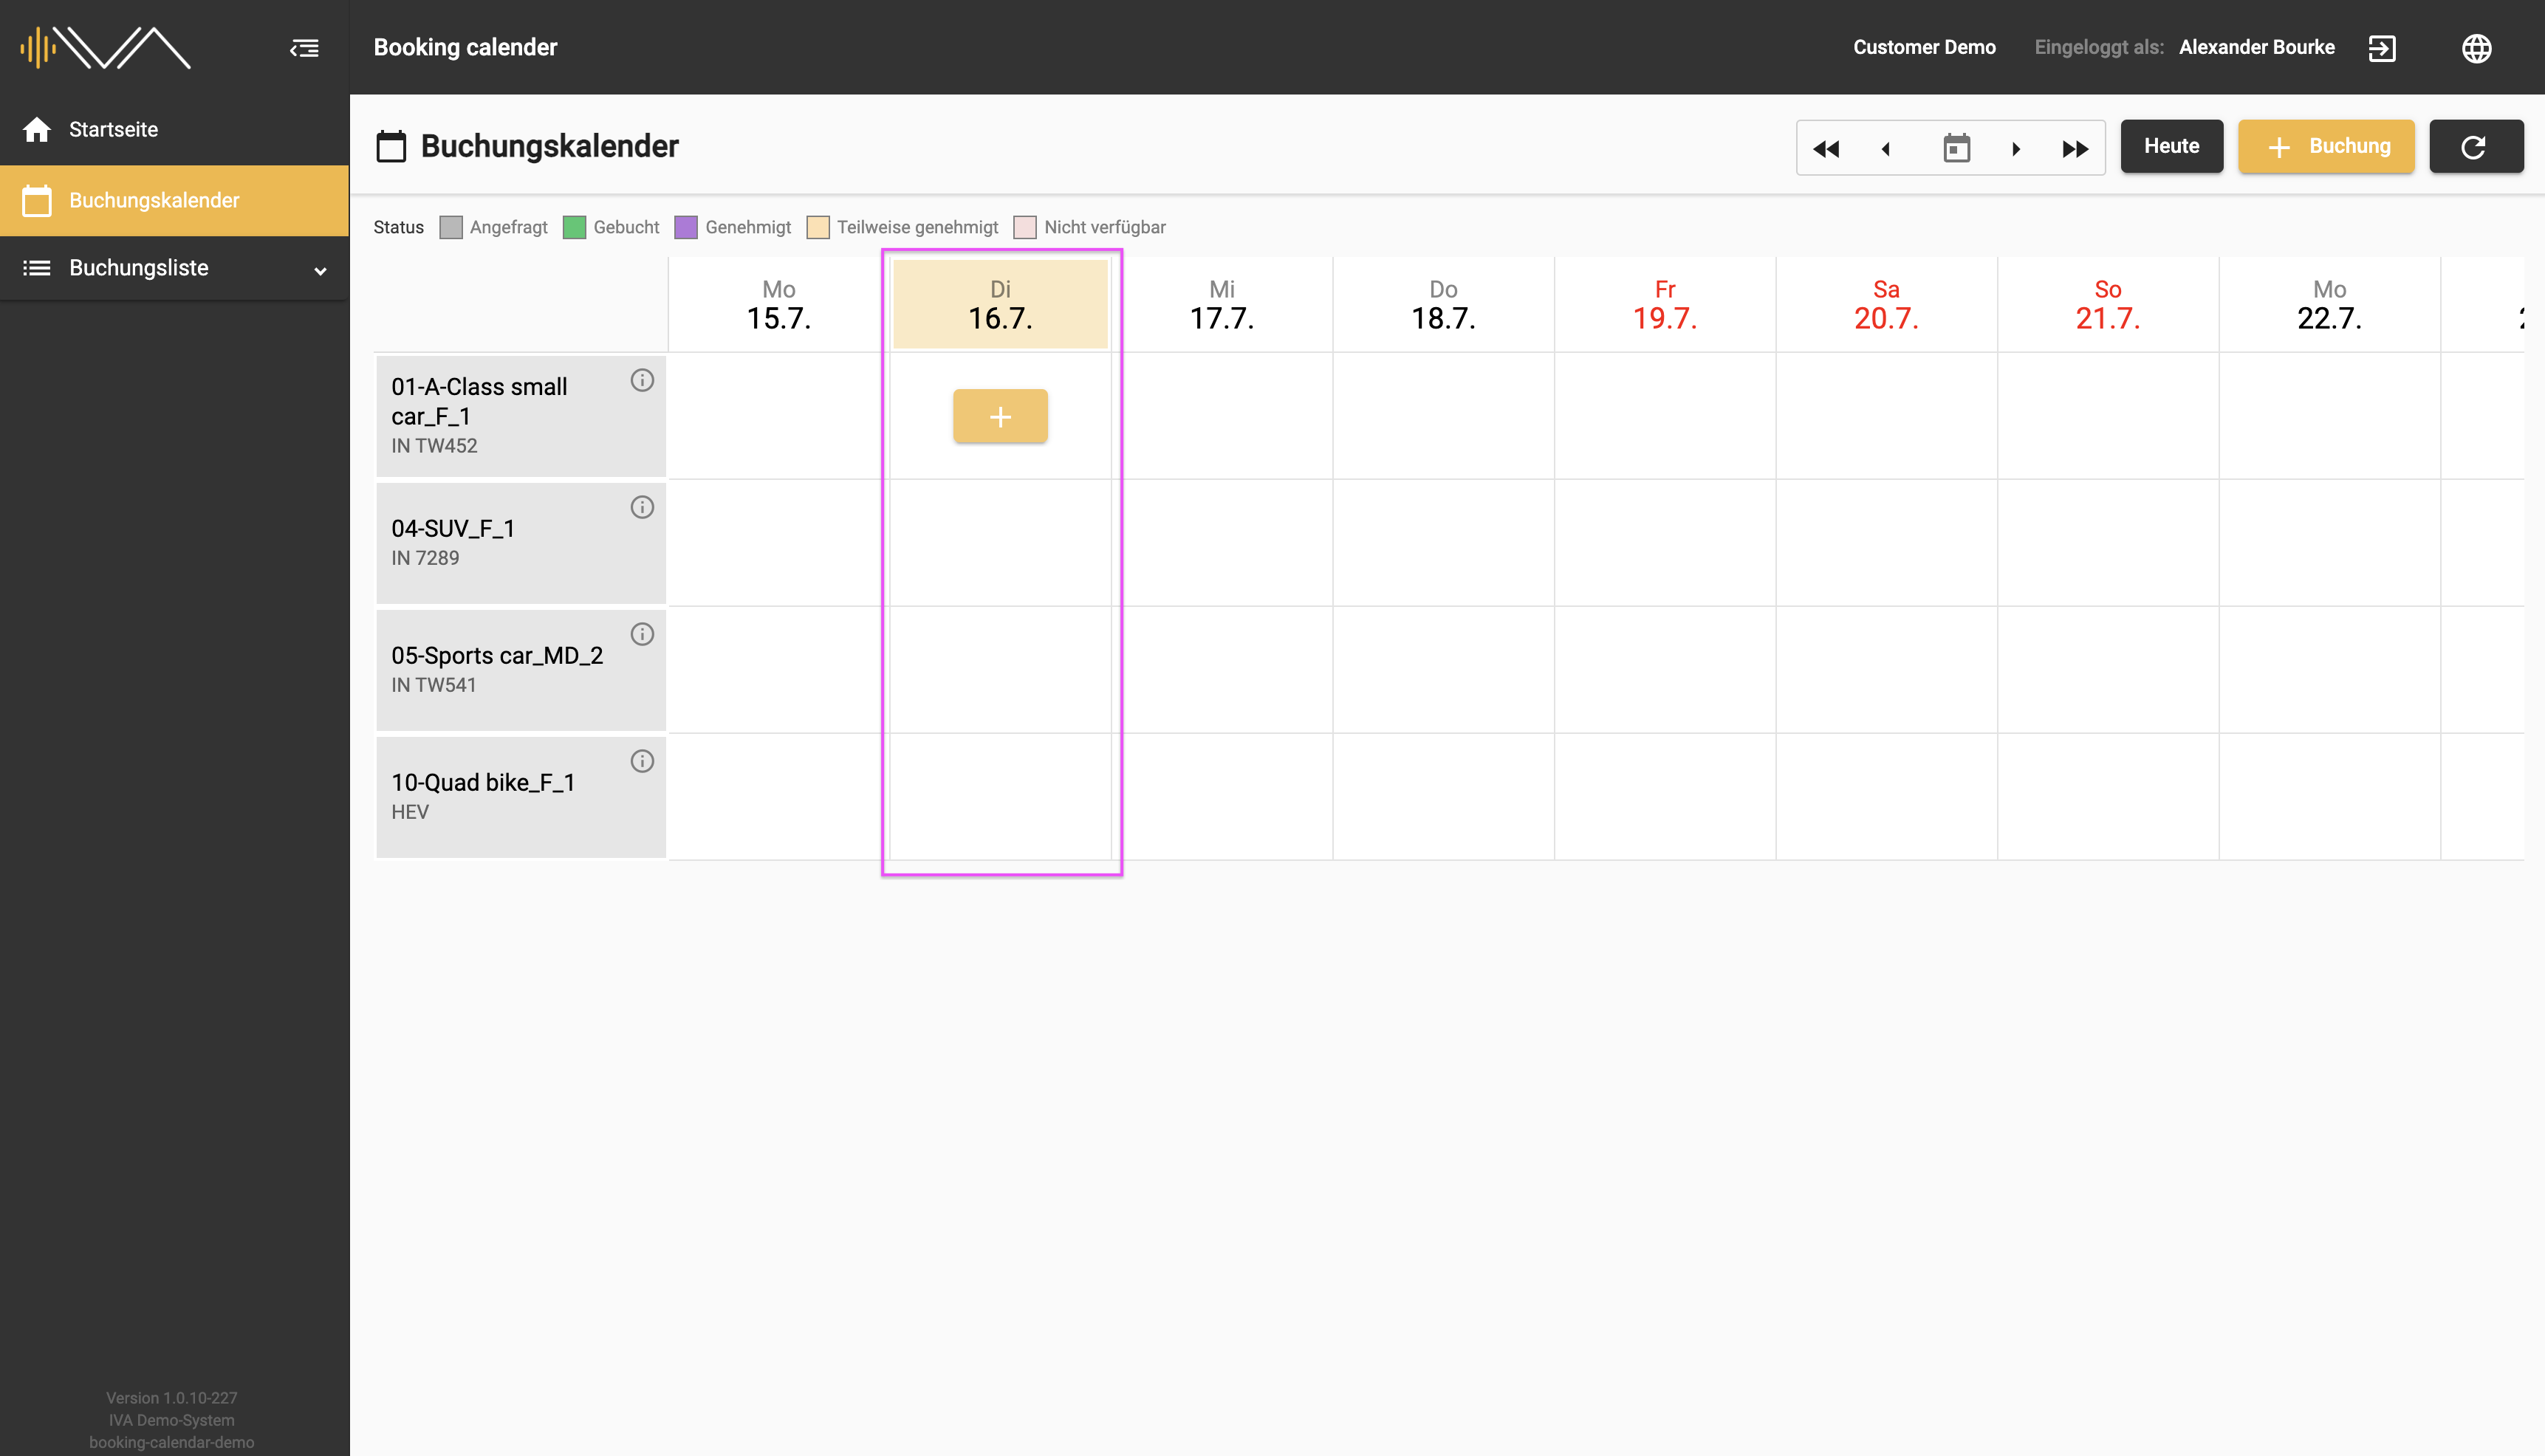
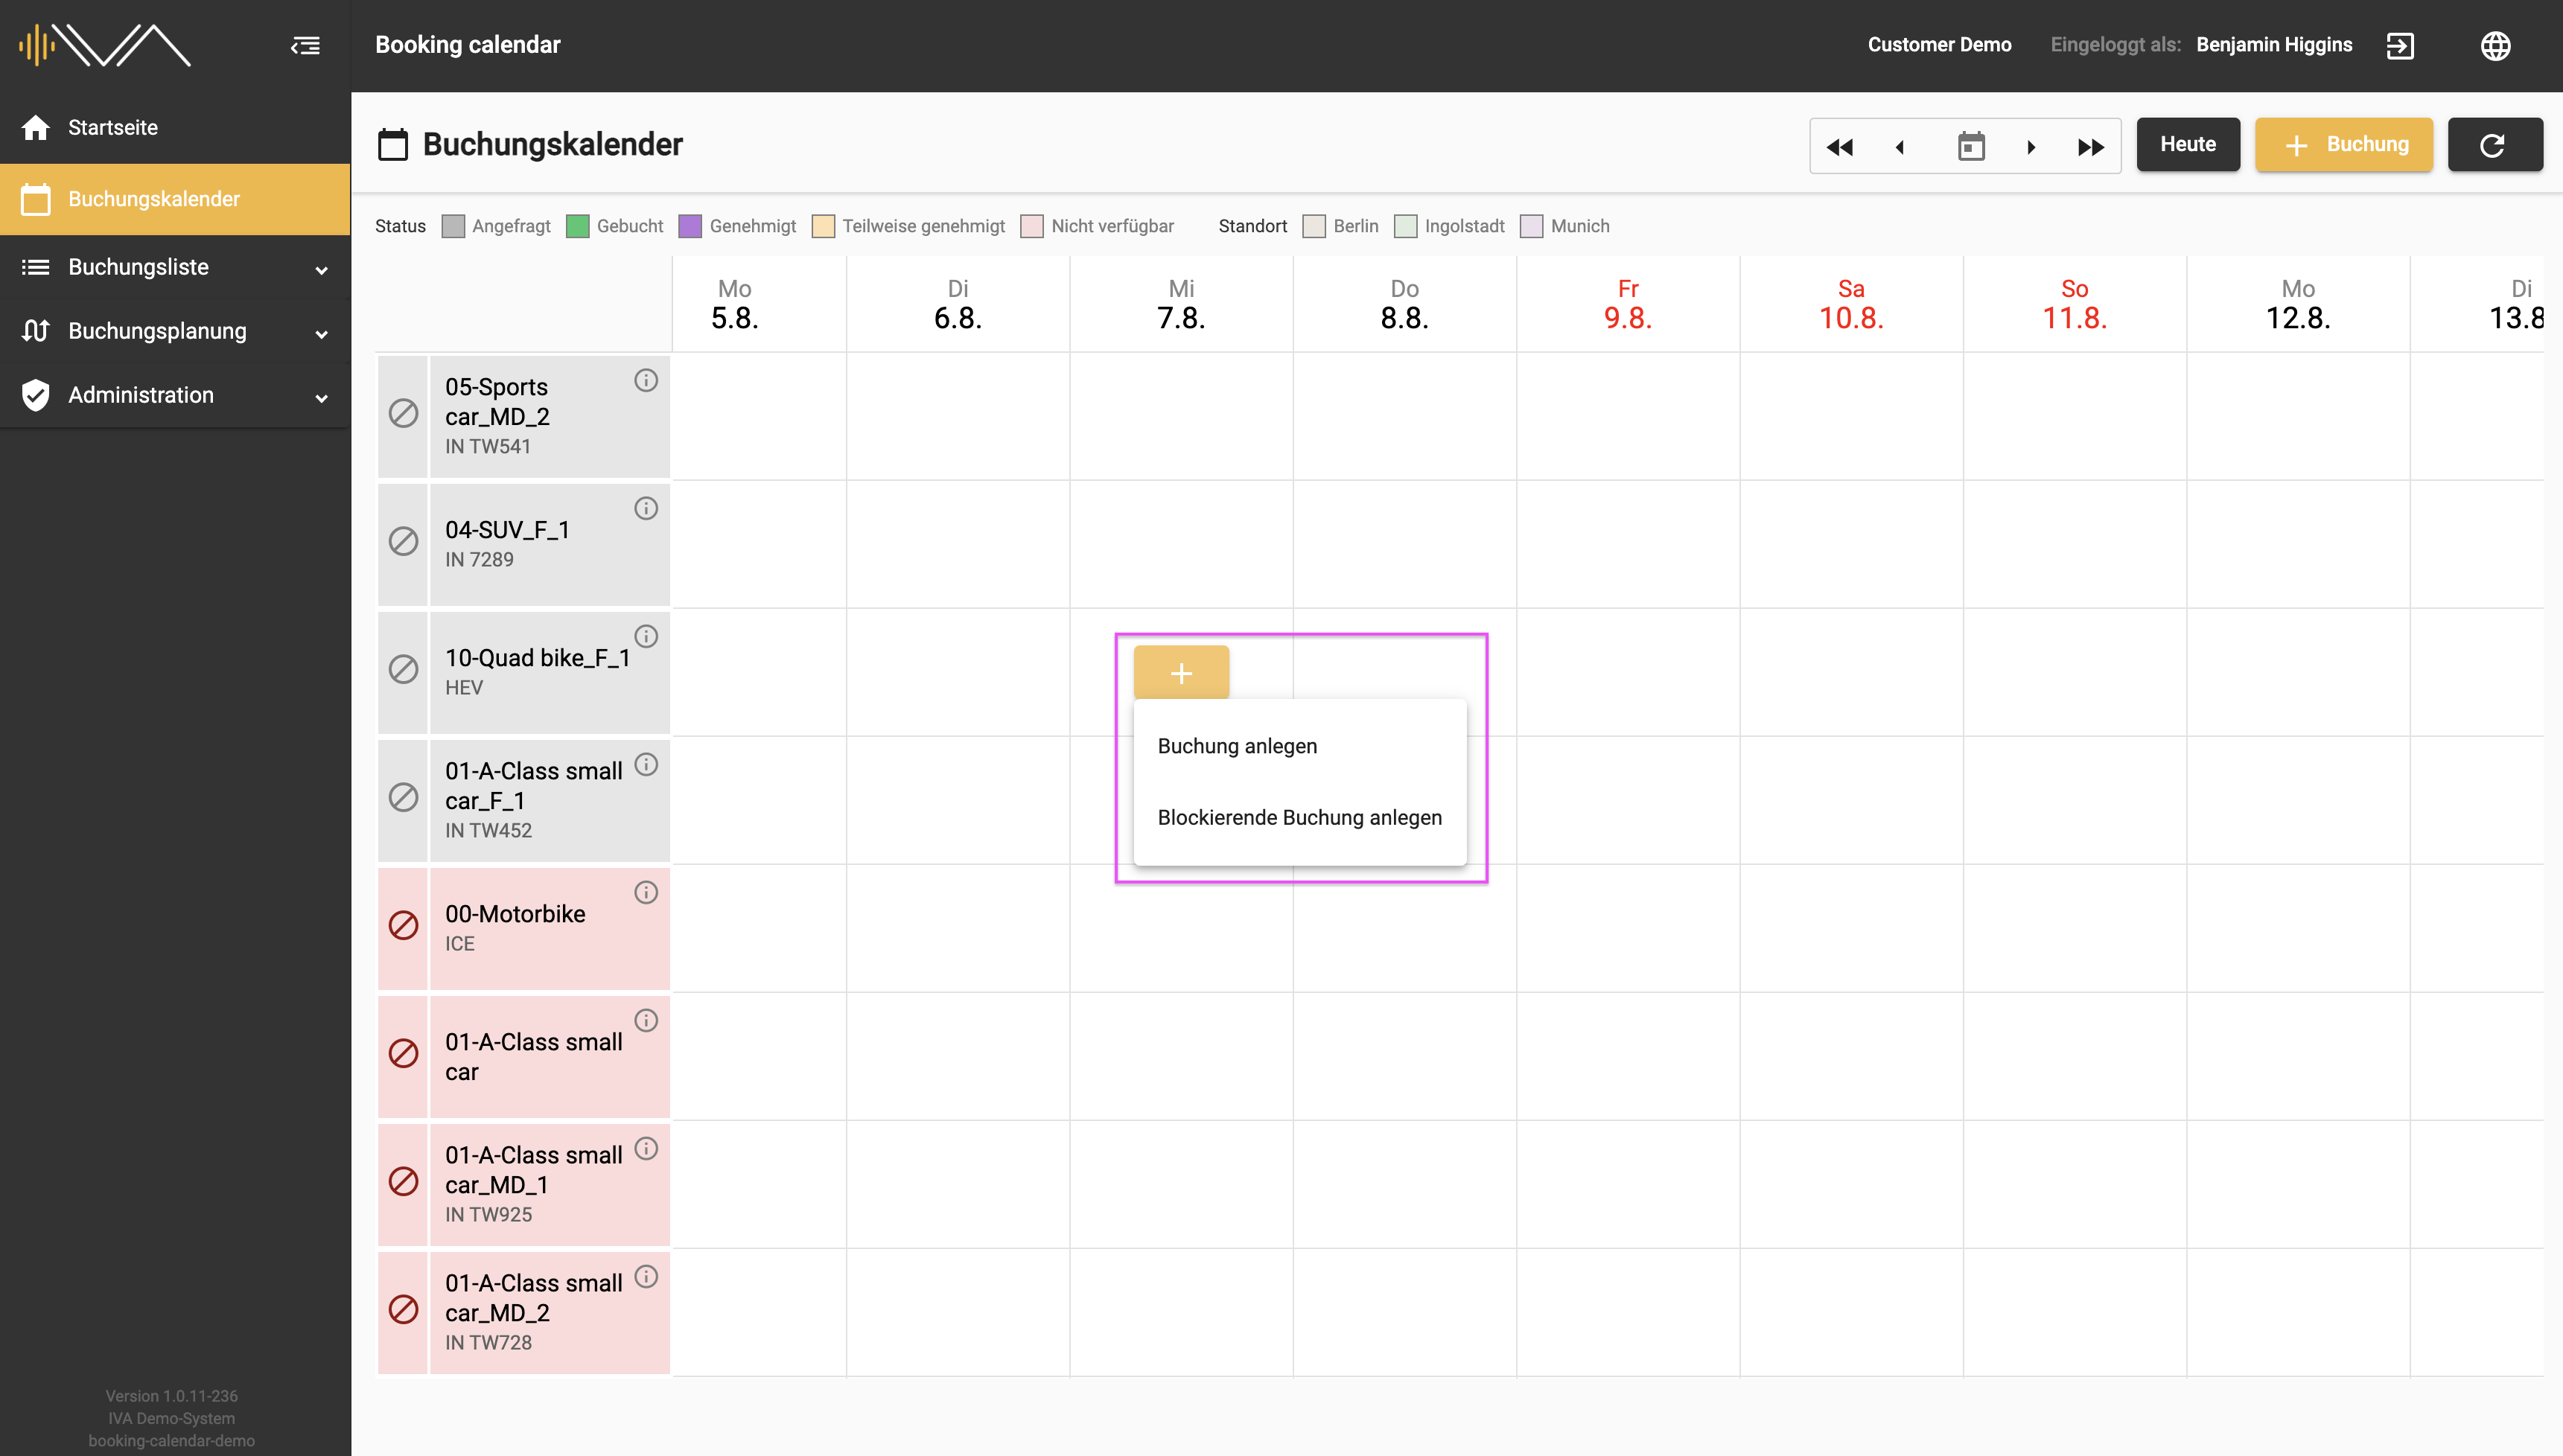
Looking at the individual day, through hovering over it, you can find a “+” button. Clicking on it opens a separate pop-up “Create booking” with the following options:
- Create booking
- Create a blocking booking
This dropdown is only available for planners.
Clicking on “Create booking” opens a separate pop-up with the following information:
- "User", automatically selected
- "Delegate"
- "Test object", automatically selected
- "Location", selected if the assignment has been selected
- "Start date" and "End date" (automatically selected)
- Tax-relevant settings:
- two radio buttons: “Within” or “Outside working hours”
- a checkbox: “Personal company car available” appears next to the selected radio button “Outside working hours”
- a checkbox: “Evaluate in IVA” an optional setting, depending on the settings in the administration
- "Reason"
- "Approver 1"
- "Approver 2", for journeys outside working hours
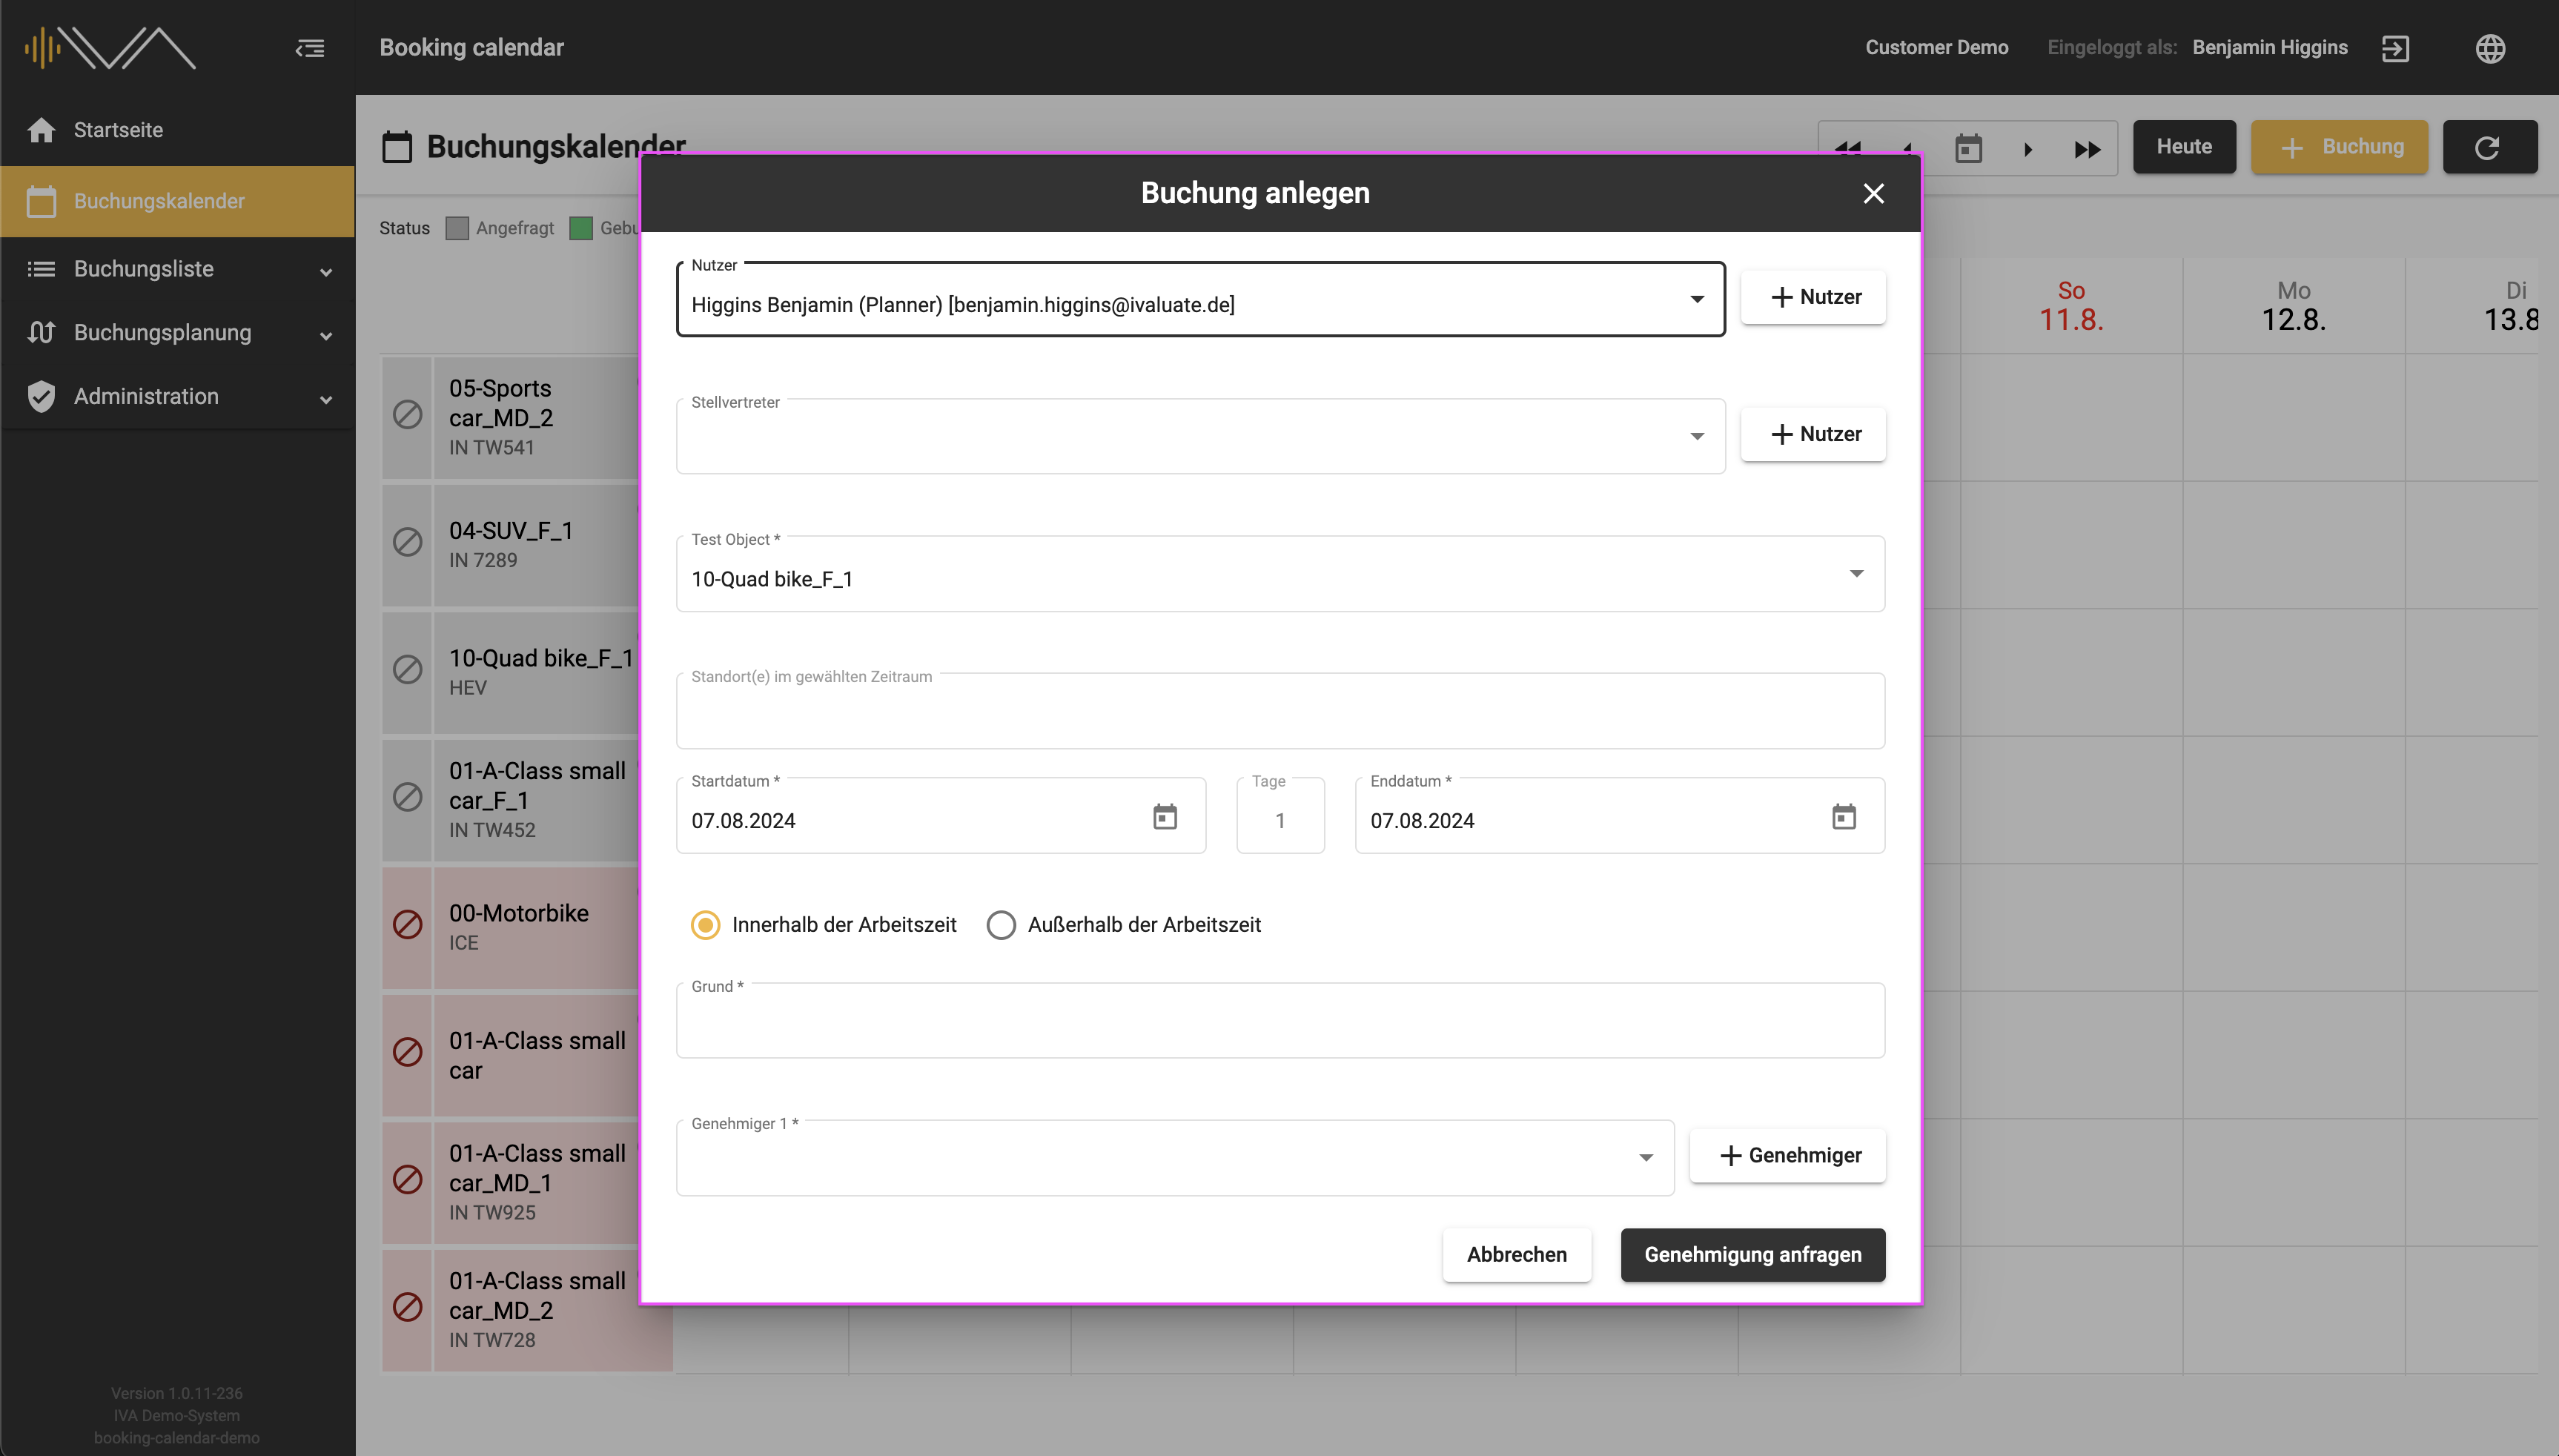
You can change or add to your details, e.g. create a booking for another person. Then click on the “Request approval” button below. Your request will be saved and, in most cases, forwarded to the approver. Under the booked day and the corresponding vehicle tile, you will then see the tester’s name, part of the reason and the status “Requested”.
Click on “Create a blocking booking” to open a separate pop-up “Edit blocking booking” with the following information:
- "Creator"
- "Locations"
- "Test object"
- "Start date" and "End date", automatically selected
- "Reason"
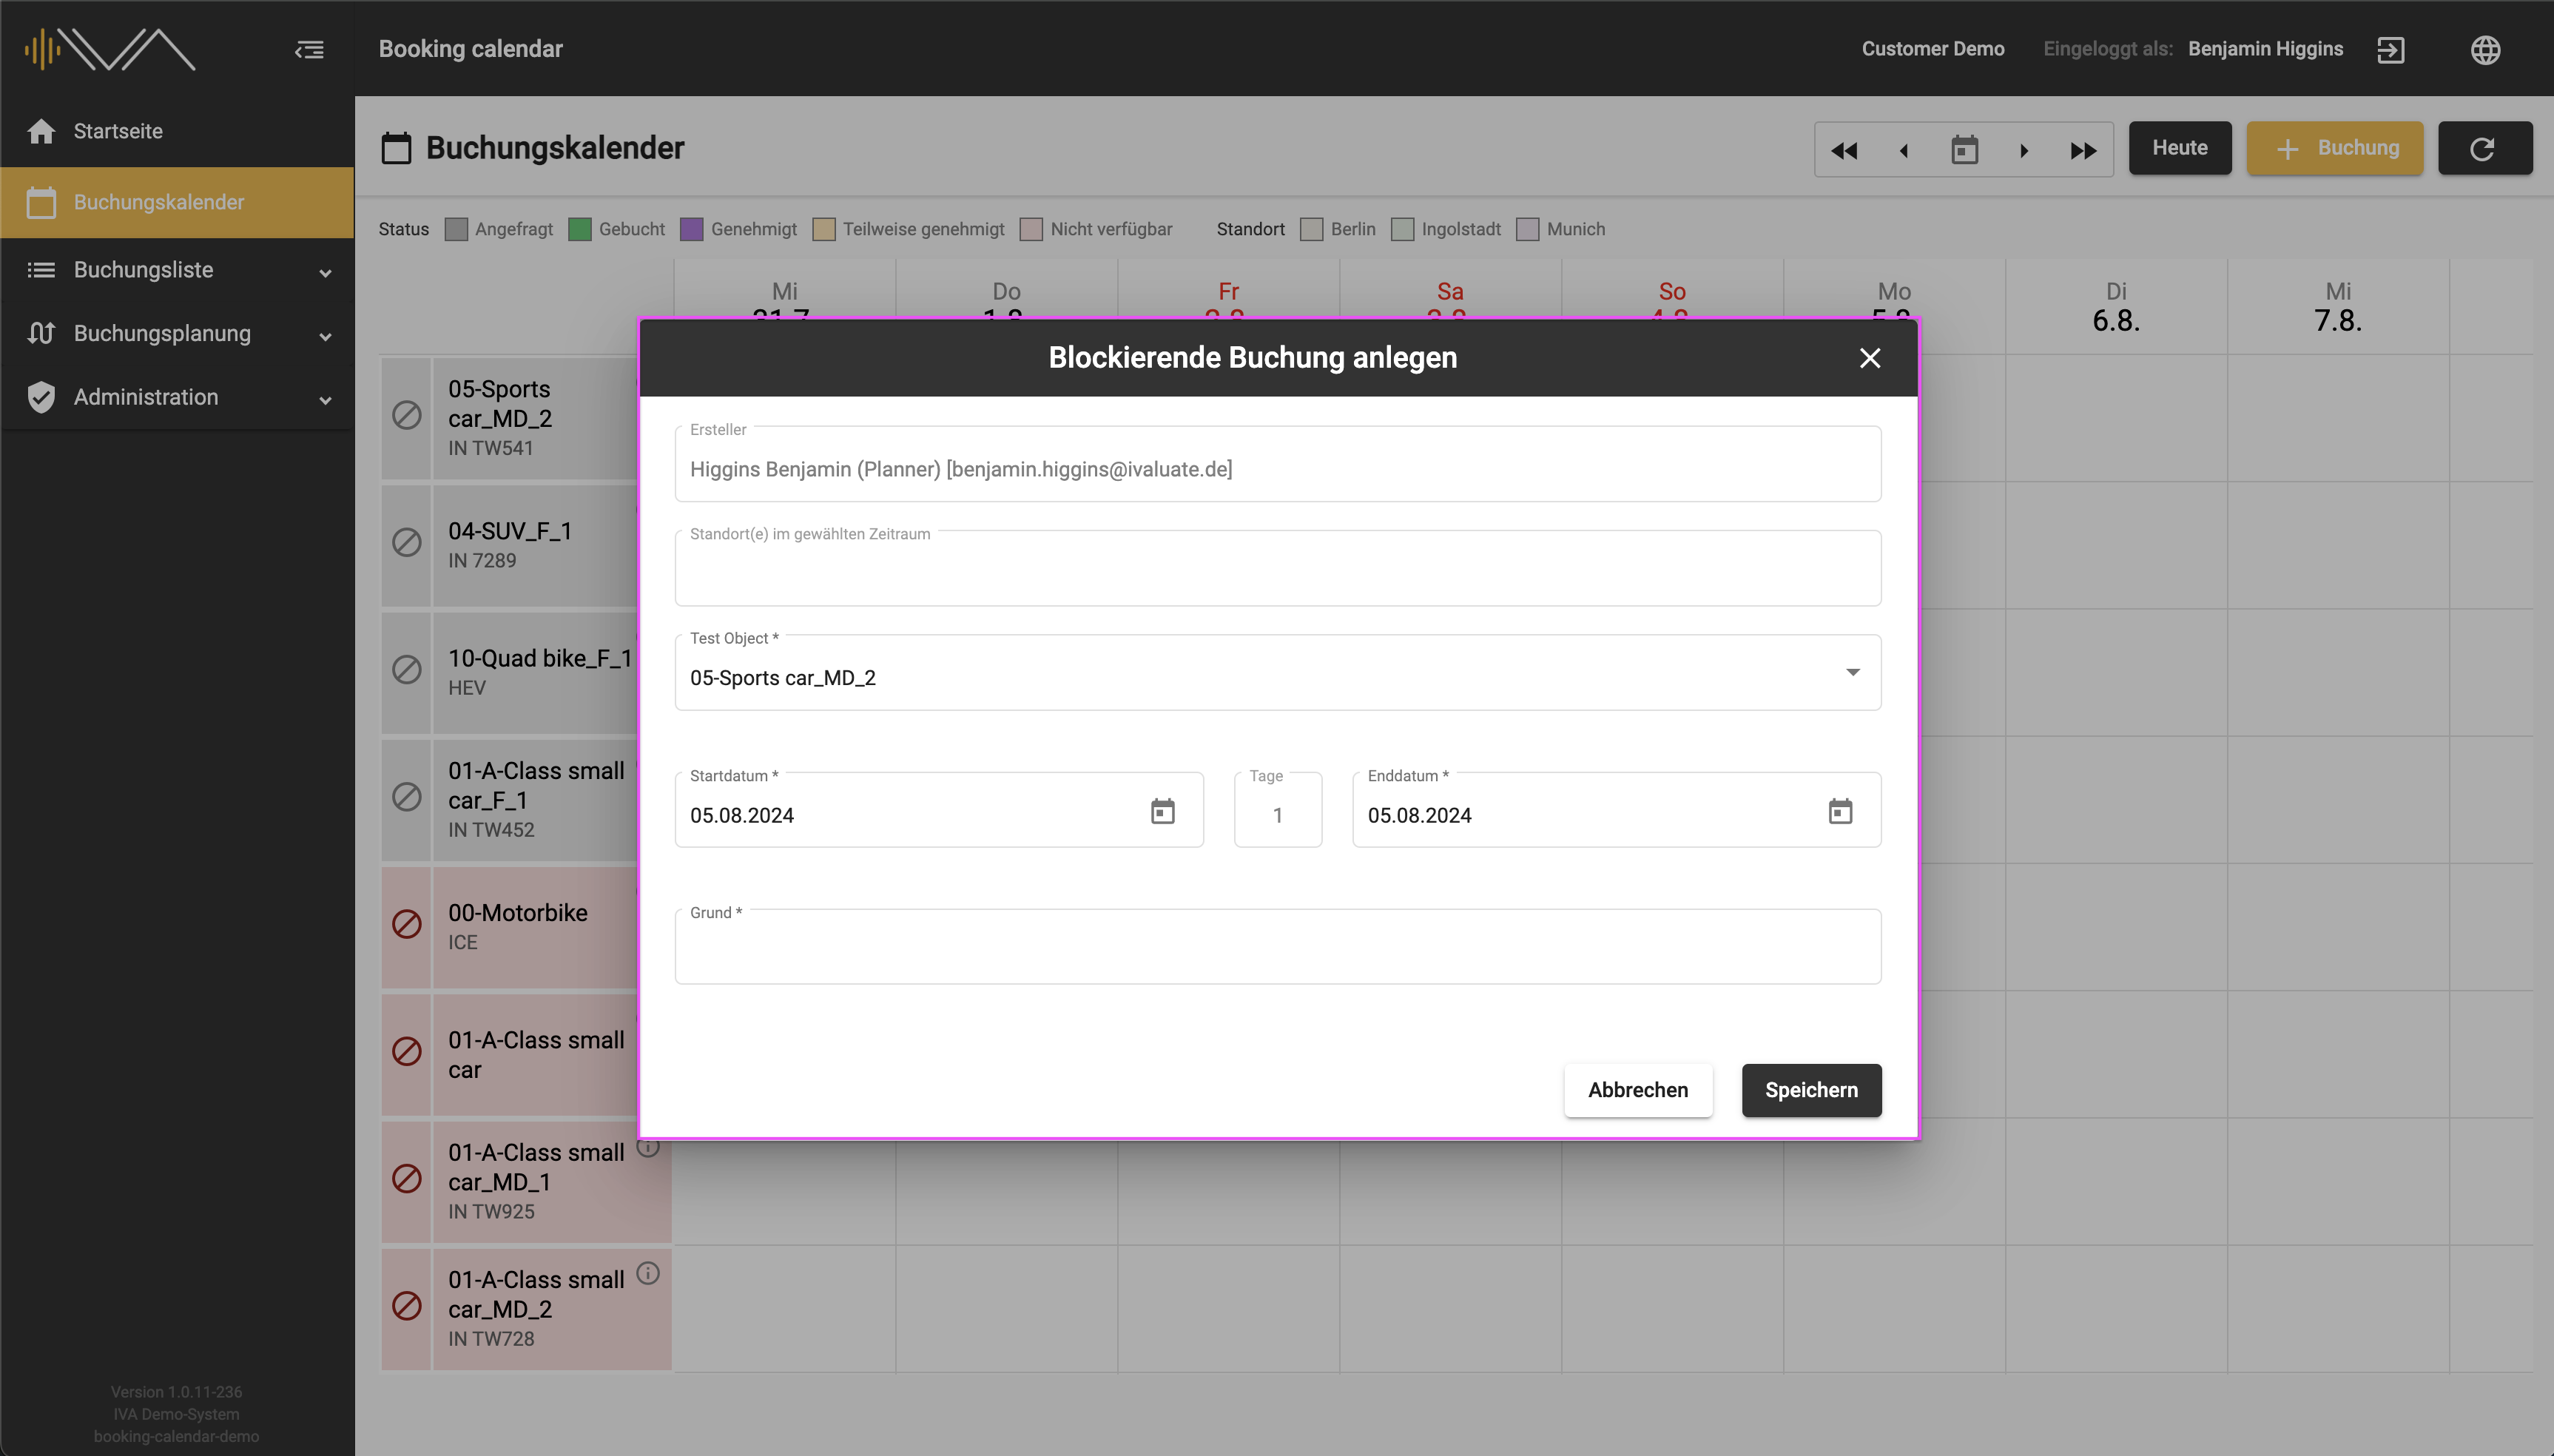
If you then click on the “Save” button, the vehicle is blocked for the selected date.
The second way to make a booking is by clicking on the “+ Booking” button. A separate pop-up “Create booking” will then open with the same details as above. The test object needs to be selected manually here.
After making a booking, you will see your requested booking in the booking list. The text line containing the booking information is colored orange. You can edit the booking afterwards by clicking on the “Pencil” icon.
More information can be found under the menu item “Booking list”.
If the test object is assigned a current location for a specific period, you will see the name of the location in a tile at the top left.
Mandatory information is marked with an “*”.
QUARTERLY VIEW
The column for each day is wider here than in the “Daily view”. It is possible to book a test object for a day in a quarter-hourly cycle.
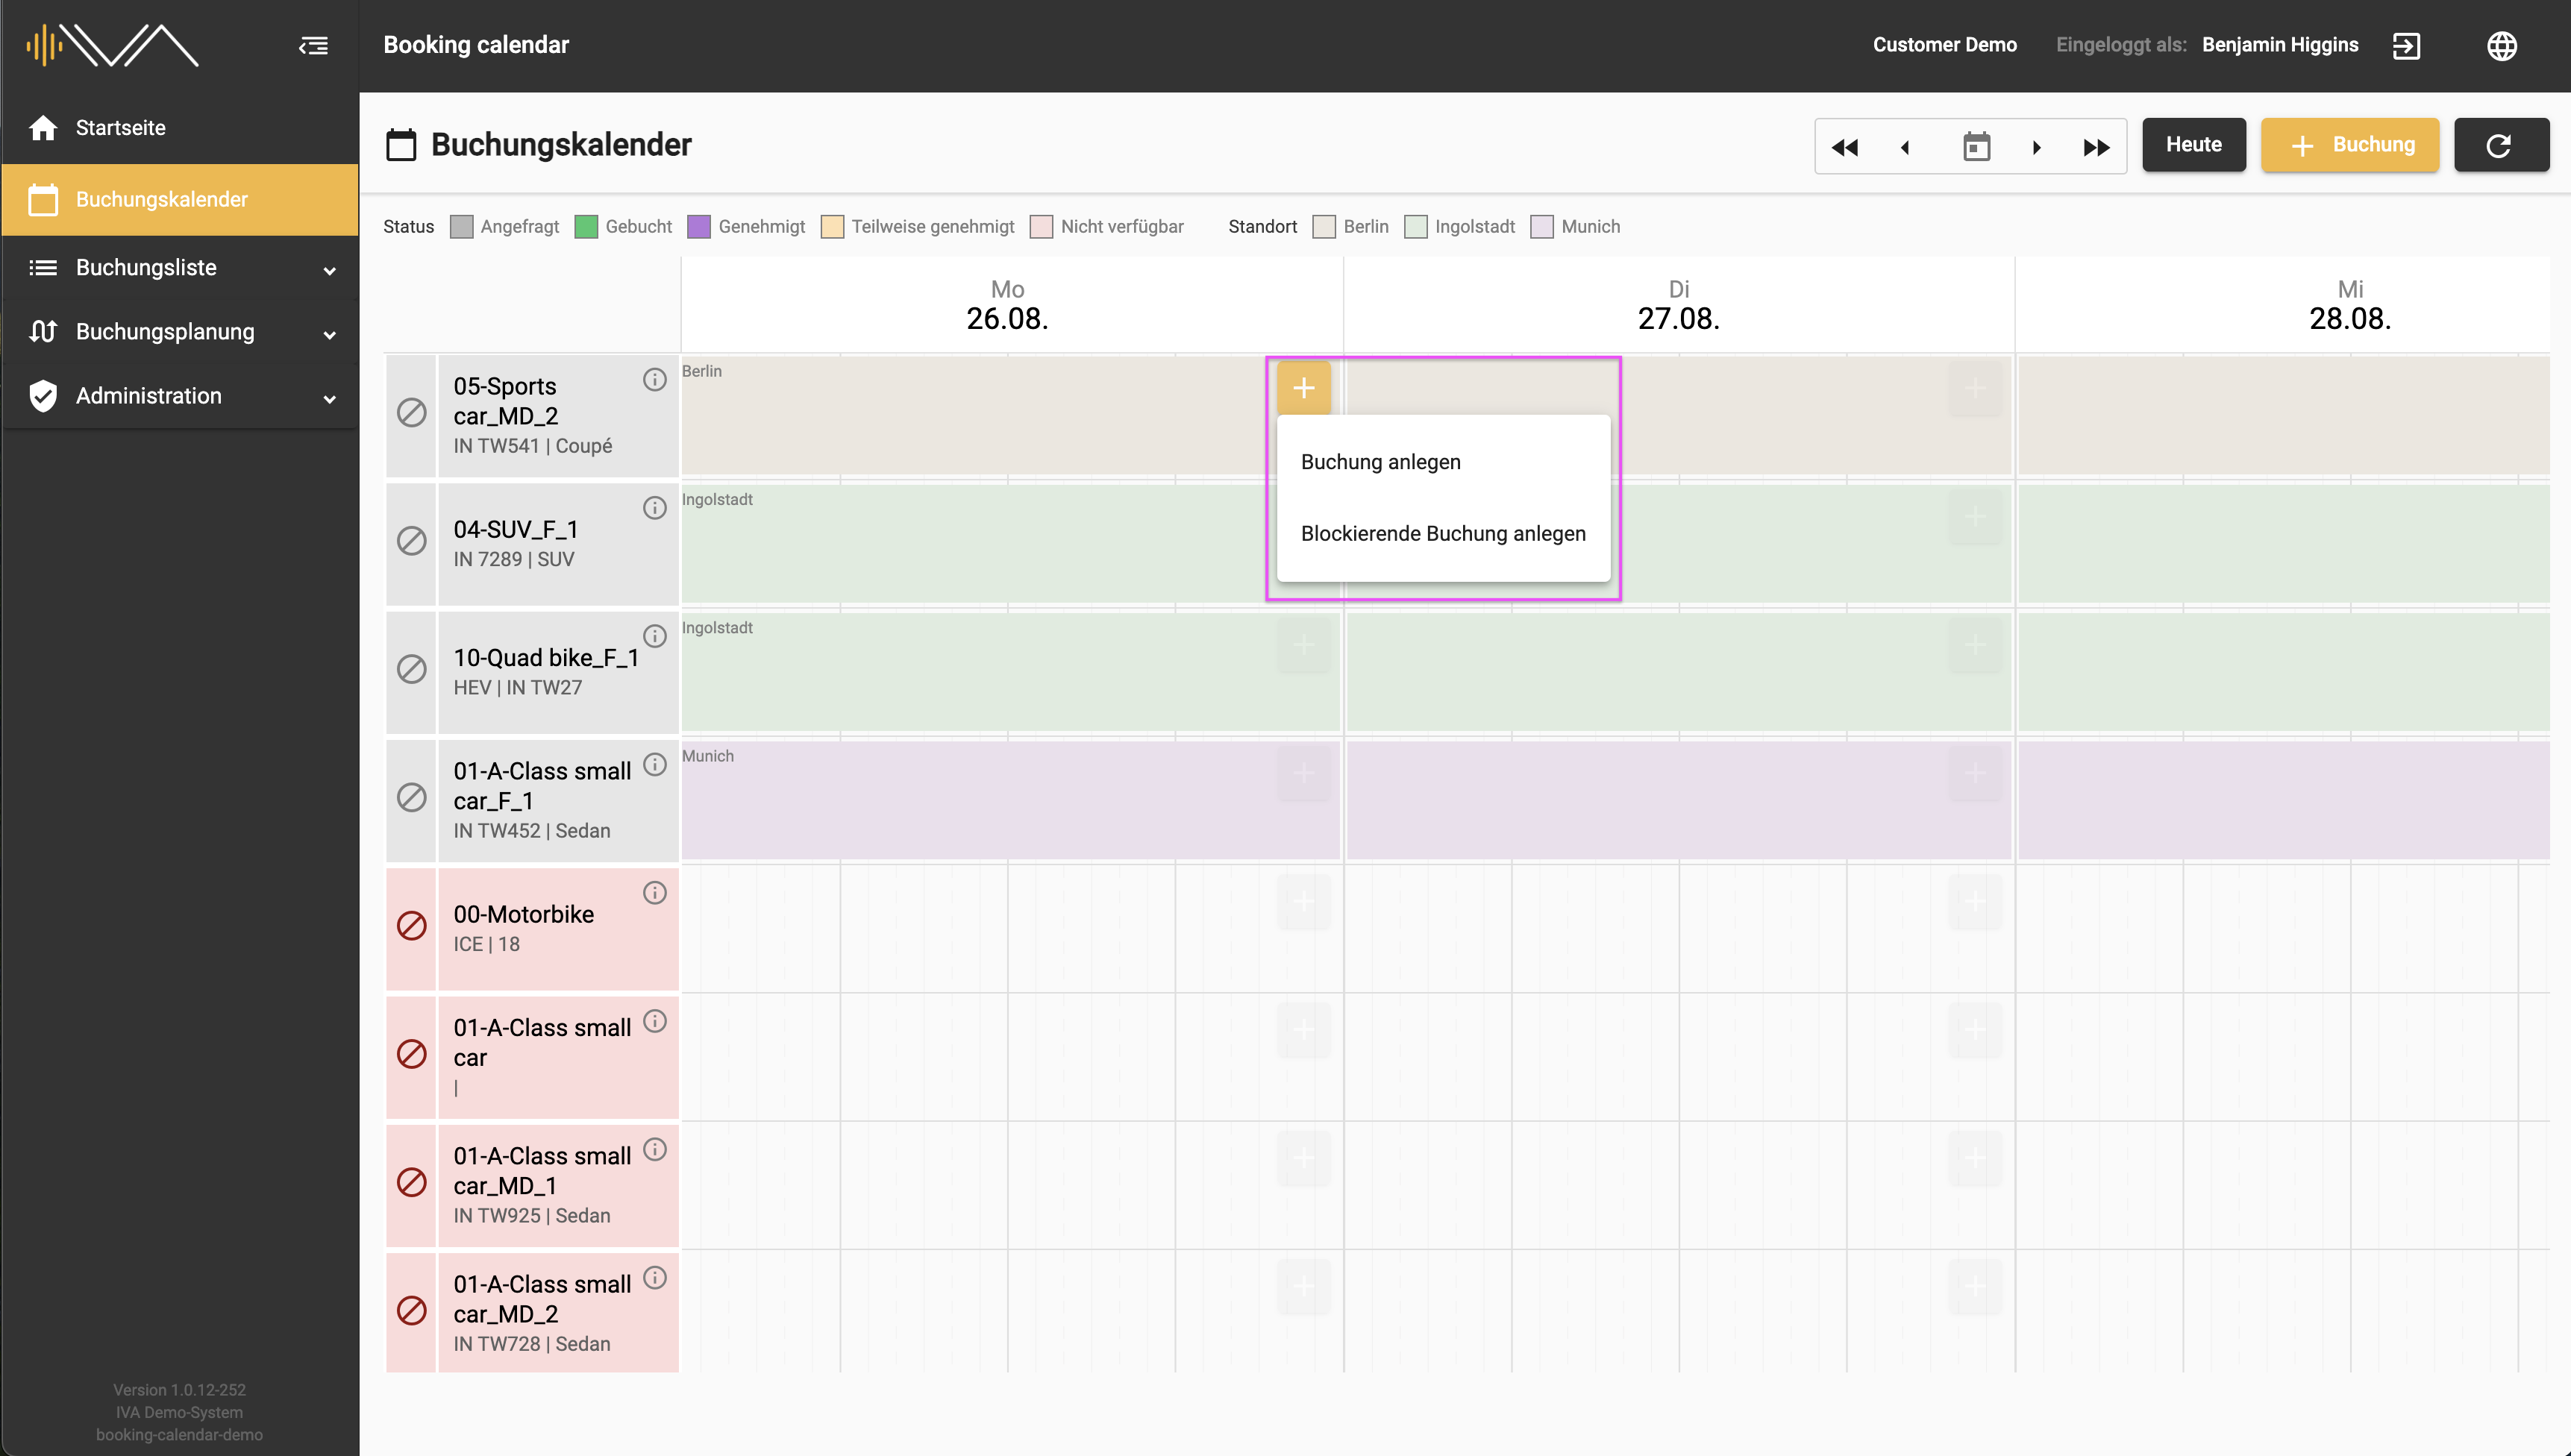
Looking at the individual day, through hovering over it, you can find a “+” button.
Clicking on it opens a separate pop-up “Create booking” with the following information:
- "User", automatically selected
- "Delegate"
- "Test object", automatically selected
- "Location", selected if the assignment has been selected
- "Start date" and "End date", automatically selected
- “Duration”, automatically calculated
- Tax-relevant settings:
- two radio buttons: “Within” or “Outside working hours”
- a checkbox: “Personal company car available” appears next to the selected radio button “Outside working hours”
- a checkbox: “Evaluate in IVA” an optional setting, depending on the settings in the administration
- "Reason"
- "Approver 1"
- "Approver 2", for drives outside working hours
The checkbox: “Evaluate in IVA” depends on the settings in the administration and is optionally available.
If the checkbox is selected, a test is created in IVA.
2.3. Test object tile for planners
In the calendar, you will find the list of available test objects in the first column on the left and the respective day view.
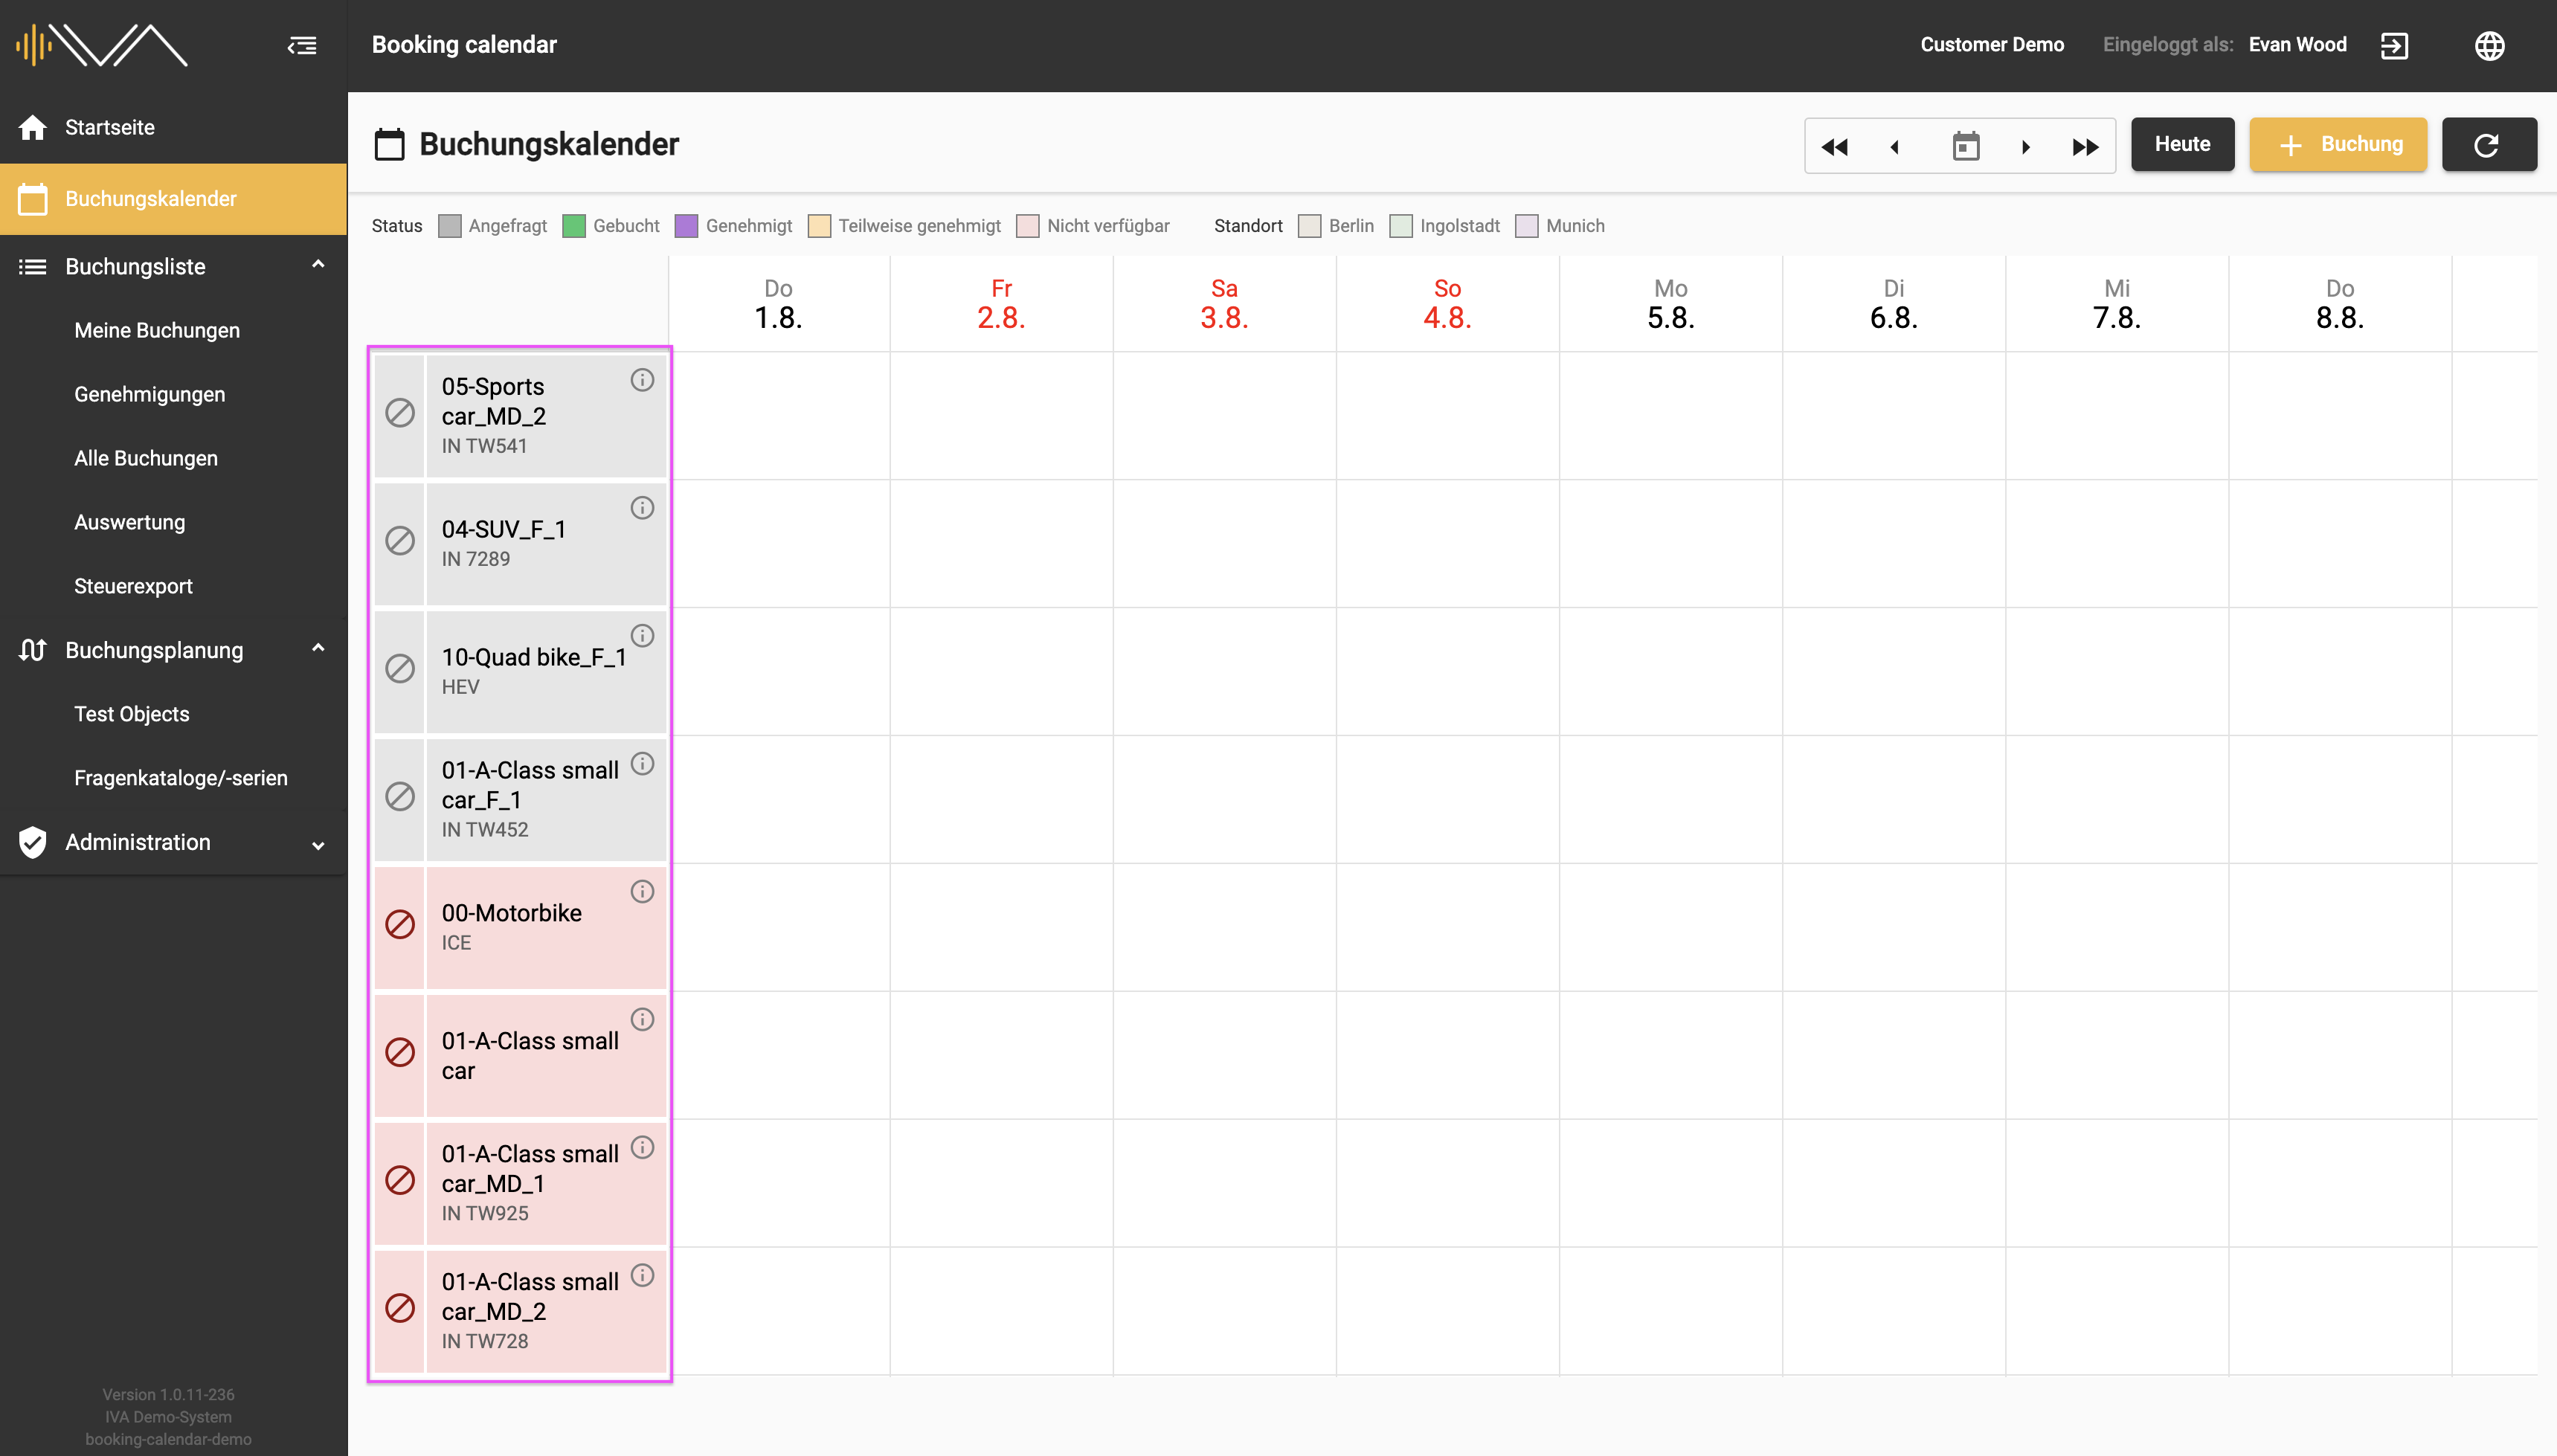
The two most important pieces of information are displayed in the test object tile:
- Test object name
- The first two attributes
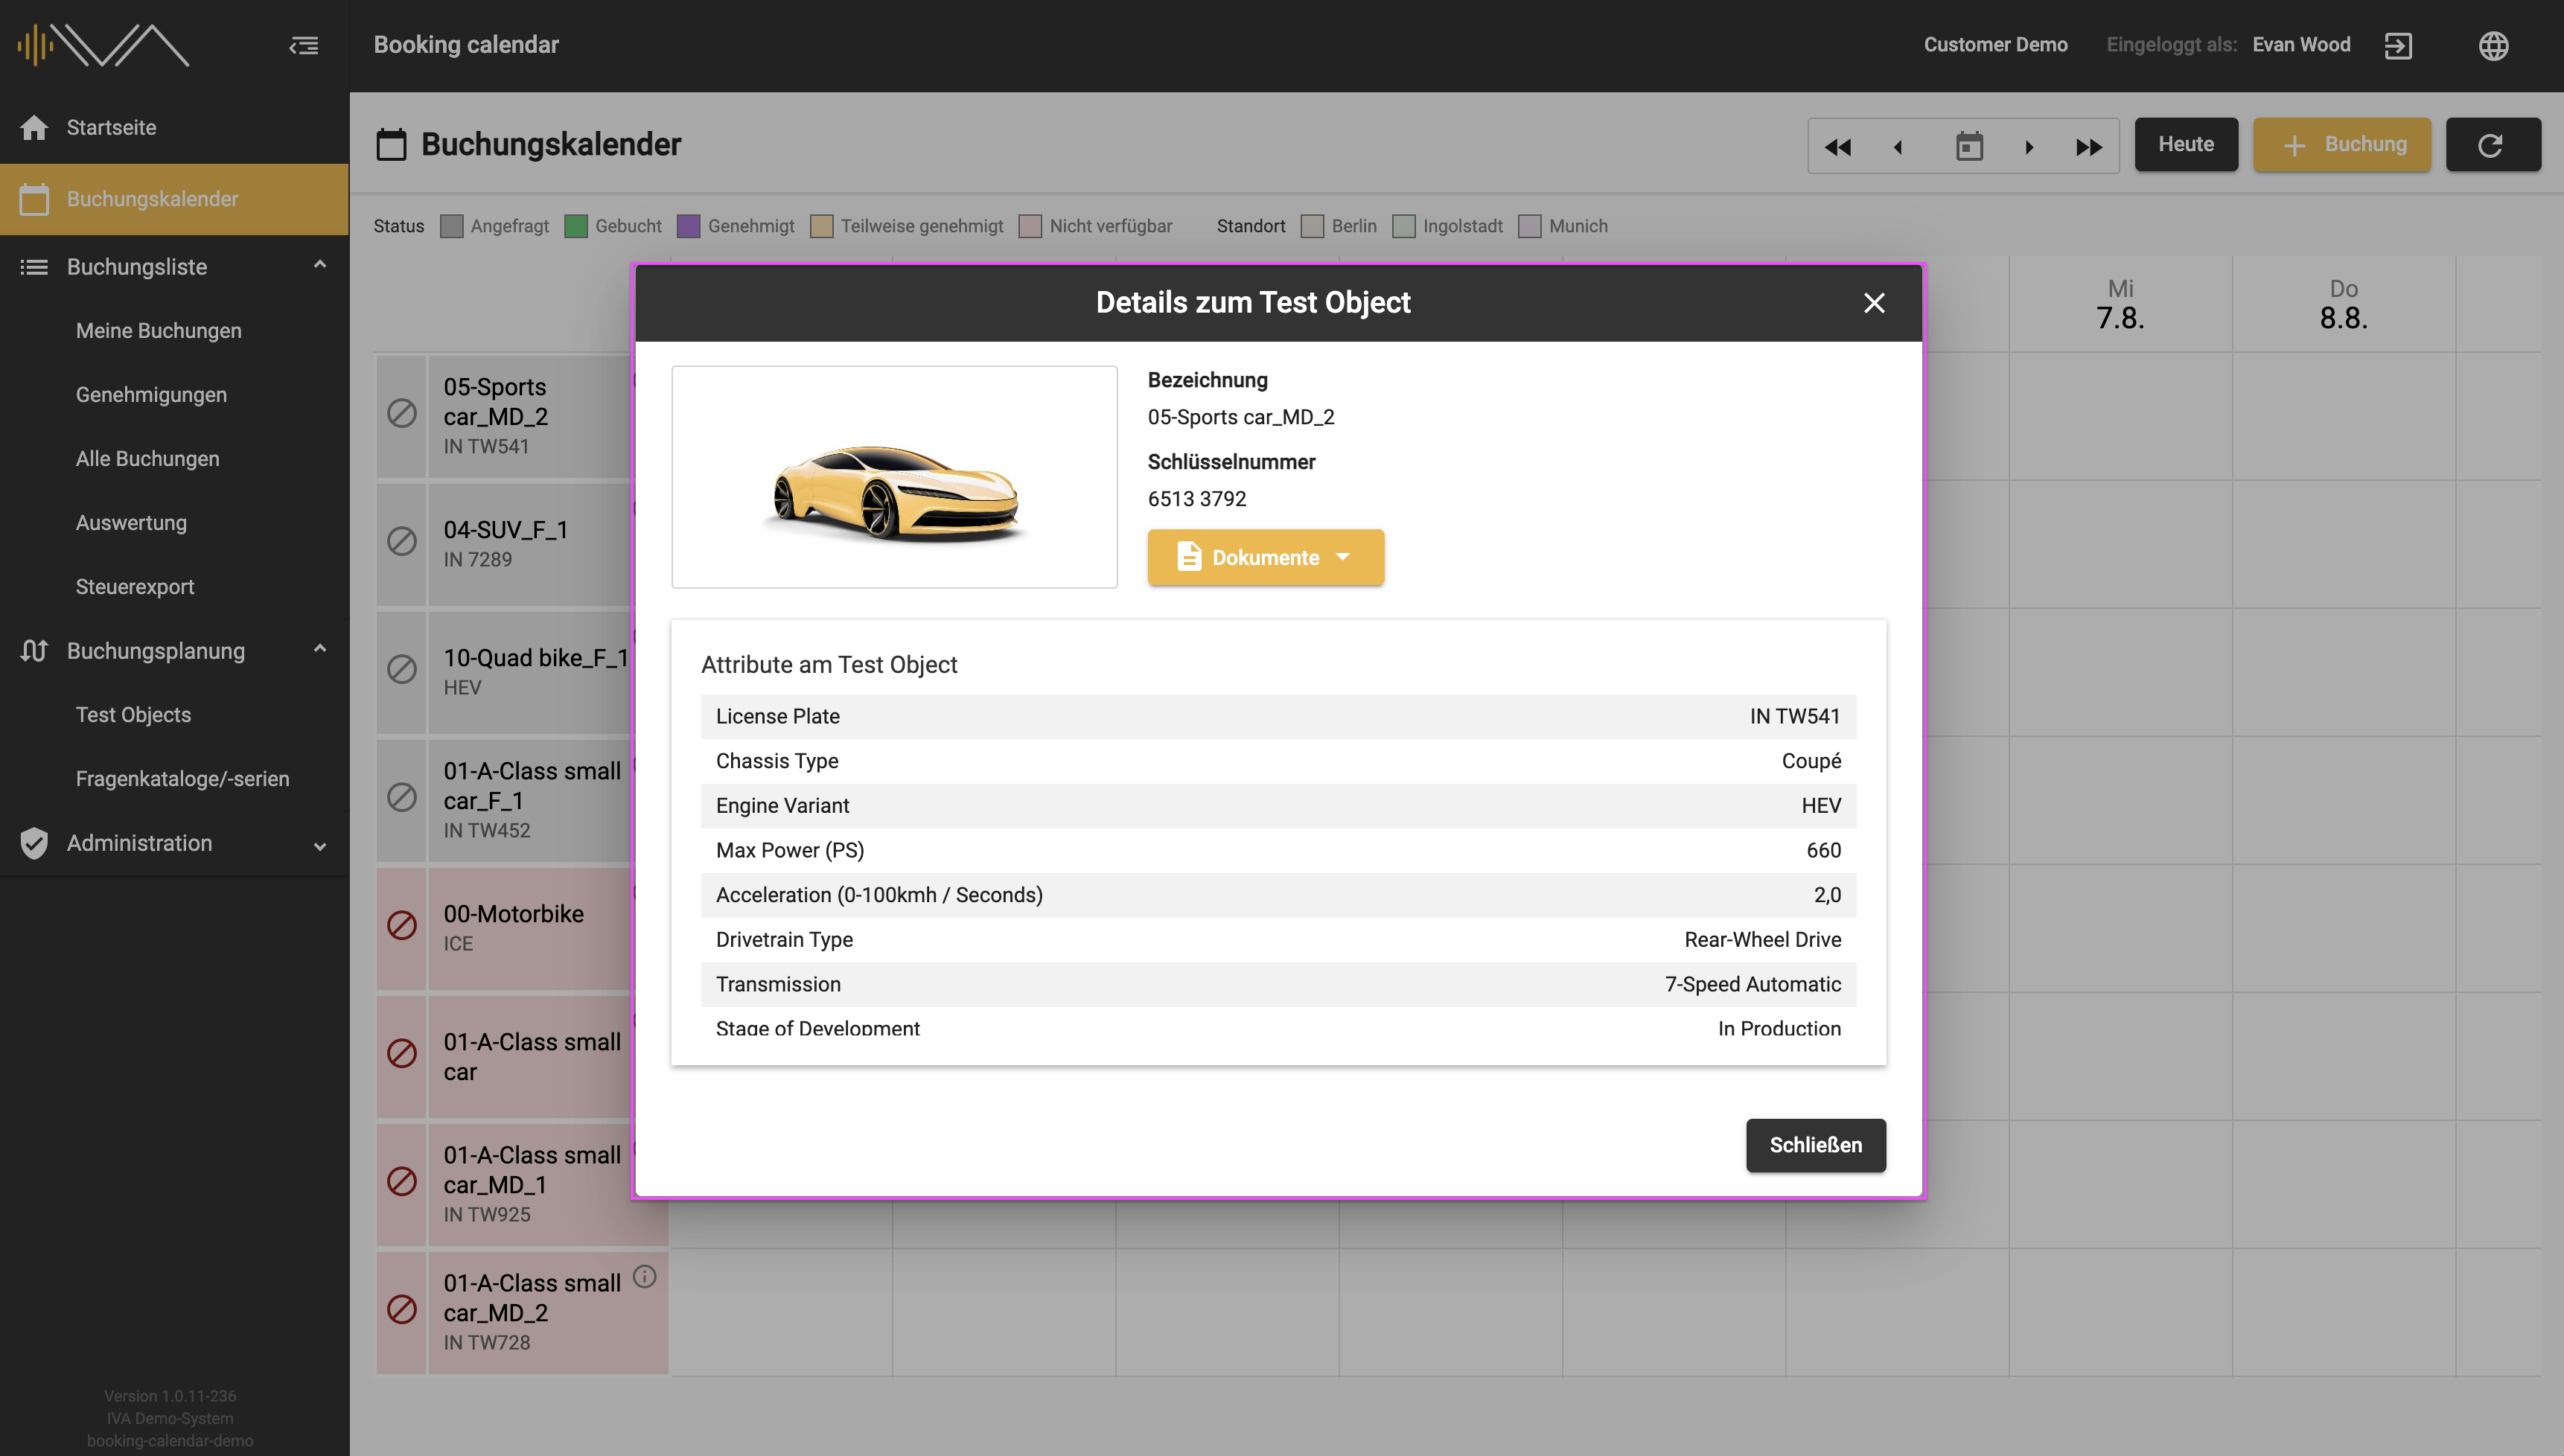
Click on the “i” icon to open a separate window containing further information on the test object:
- Image of the test object
- Test object name
- Key Value
- Documents
- Further attributes
In front of the vehicle tile, there is a narrow column with a “block” icon that is only visible to planners. By clicking on this icon, you can exclude a vehicle from the booking calendar or activate it.
Red “Block” icon/tile = excluded from the booking calendar
Gray “Block” icon = activated for the booking calendar
The tile of the vehicle also turns red or gray, depending on whether the vehicle is blocked or activated.
2.4. Legend
The legend is located below the menu at the top left. It helps you find your way around the booking calendar and explains the color coding of the status and location.
The following statuses can be defined for “Status”:
- Requested
- Booked
- Approved
- Partially approved
- Not available
Further information can be found here: Status
All locations that have been made available by the administrator are listed under the location.
The locations defined by the administrator are displayed under “Location”.
2.5. Date picker
At the top next to the buttons there is a date picker and four arrows that allow you to quickly select a date and skip through certain time intervals.
3. Booking list for planners
There are 5 submenu items under the booking list, each with the corresponding details: 3.1 My bookings 3.2 Approvals 3.3 All bookings 3.4 Reports 3.5 Tax export
3.1. Overview "My bookings" for planners
The booking list provides you with an overview of all bookings that you have requested or booked. The list is made up of several columns.
On the left, there is a “Test object” column in which the test object name and the first two attributes are listed.
On the far right is the column: “To test”. If a drive has been approved, the column is filled with a “Car” icon. Clicking on the icon takes you to the corresponding test, i.e. a new tab opens in the tester web application.
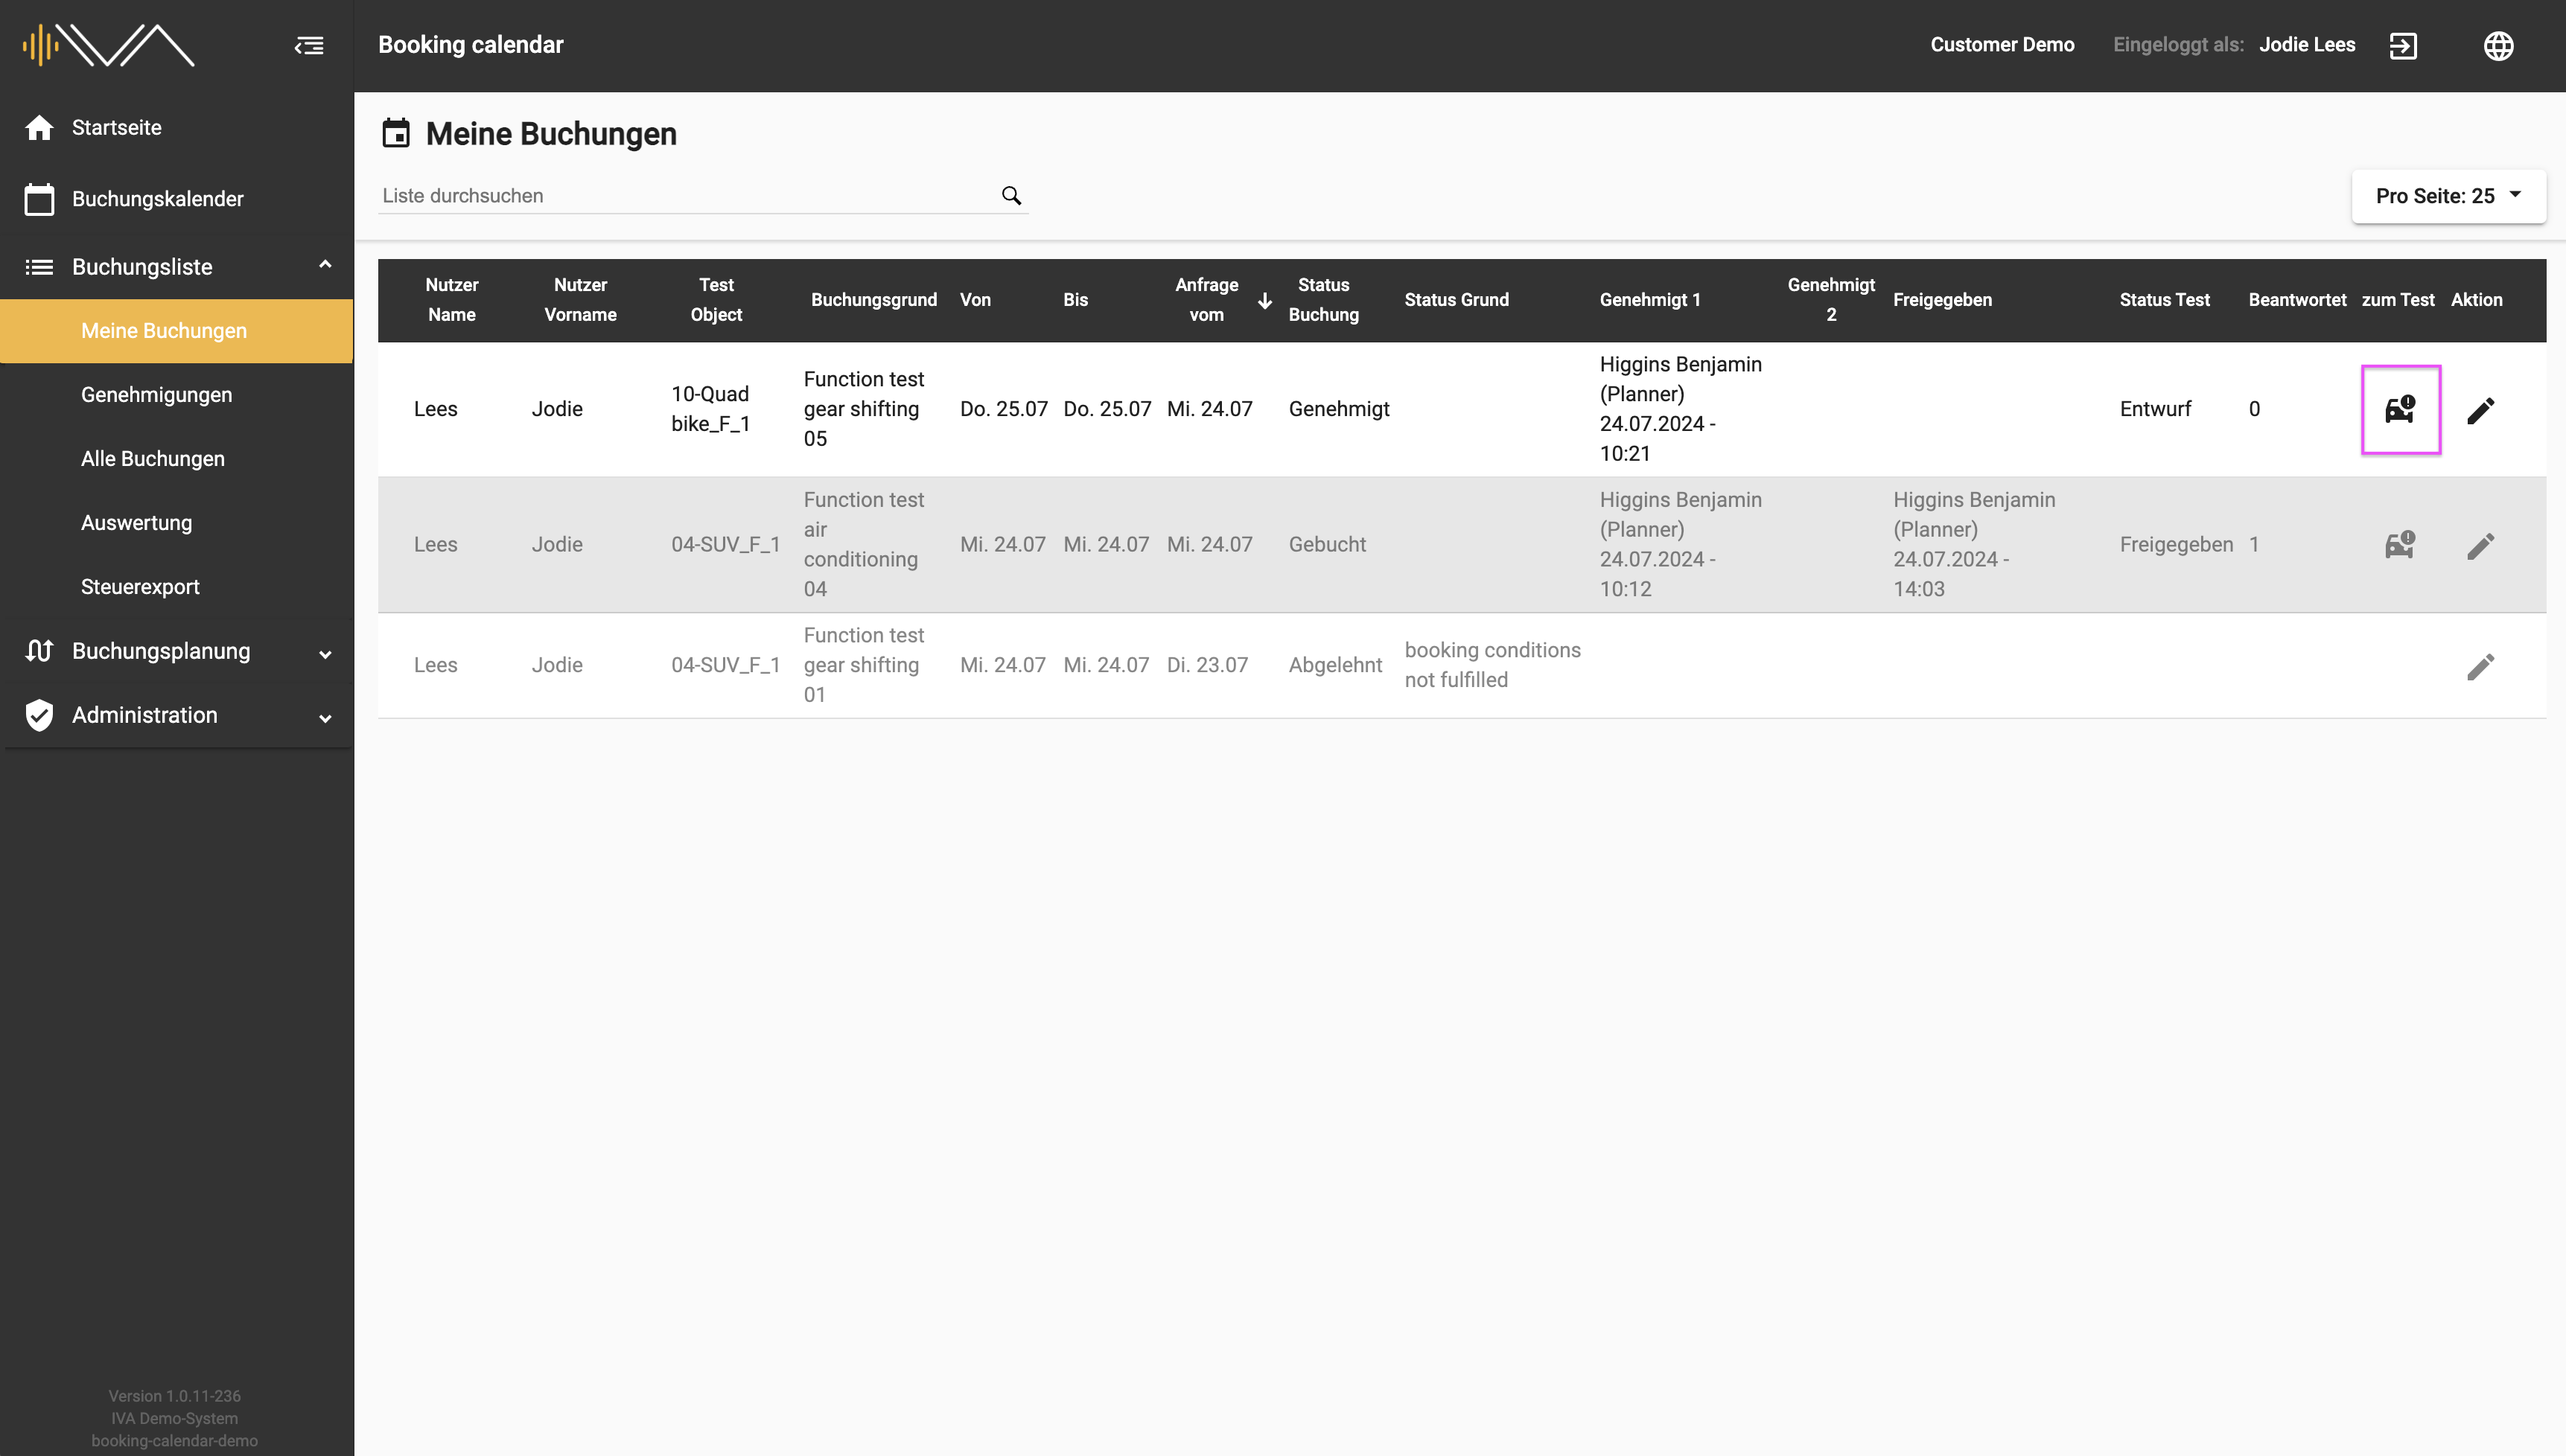
The “Status test” and “Answered” columns can be sorted.
The tester only sees this one submenu item. All other submenu items listed below it are invisible to the tester.
3.2. Approvals
If you have been assigned the Approver role, you will find all booking requests an their statuses under this menu item:
The bookings can have following statuses:
- Approved
- Requested
- Booked
- Canceled
- Rejected
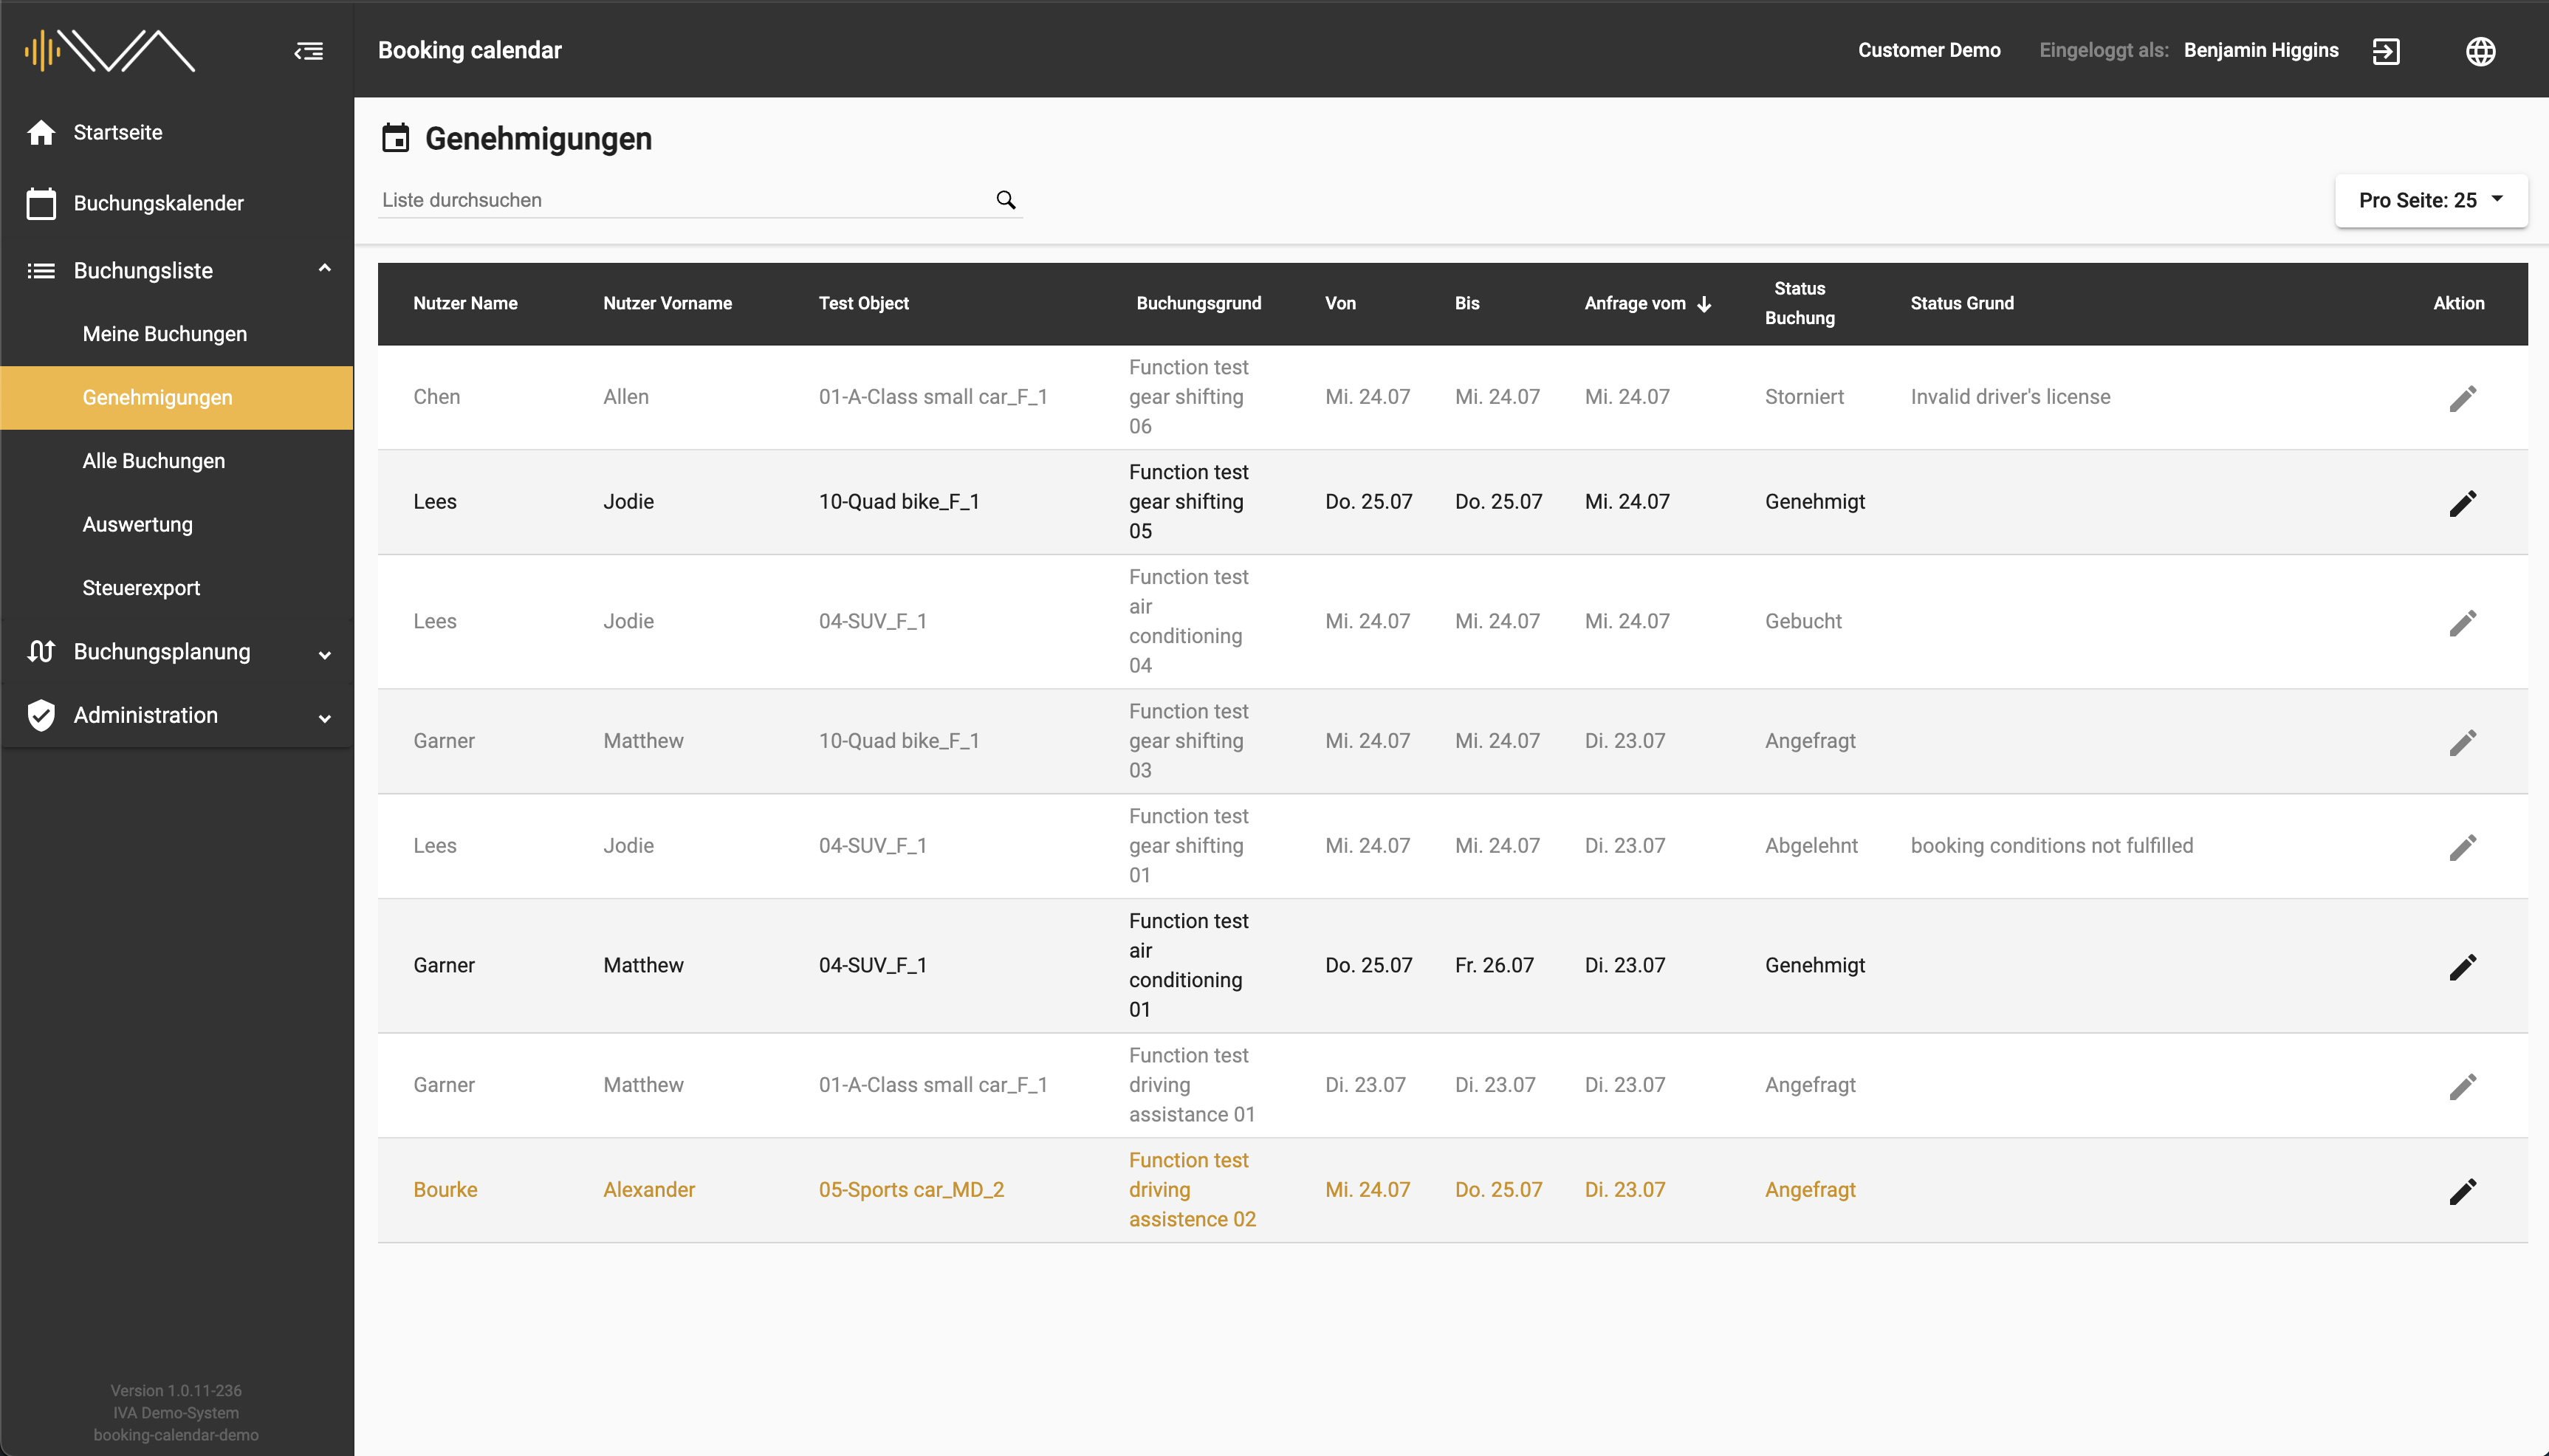
To approve a booking, please click on the “pencil” icon. A separate pop-up will open: “Approve booking”. Here you can approve the booking and optionally enter the reason for approval.
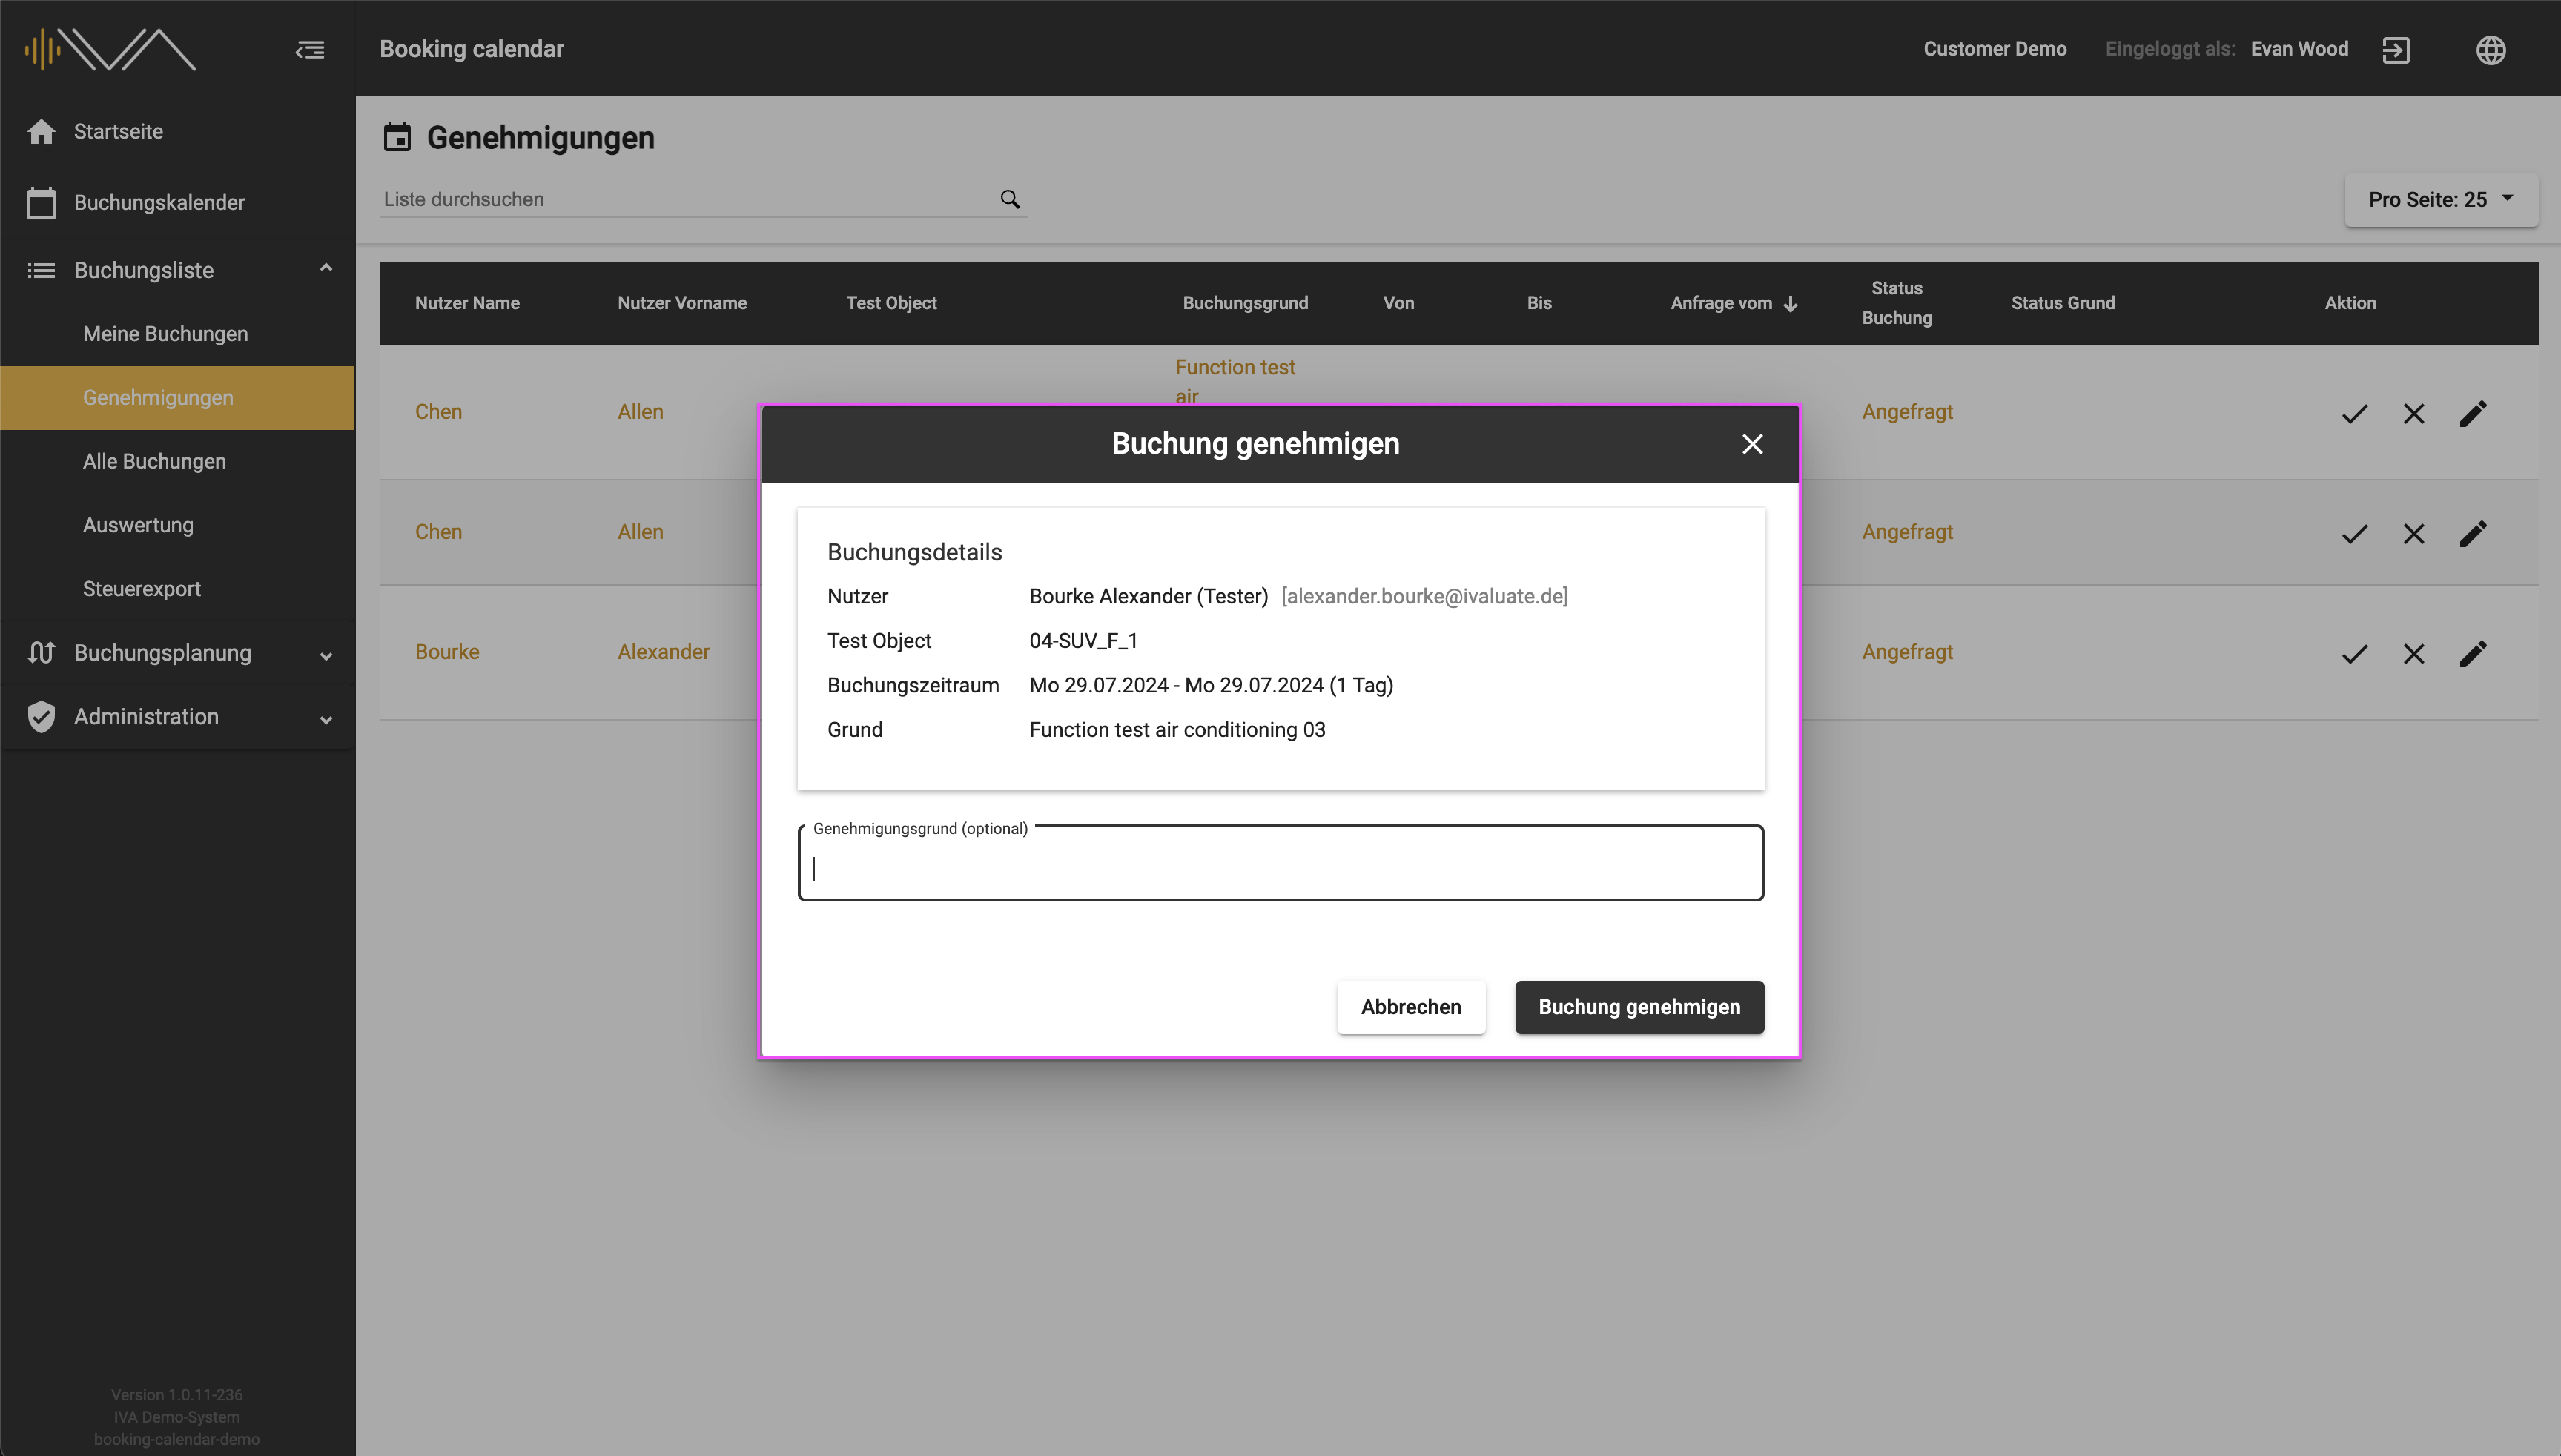
The booking is approved by clicking on the “Approve booking” button.
3.3. All bookings
Here you can see all the bookings that have been requested in this division. The various statuses can be viewed under the “Booking status” column. Here you can subsequently enter the value of the “kilometers driven” and edit the reason for a blocking booking.
On the far right is the column: “To test”. If a drive has been approved, the column is filled with a “Car” icon. Clicking on the icon takes you to the corresponding test, i.e. a new tab opens in the tester web application.
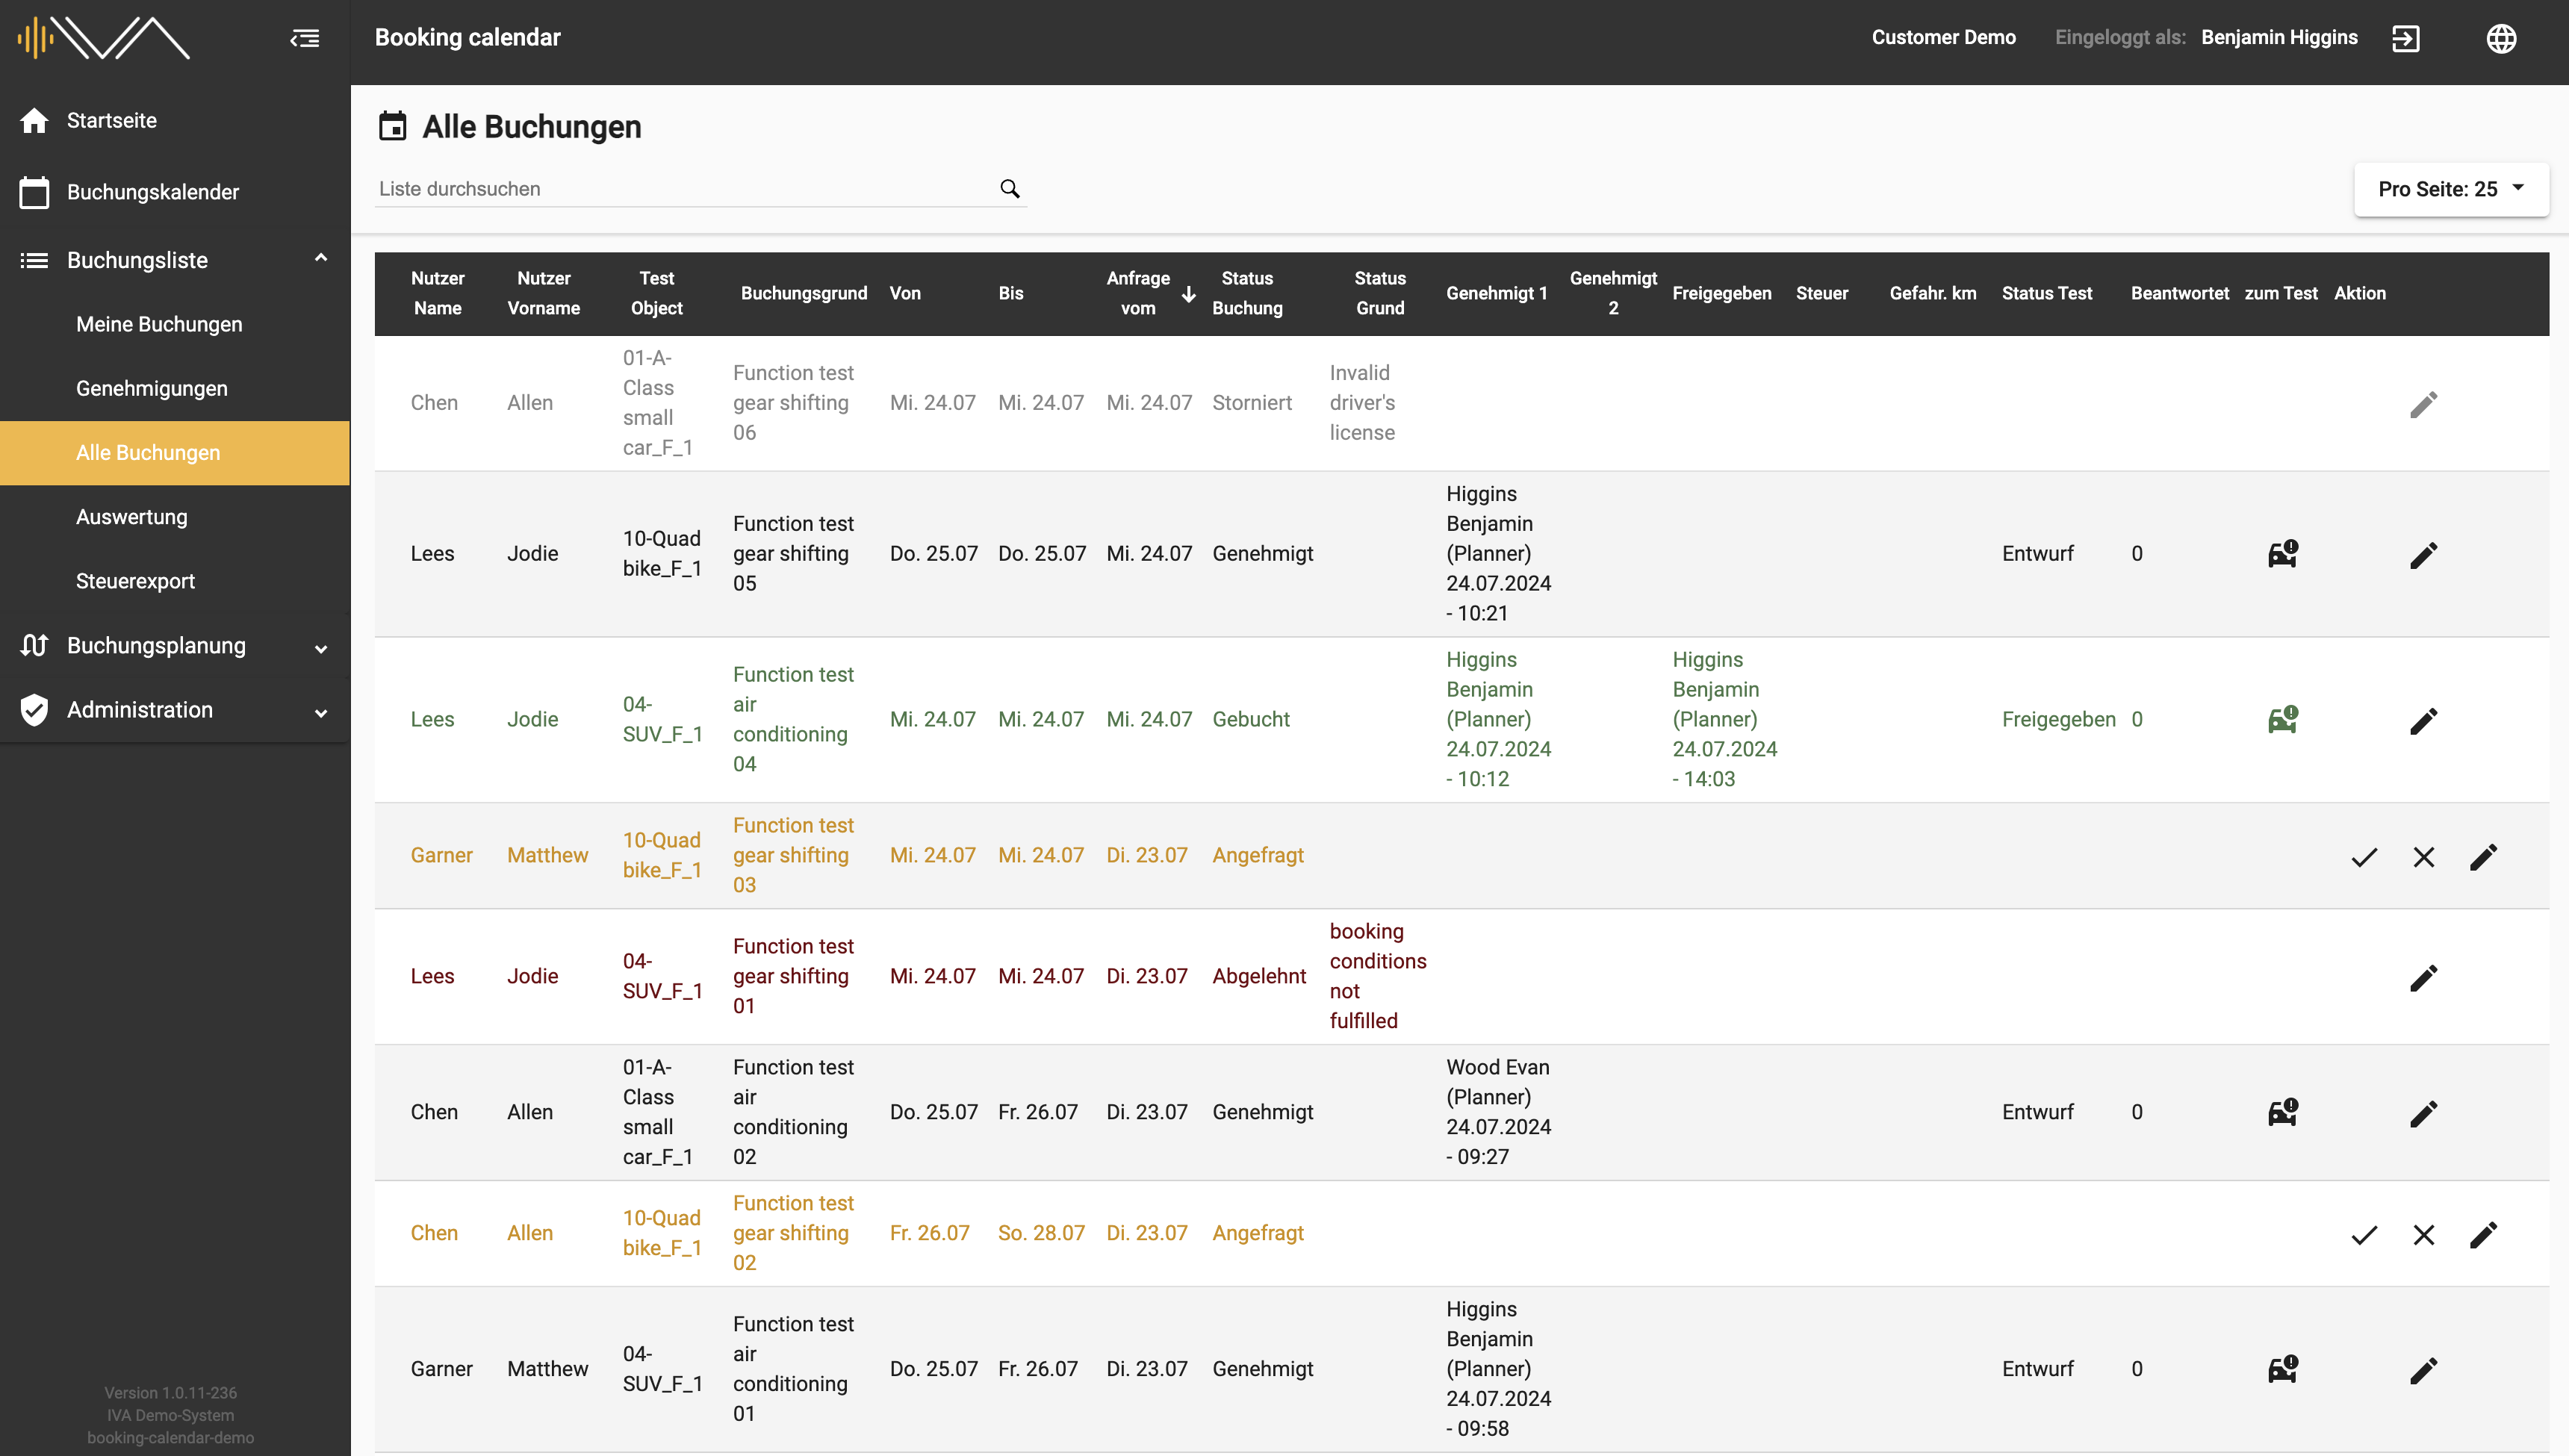
The “Status test” and “Finished” columns can be sorted.
3.5. Tax export
Here you can create a monthly export if the “Tax” column is filled in under the “All bookings” menu item and values are entered in the “Kilometers driven” column.
Simply select a month and the corresponding year and click on the “Create export” button at the bottom right. An Excel file will now be generated and downloaded.
If errors are found, a manual change must be made in the corresponding line under “All bookings”.
4. Booking planning
Planning for 4.1. vehicles and 4.2. questionnaires/-series can be performed in the booking planning.
4.1. Test objects
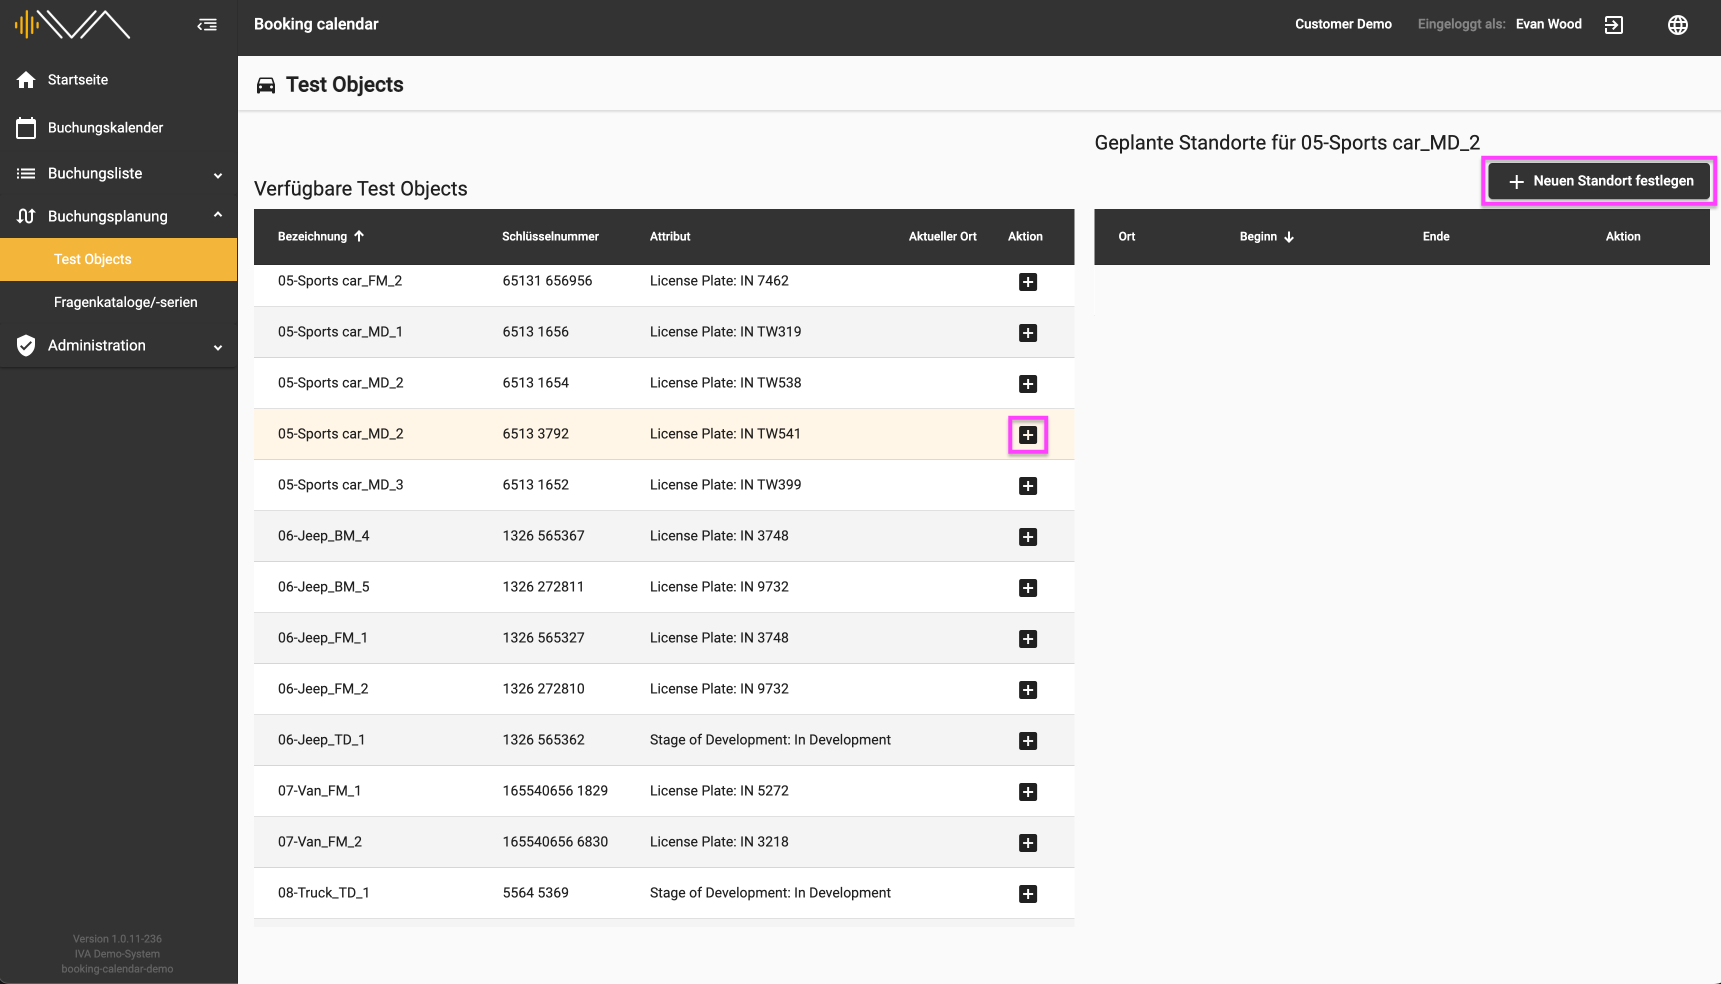
If you click on a row with a test object, the tile is colored light yellow and you can perform an action by clicking on the “+” icon or by clicking on the “+ Set new location” button at the top right. A new window then appears in which you can assign the “Location” and the “Start” and “End date” to the corresponding vehicle.
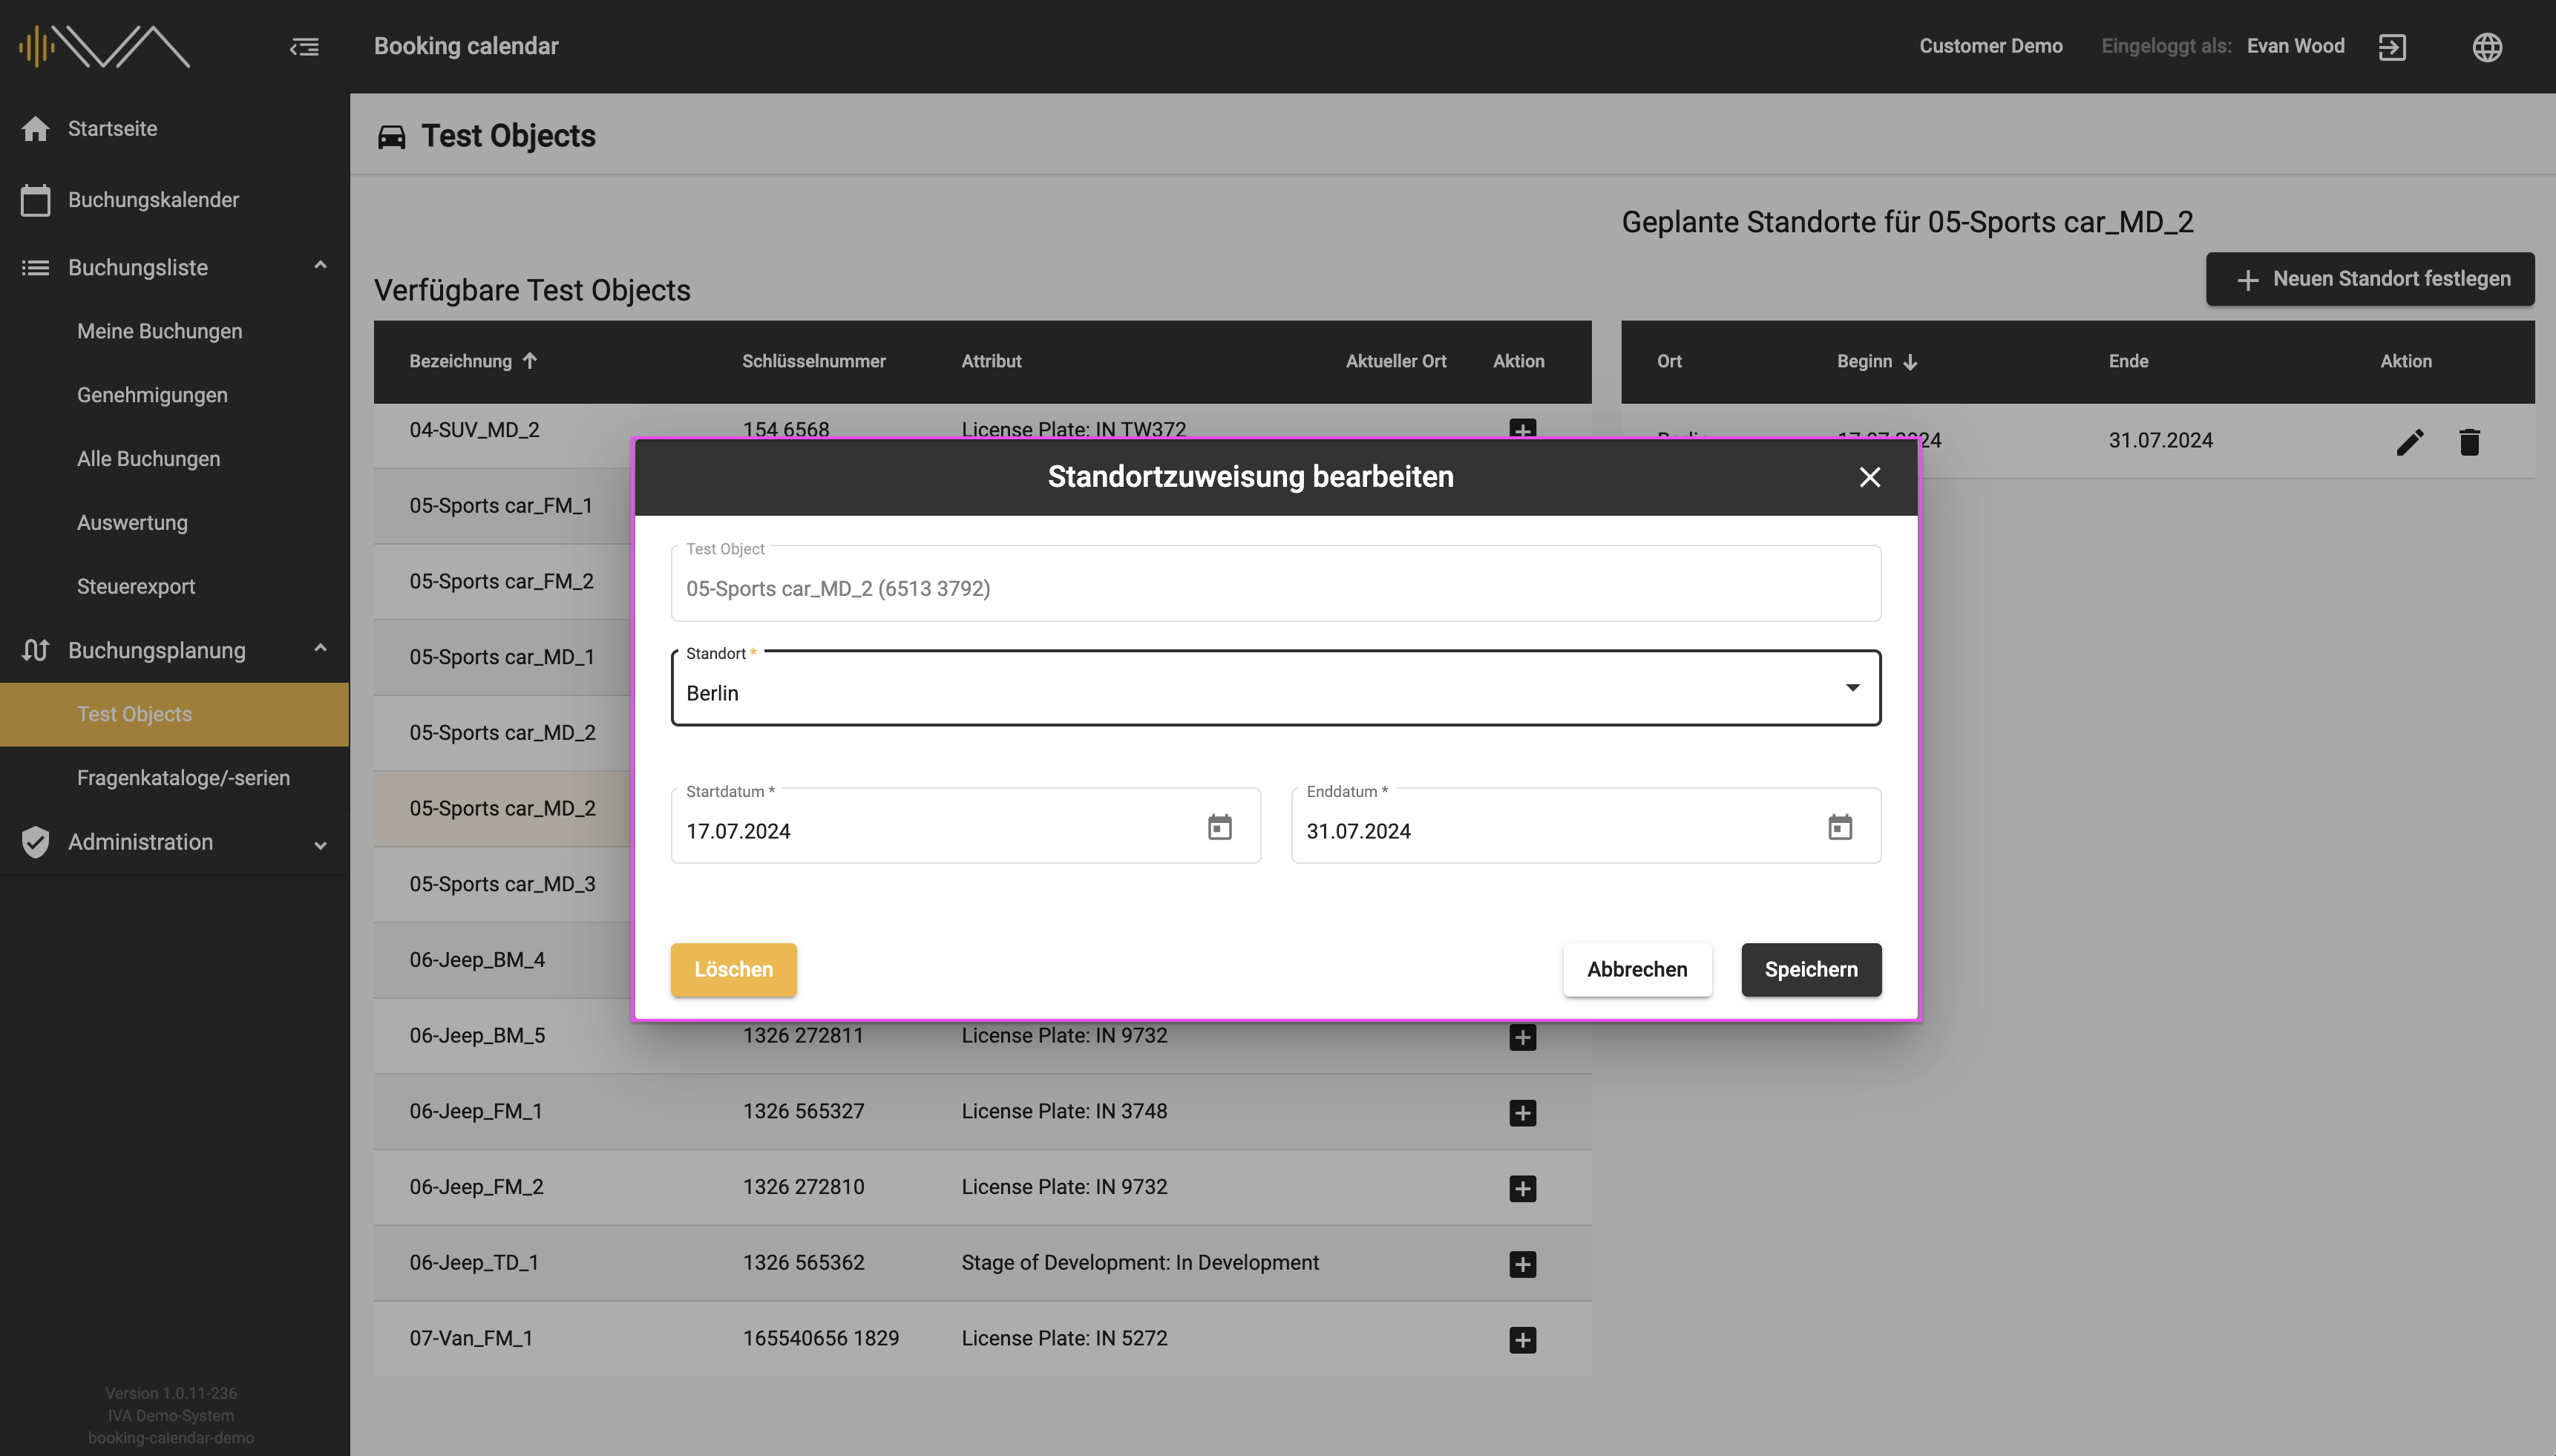
A new row then appears with the location, start and end dates, which you can edit or delete.
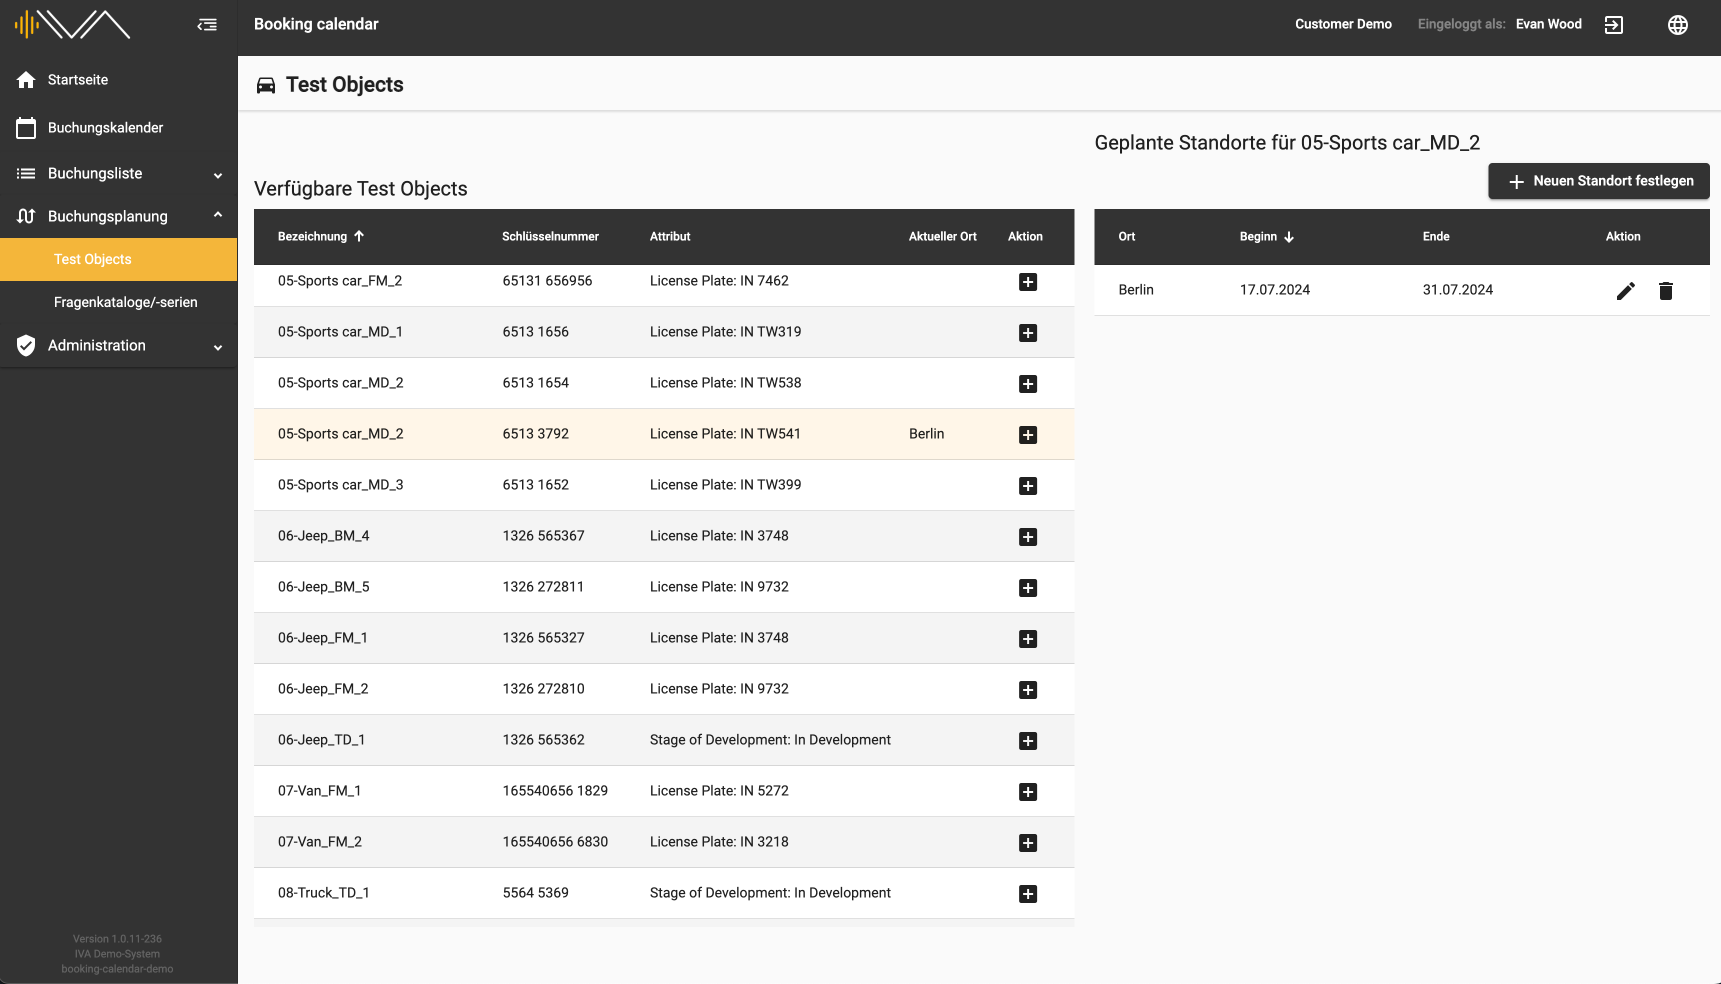
This allows you to assign “Planned locations” to each vehicle individually. These locations are automatically assigned in the booking calendar when creating a booking.
4.2. Questionnaires
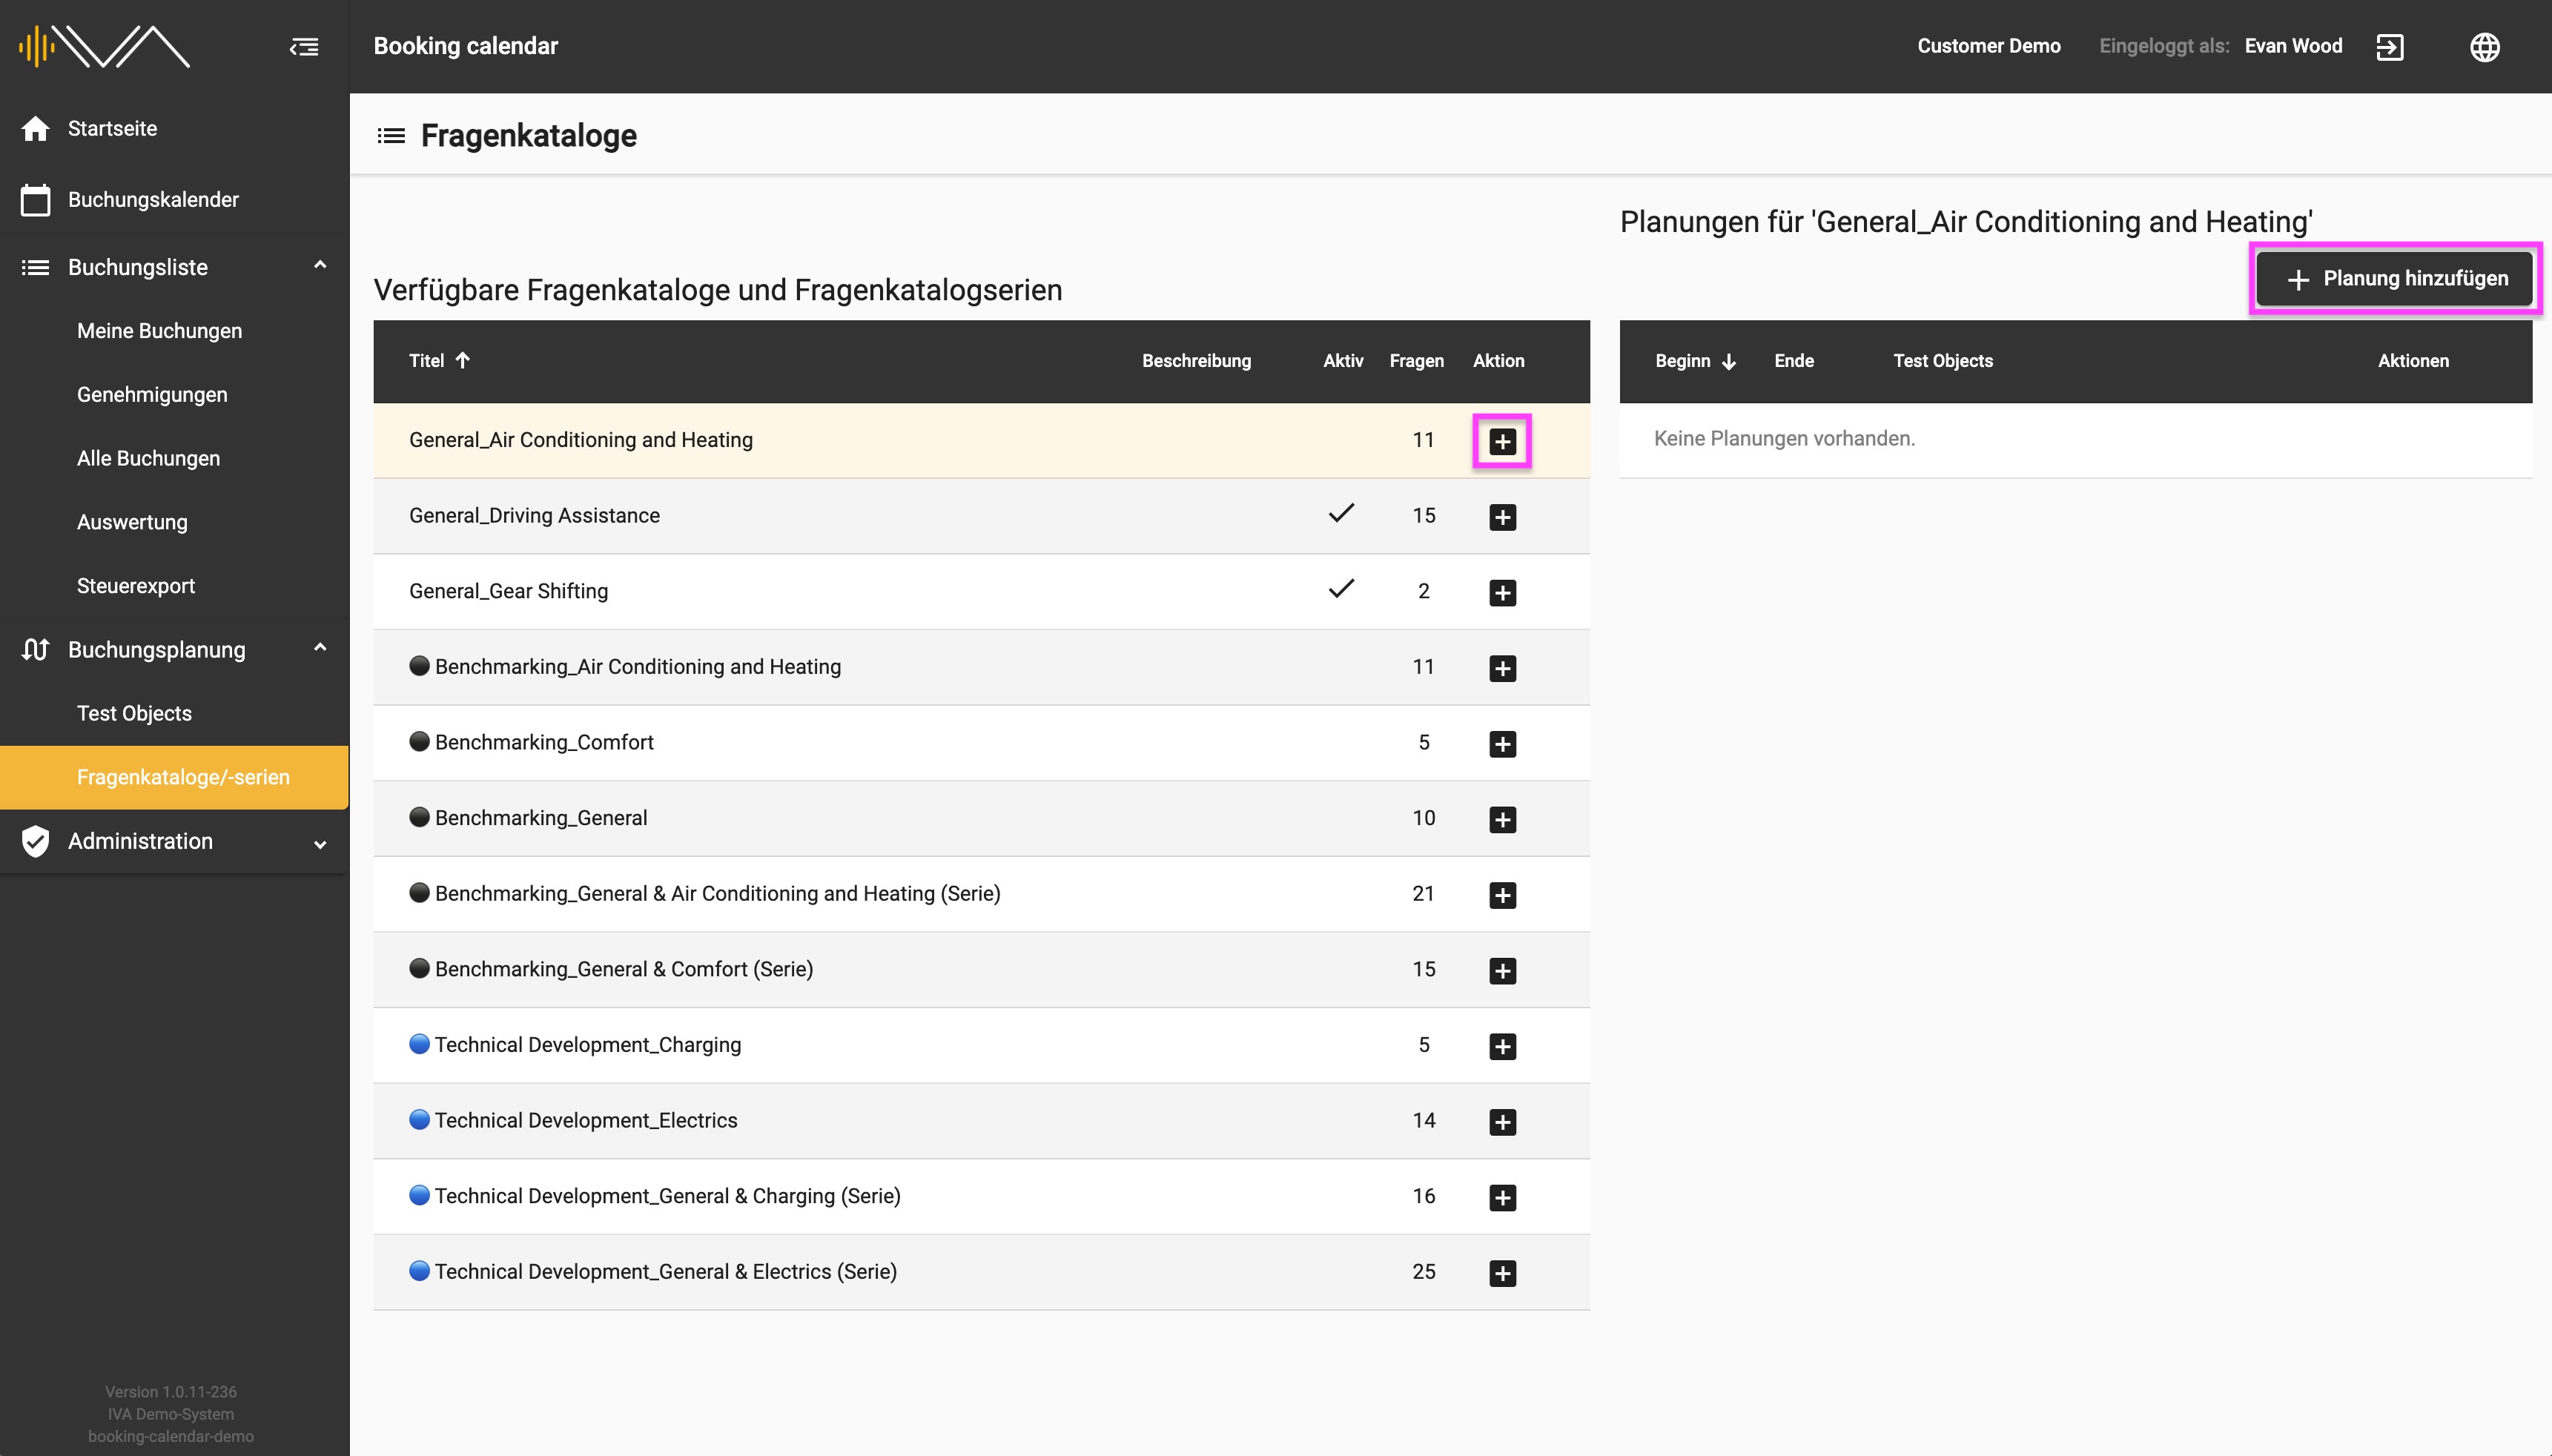
If you click on a row of the questionnaire/questionnaire series, the tile is colored light yellow and you can perform an action by clicking on the "+" icon or by clicking on the "+ Add planning" button at the top right.
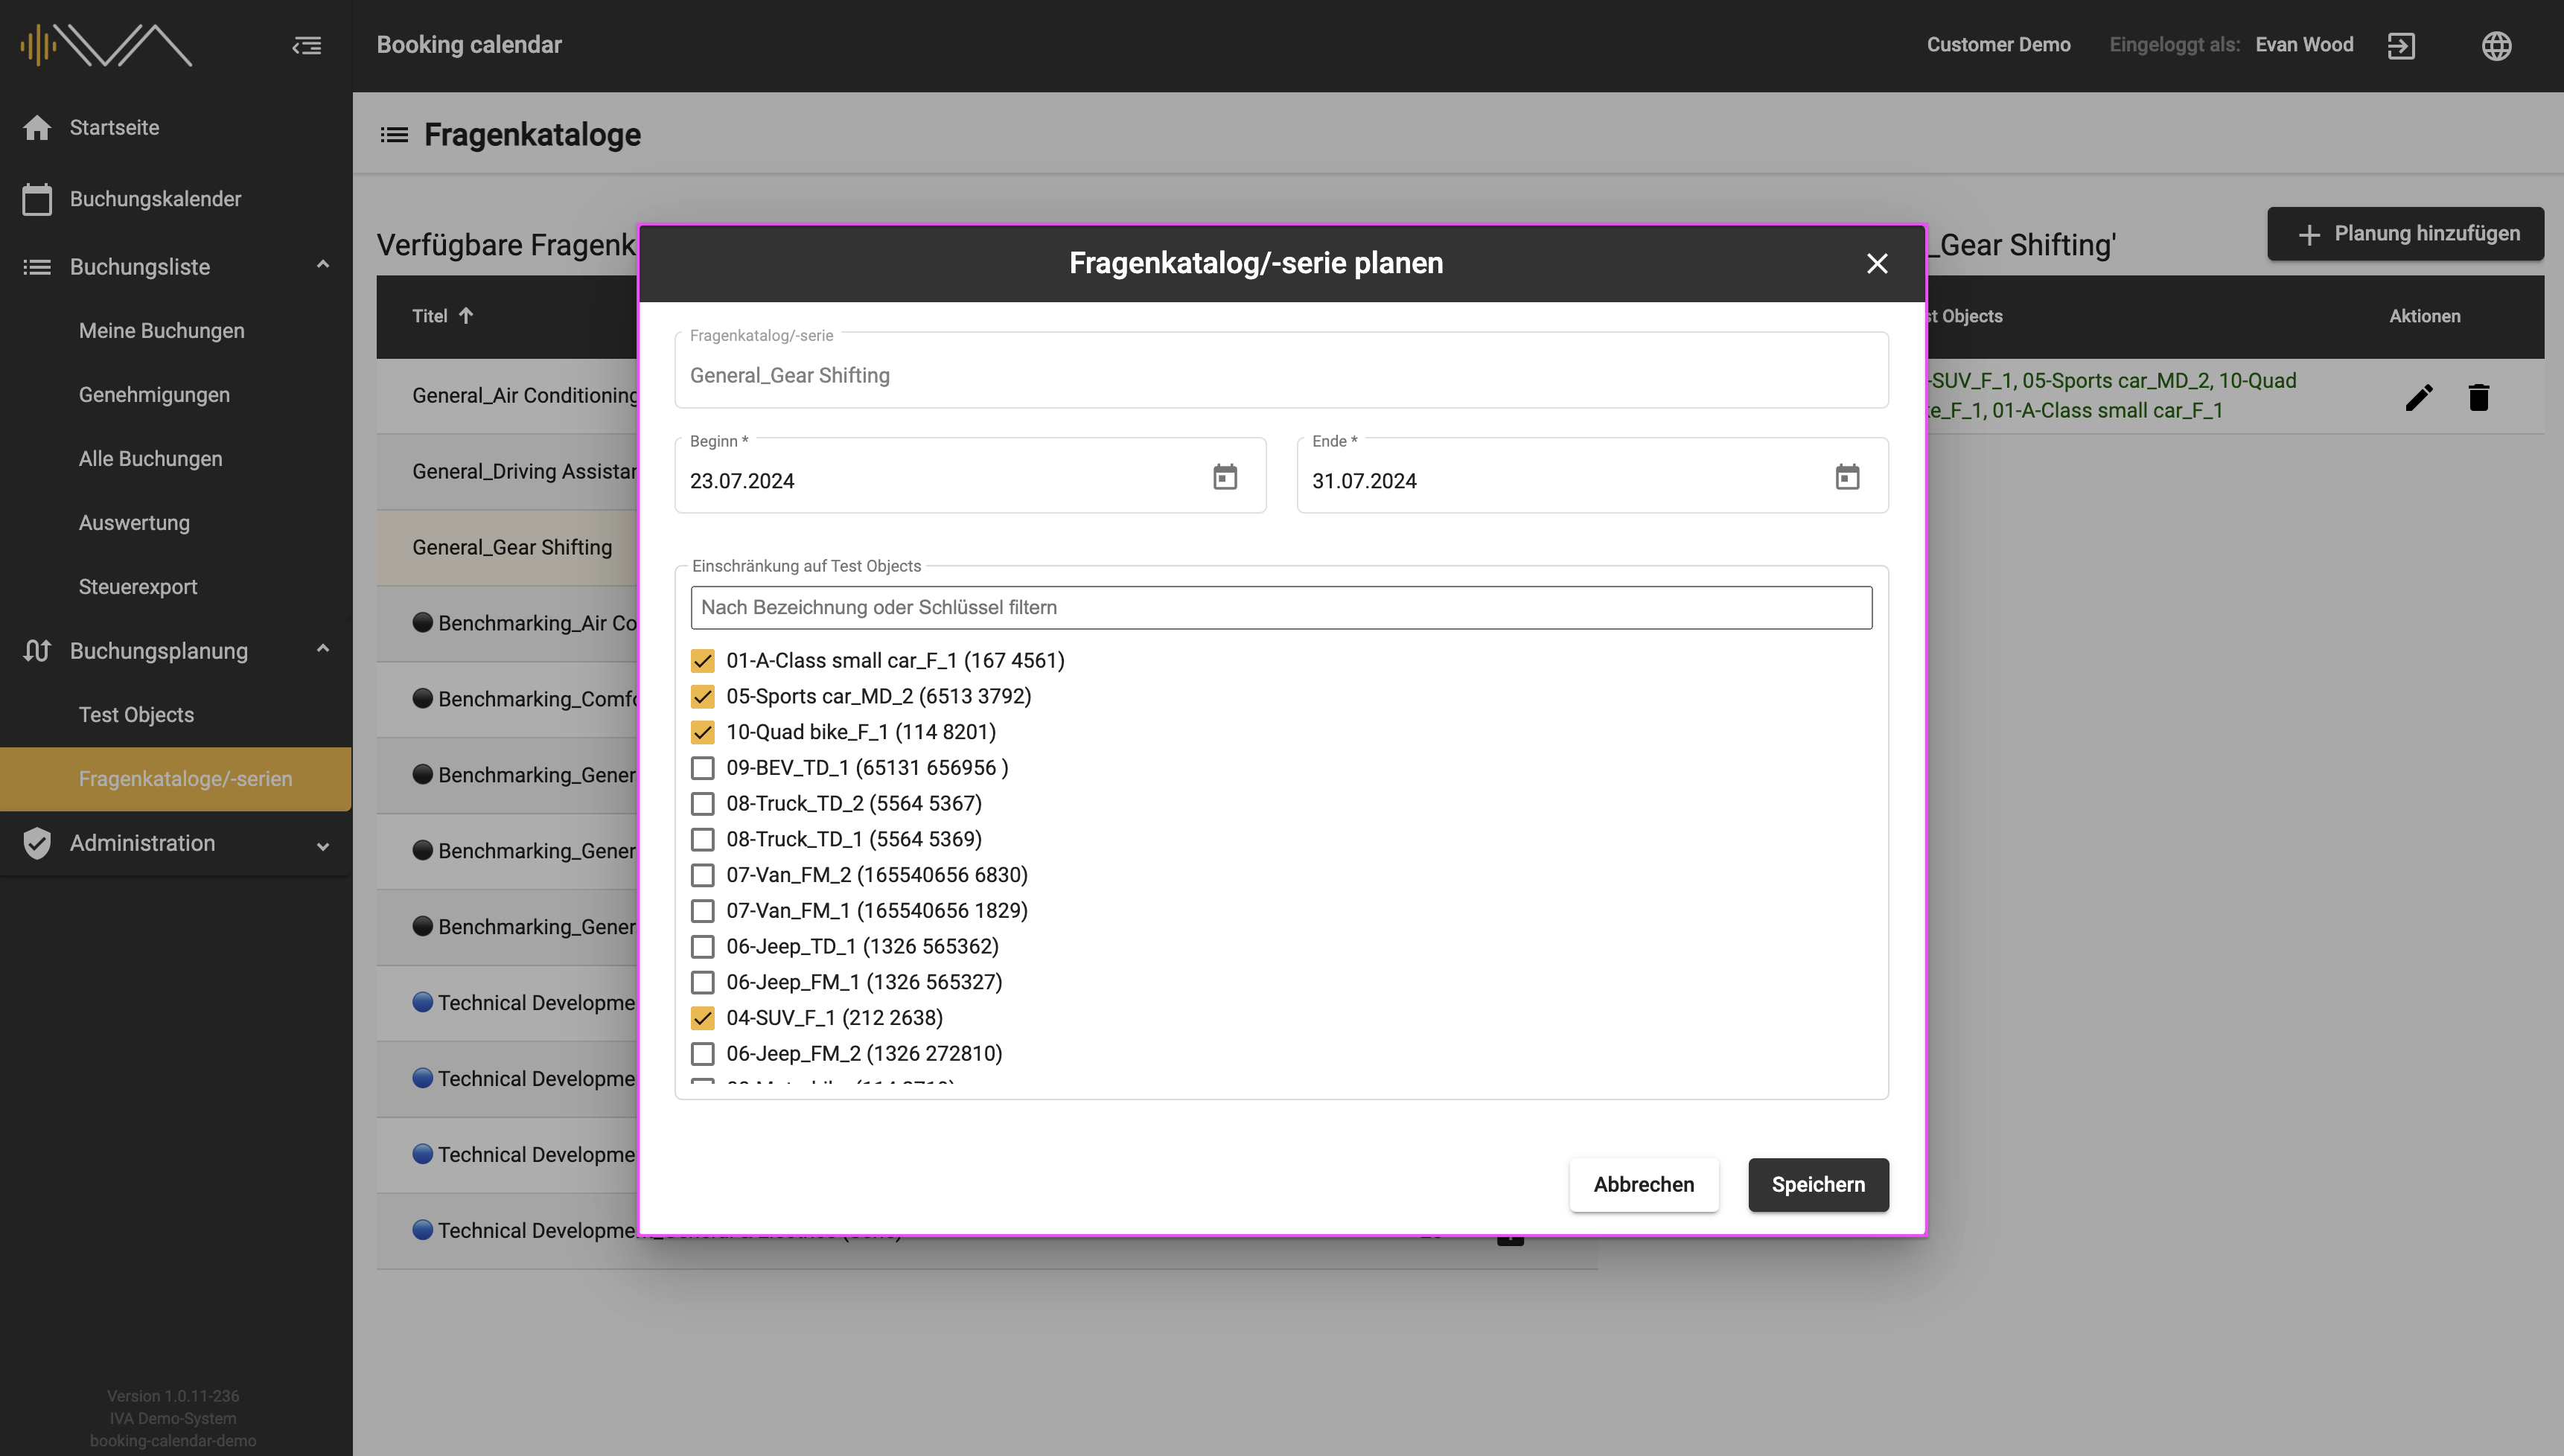
A new window then appears in which you can assign the “Start date” and “End date” and also the vehicles listed to the corresponding questionnaire. In the list of test objects, you will see the name of the test object, the key value and the first two attributes listed in brackets.
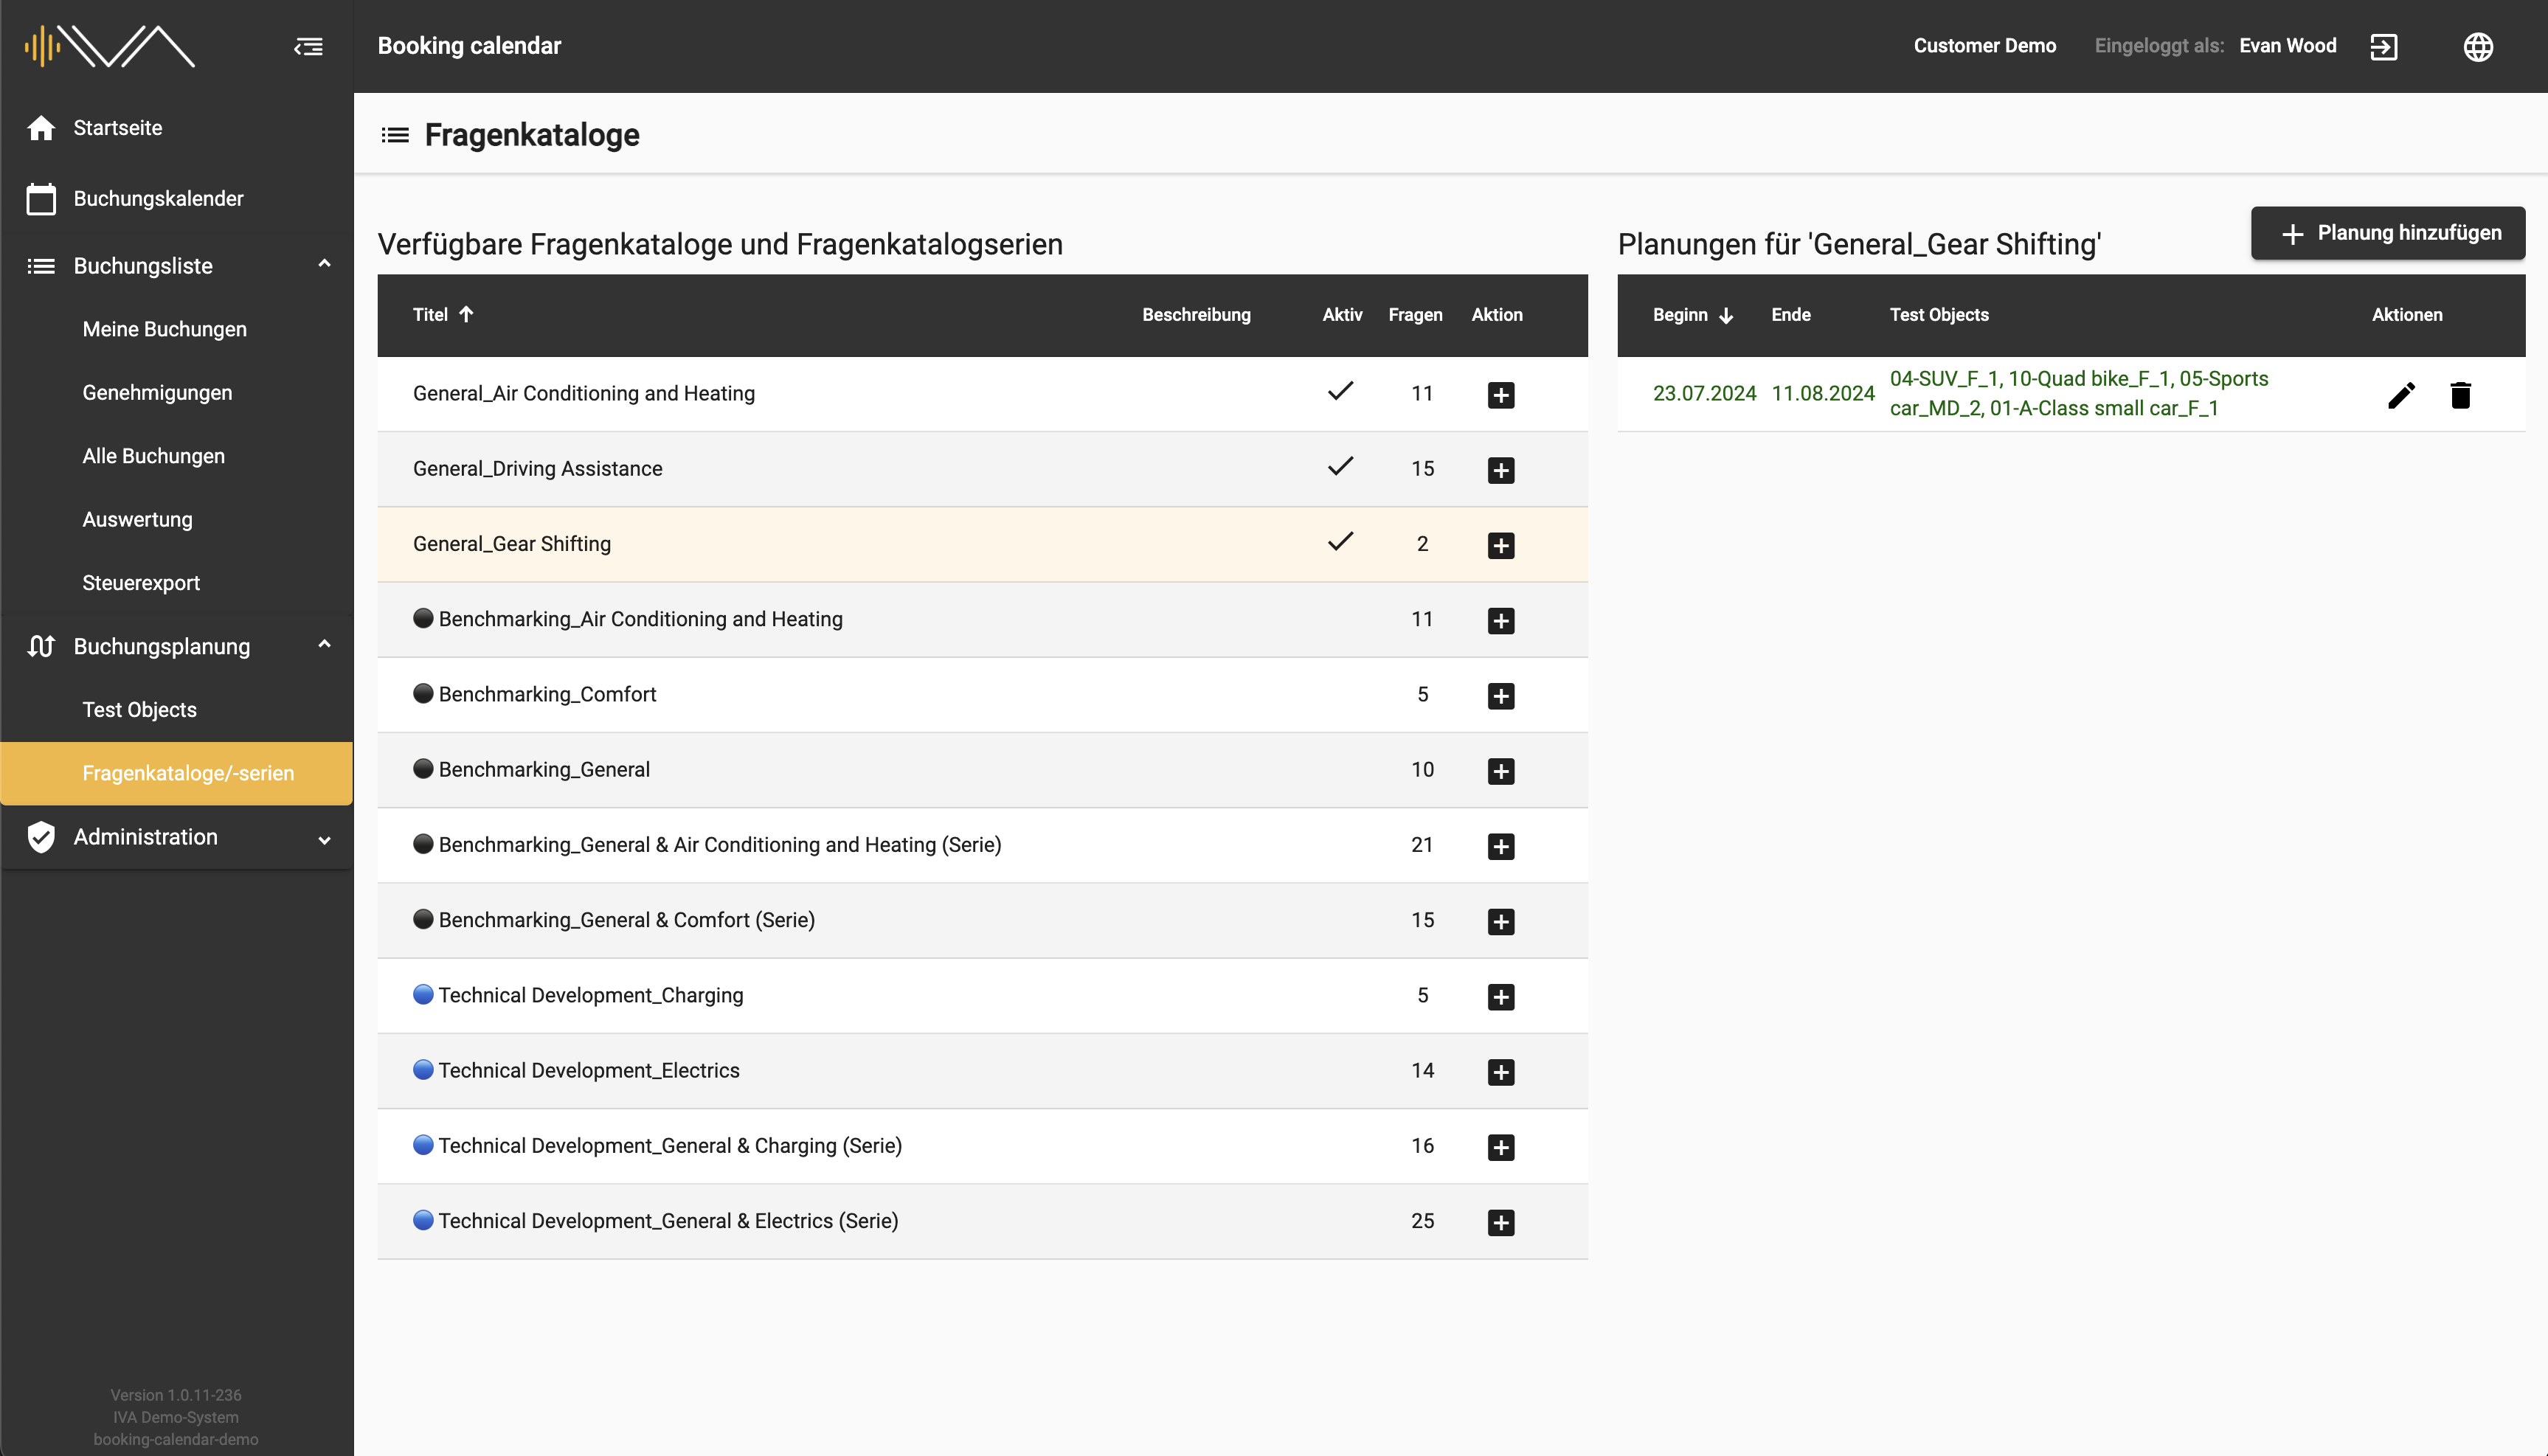
A new line then appears with the start, end and vehicles, which you can edit or delete.
This allows you to assign individual “ Planning” to each question catalog. These plans are automatically assigned to the corresponding vehicle in the corresponding period and answered by the tester.