Data pool
In the data pool, test objects, questions and instructions are stored per area and can be used in different tests.
- Test objects
- What is a test object?
- How do I create a new test object?
- How do I edit an existing test object?
- How do I delete an existing test object?
- Questions
- How do I create a new question?
- How do I edit an existing question?
- How do I delete an existing question?
- Instructions
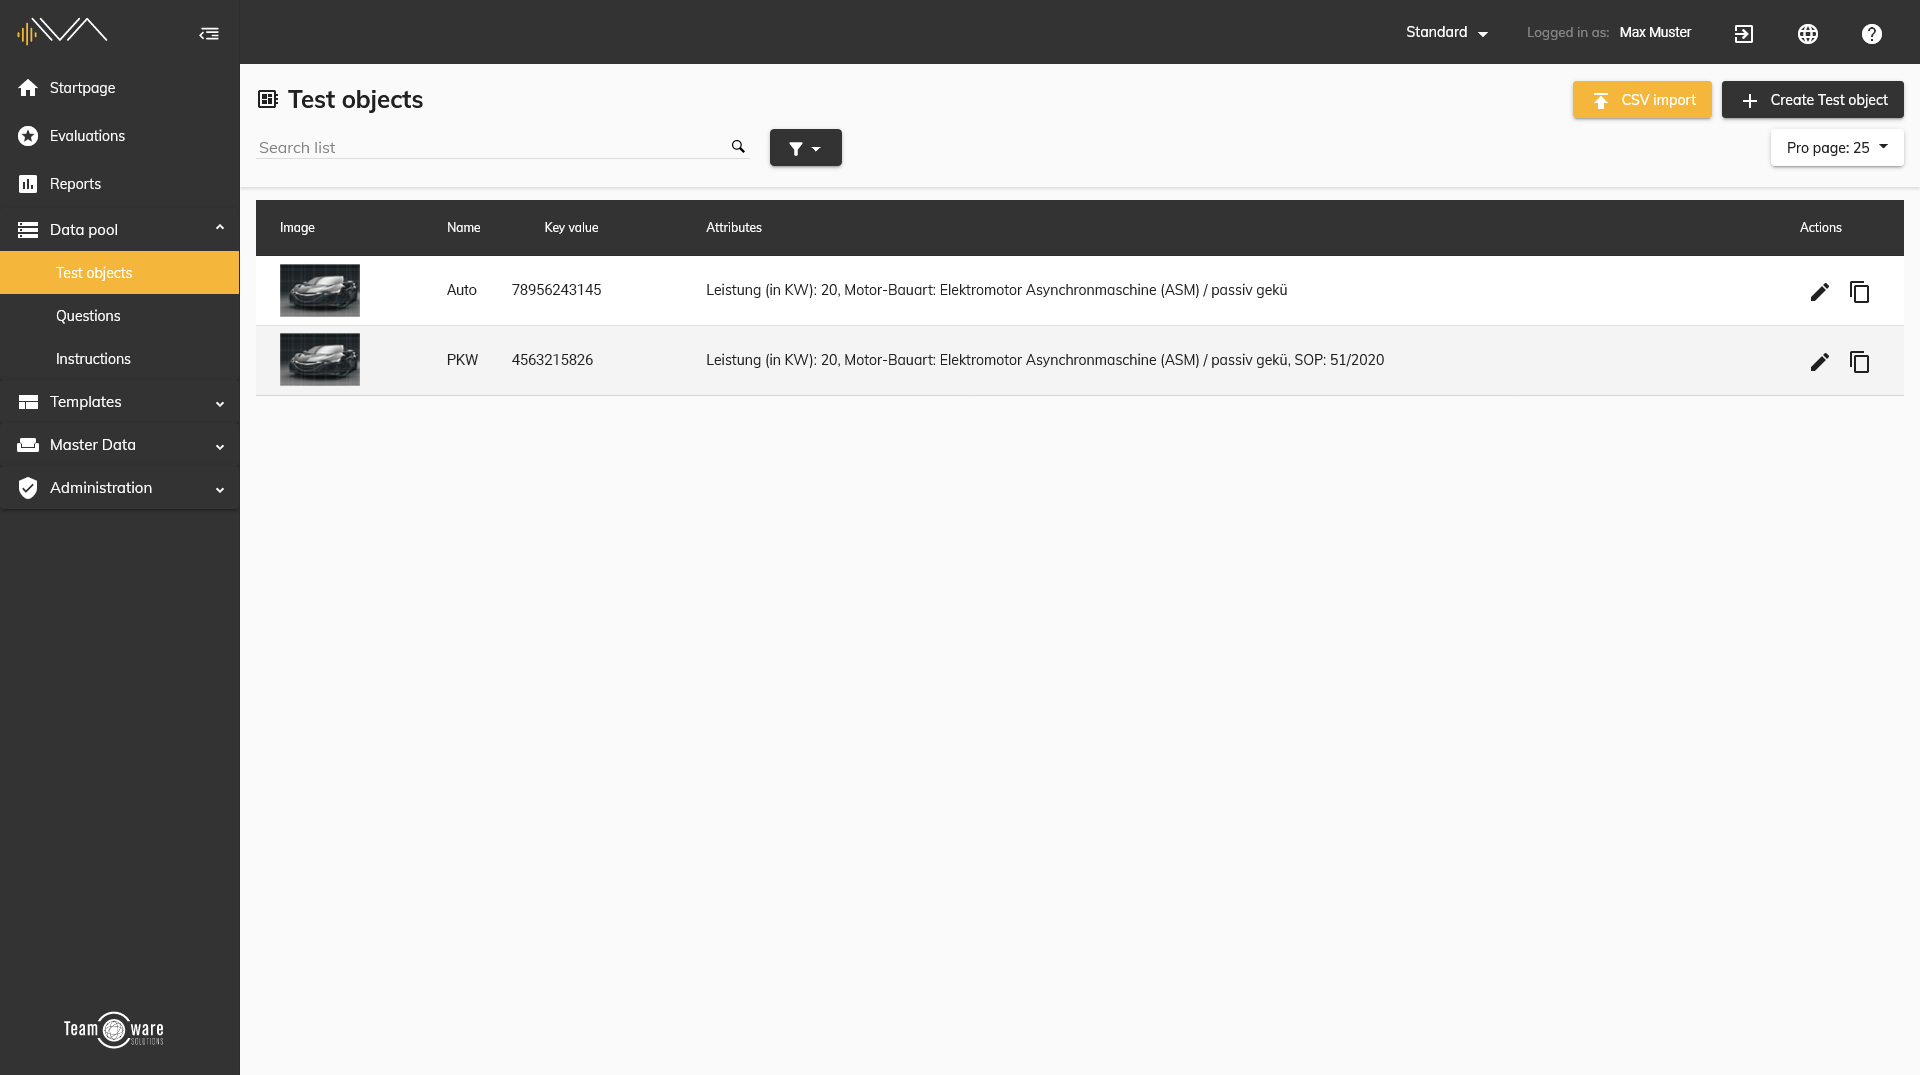
Test objects
Test objects are the central building block around which everything in IVA revolves. The term can be adapted to your language use and you can, for example, speak of "vehicles", "topics" or "products".
What is a test object?
Test objects are the central building block around which everything in IVA revolves.
The term can be adapted to your linguistic usage and you can speak of 'vehicles', 'topics' or 'products', for example.
Test objects can be created and edited not only in the data pool, but also when creating or editing an evaluation or test. All created test objects are stored and displayed in the data pool.
The tests in your evaluations refer to selected test objects. A test object can be assigned to several different evaluations and tests at the same time. It is important to note that multiple uses always refer to the same test object. The data and attributes for a test object that have been edited within a test therefore also change in the data pool and all other tests to which the test object is assigned.
How do I create a new test object?
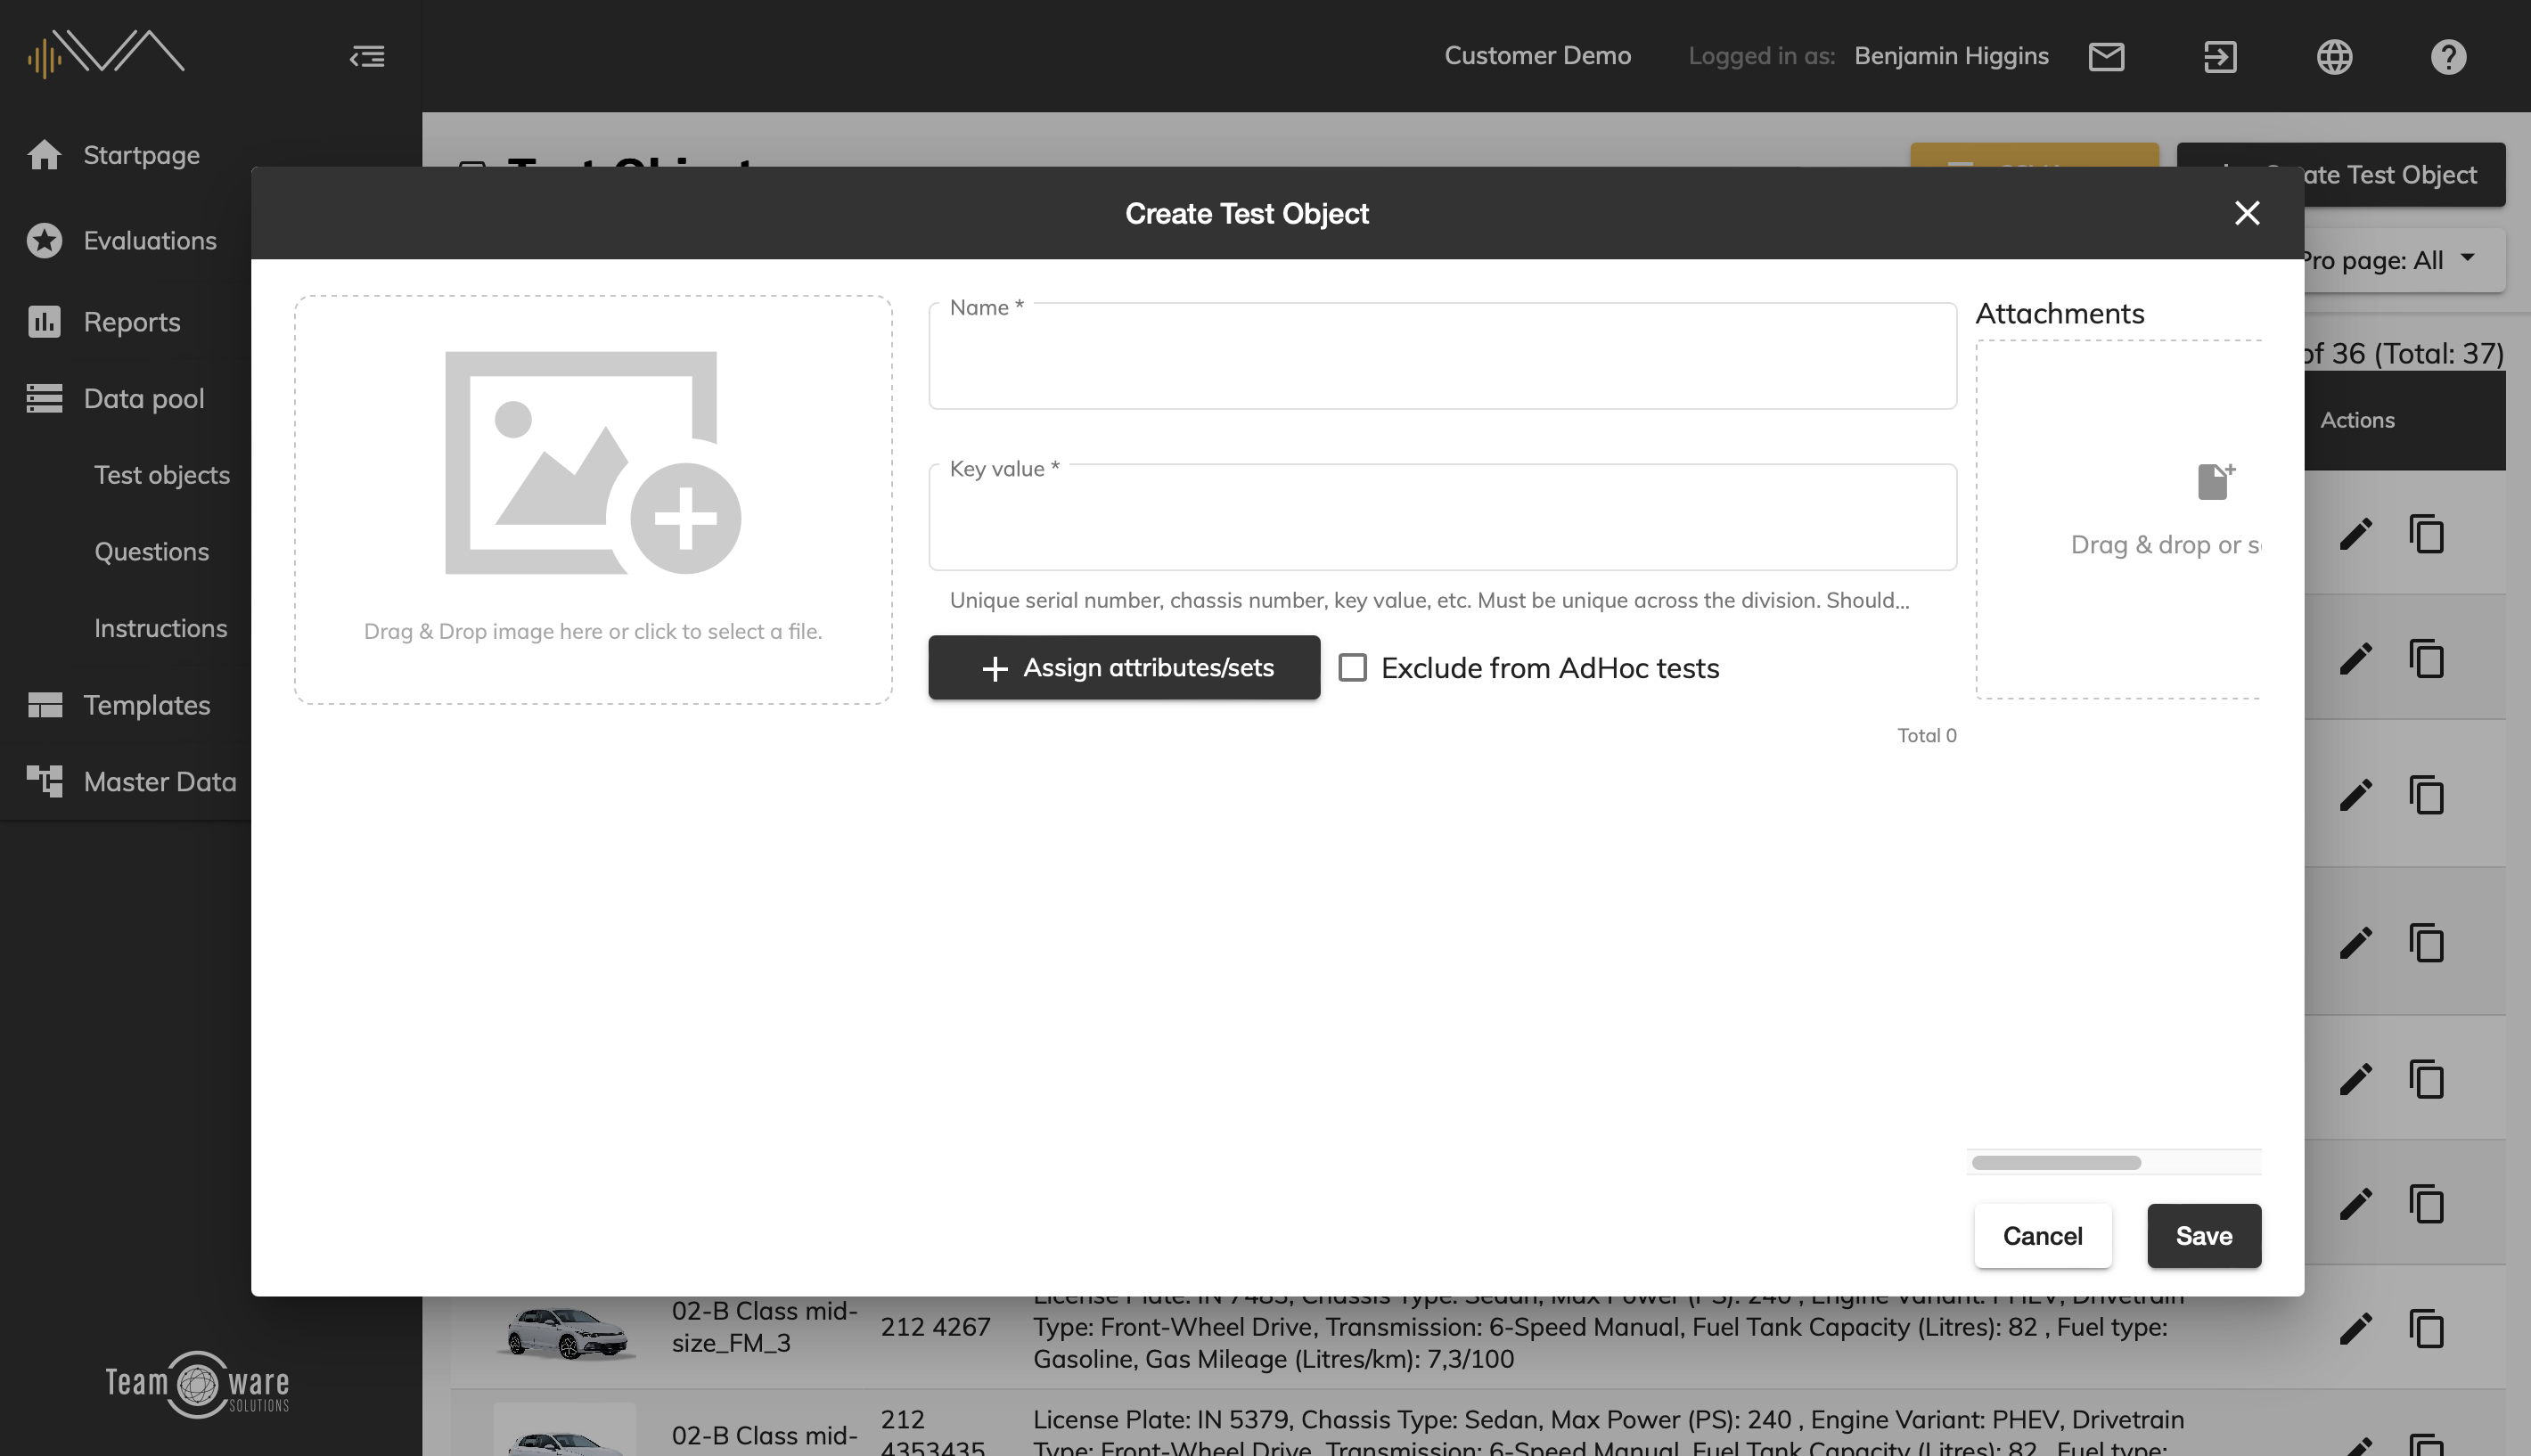
Name (mandatory field): enter an easily recognizable designation for the test object here. This entry will be locked as soon as the test object is in use. Examples: A4 Avant, MacBook Pro 13 inch, etc.
Key value (mandatory field): Enter a specific key number here that uniquely identifies the test object for this area. This can be a serial number, chassis number or similar. This entry will be locked as soon as the test object is in use.
Add image (optional): You can add a photo for the new test object. To do so, simply drag and drop the image file onto the designated area or click the area to select a file from your device. Supported file formats: JFIF, JPEG, JPG, PJPEG, PJP, PNG, GIF, SVG.
Attach PDF (optional): If needed, you can upload a PDF document with more detailed specifications about the current test object. To do so, simply drag and drop the PDF file onto the marked field or click the area to select a file on your device.
Add Attributes (optional): When you click on the "Assign attributes/sets..." button, another pop-up dialog opens, which is divided into two columns. In the left column you can search through the attributes and attribute sets that have already been created for the current division. To add an instruction or a set to the test object, drag&drop it to the right side or double-click it. The selected statements are now listed on the right side under "Selected Attributes". If you would like to remove a selected attribute, click on the red cross to the right of the corresponding attribute. As soon as you are satisfied with your selection, you can save your entry by clicking on the "Apply" button.
You can also create a new attribute. To do this, click the "+ Create new attribute" button. Another pop-up dialog opens. Enter a unique name, a description and the type for the new attribute. The following types are available: text, number, drop-down list, value list, active/inactive, calendar-week and date. Decide whether or not you want to hide the new attribute in the web tester and app. Then click on the "Save" button to create the attribute in the master data and add it to your test object.
Then the selected attributes will appear listed one below the other and you can enter a value for the current test object depending on the type of attribute.
Exclude from AdHoc tests (optional): Check this box if you want to exclude the new test object from being used for AdHoc-tests. Test objects blocked in this way are still visible to testers in lists but cannot be selected for AdHoc-tests. Blocked test objects are marked with a block-symbol in the iOS-App.
Don't forget to click "Save" afterwards.
How do I edit an existing test object?
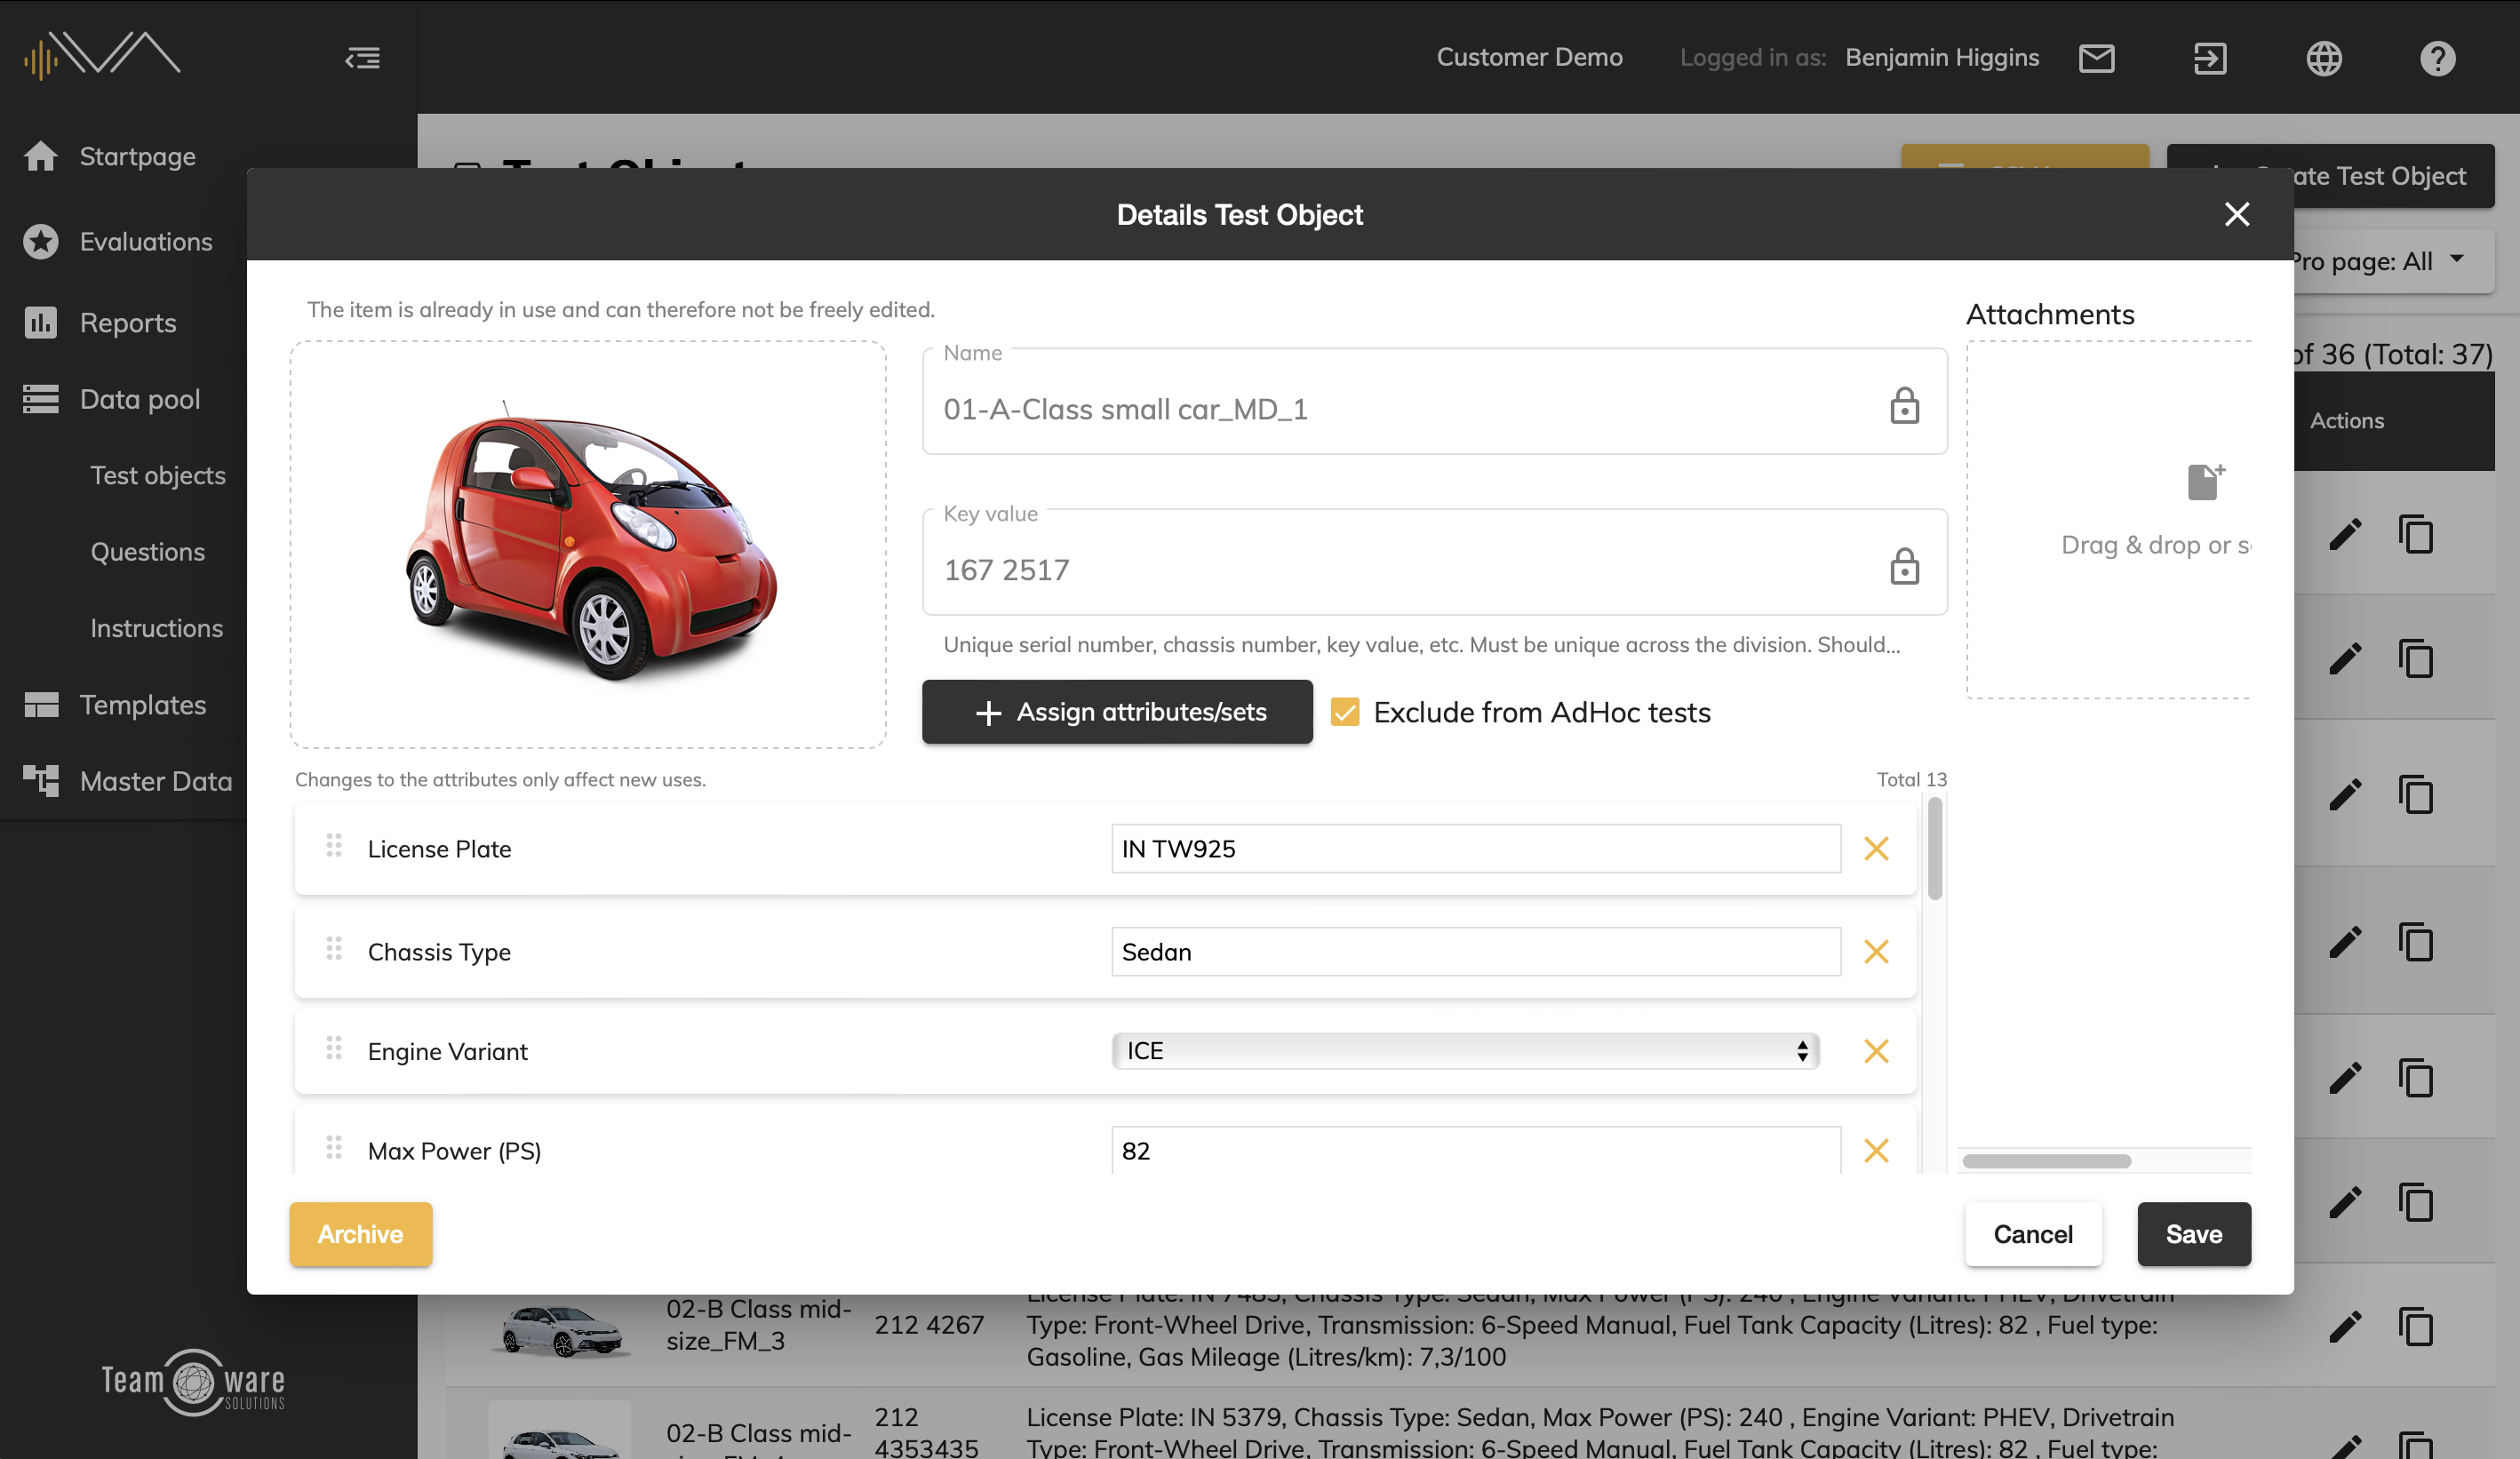
Name (mandatory field): This is an easily recognizable name for the test object. This field can be changed freely without hesitation as long as the test object is not yet used in any evaluations or tests. As soon as the test object is used in one or more evaluations and tests, this field is locked. However, this field can be unlocked and edited again if required by clicking on the lock symbol.
Key value (mandatory field): This is a specific key number that uniquely identifies the test object for this division. This field can be freely changed without hesitation as long as the test object is not yet used in any evaluations or tests. As soon as the test object is used in one or more evaluations and tests, this field is locked. However, this field can be unlocked and edited again if required by clicking on the lock symbol.
Add image (optional): You can add a photo for the test object. To do so, simply drag and drop the image file onto the designated area or click the area to select a file from your device. To remove the current image, hover over the image and click the Red Cross in the upper right corner. Supported file formats: JFIF, JPEG, JPG, PJPEG, PJP, PNG, GIF, SVG
Attach PDF (optional): If required, you can upload a PDF document with more detailed specifications of the current test object. To do so, simply drag and drop the PDF file onto the marked field or click the area to select a file on your device. To remove the current PDF file, hover over the PDF file and click the red cross in the upper right corner.
Add Attributes (optional): When you click on the "Assign attributes/sets..." button, another pop-up dialog opens, which is divided into two columns. In the left column you can search through the attributes and attribute sets that have already been created for the current division. To add an instruction or a set to the test object, drag&drop it to the right side or double-click it. The selected statements are now listed on the right side under "Selected Attributes". If you would like to remove a selected attribute, click on the red cross to the right of the corresponding attribute. As soon as you are satisfied with your selection, you can save your entry by clicking on the "Apply" button.
You can also create a new attribute. To do this, click the "+ Create new attribute" button. Another pop-up dialog opens. Enter a unique name, a description and the type for the new attribute. The following types are available: text, number, drop-down list, value list, active/inactive, calendar-week and date. Decide whether or not you want to hide the new attribute in the web tester and app. Then click on the "Save" button to create the attribute in the master data and add it to your test object.
Then the selected attributes will appear listed one below the other and you can enter and change a value for the current test object depending on the type of attribute. Here, too, you can remove individual attributes by clicking on the cross on the right.
Exclude from AdHoc tests (optional): Check this box if you want to exclude the new test object from being used for AdHoc-tests. Test objects blocked in this way are still visible to testers in lists but cannot be selected for AdHoc-tests. Blocked test objects are marked with a block-symbol in the iOS-App.
How do I delete an existing test object?
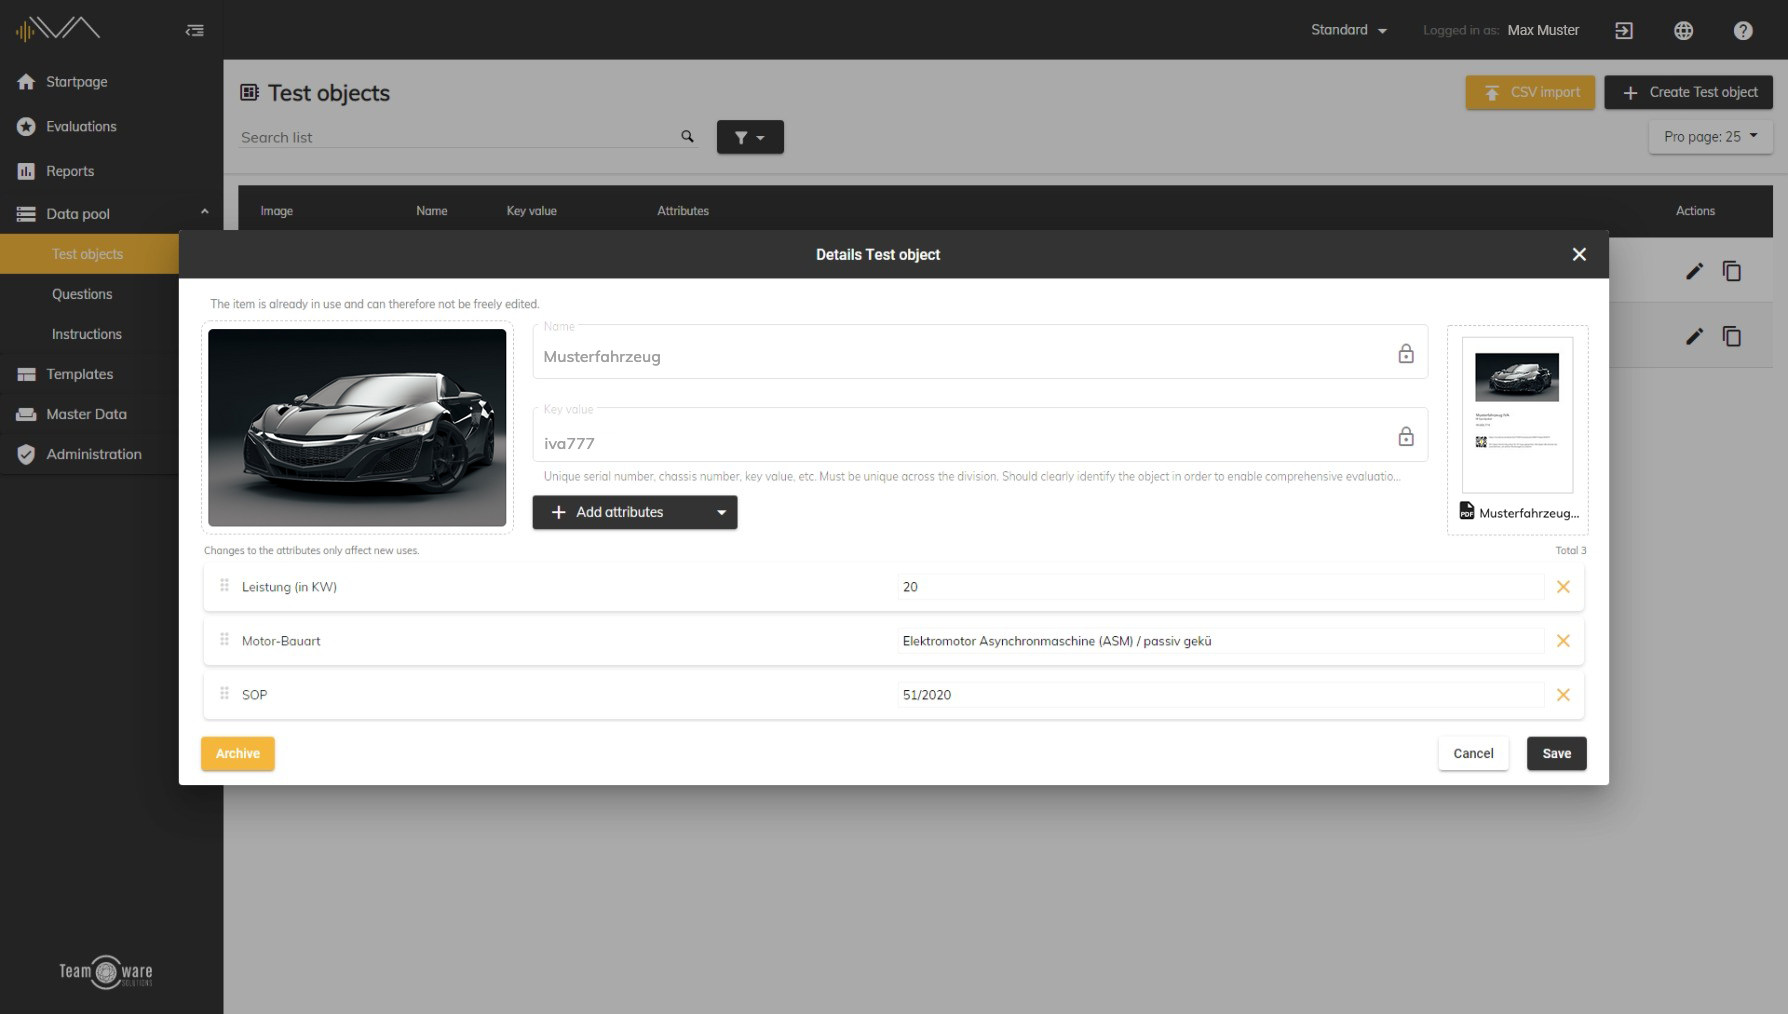
In IVA, test objects can only be deleted as long as they are not used in any tests, otherwise test objects can only be archived.
To delete or archive the test object, click on the "Delete" or "Archive" button at the bottom left of the dialog window. If you have deleted the test object, the button text now changes to "Confirm deletion!" - Click the button again to finally delete the test object. If you have archived the test object, the button text now changes to "Restore".
Questions
How do I create a new question?
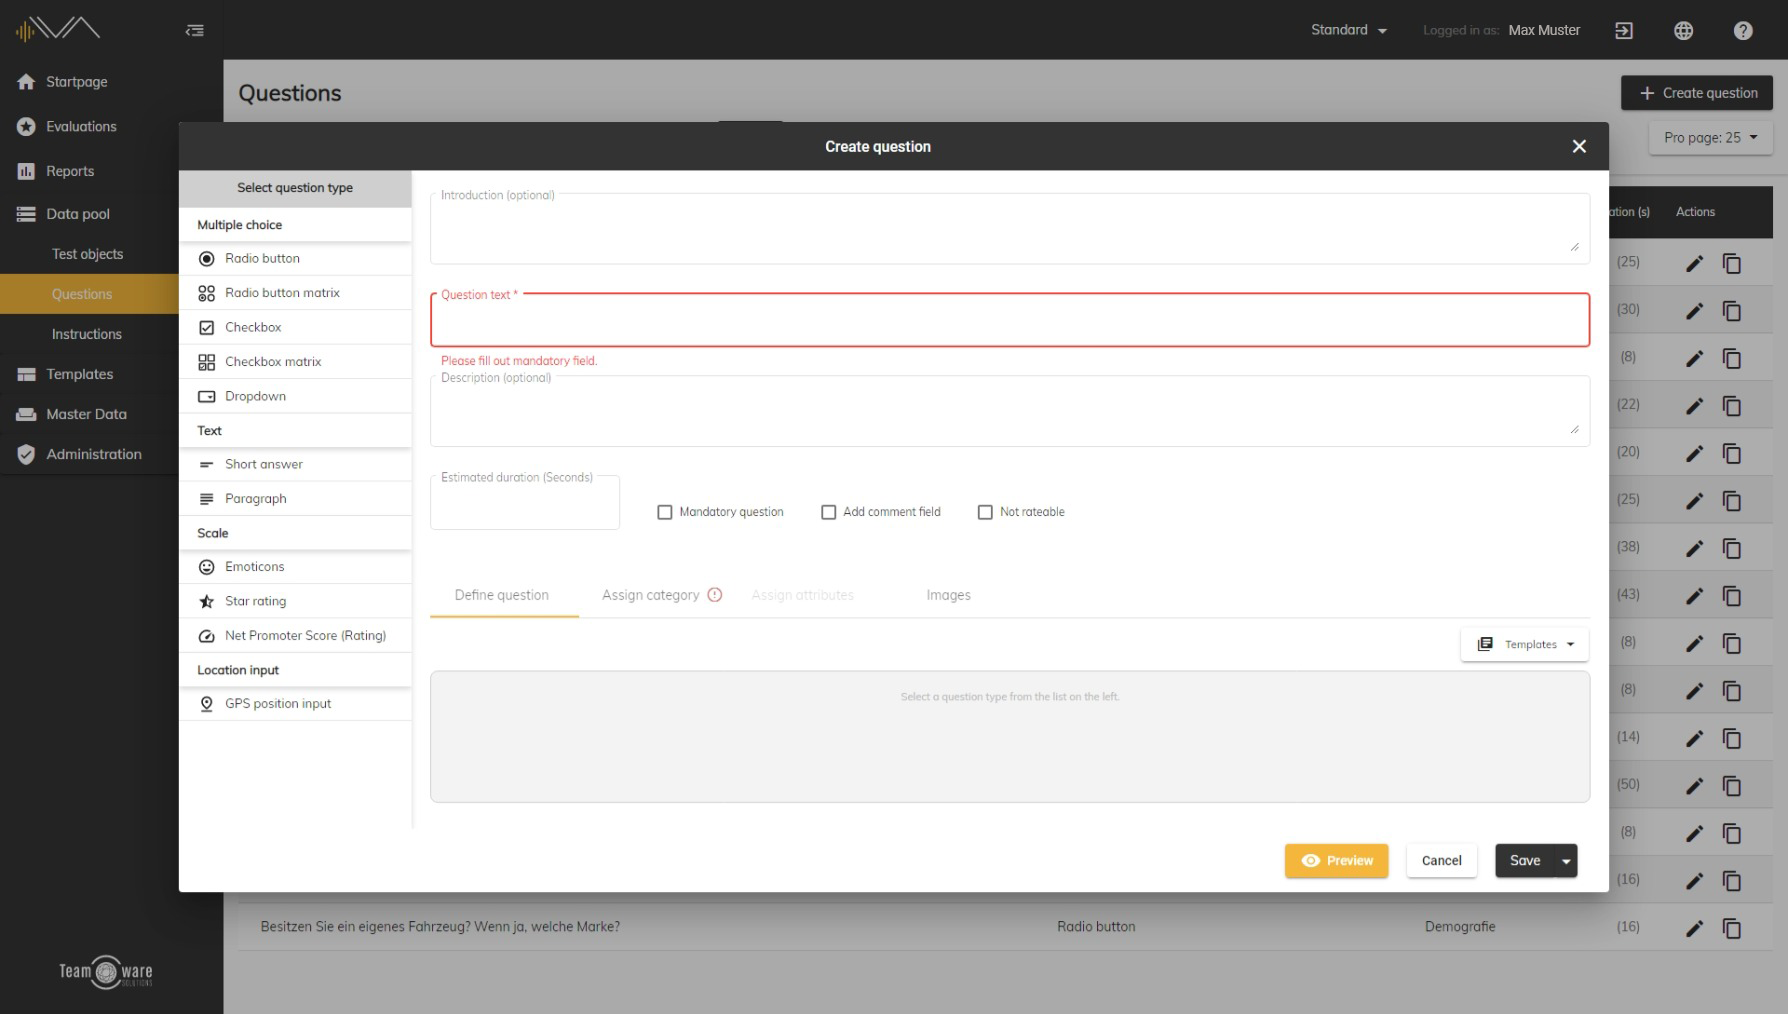
Introduction (optional)
Question text (mandatory field): enter your question here. Example: How do you like the new company structure?
Description (optional): If required, you can add a description text for your question here.
Estimated duration (optional): You can enter an estimated duration for answering the question. Thus, an approximate duration for processing a created questionnaire can be calculated.
Mandatory question (optional): Defines this question as a mandatory question. If one or more mandatory questions are assigned to a question catalog, it can only be sent if these have been answered.
Add comment field (optional): An additional comment field is added to the question. This allows the user to add a comment in addition to the actual answer to the question.
Not rate able: Select this option if you want the tester to be able to mark the question as not rateable.
The 3 tabs
Define question
Here you can define your question in more detail by selecting a question type in the column on the left. A question can only have exactly one question type.
- Multiple choice question types: For these question types, options must be specified in each case, which will be displayed to the tester in the test and between which he must decide. There are the following question types: Radio button, checkbox, radio button matrix, checkbox matrix, dropdown.
- Text question types: A short answer or a paragraph are available. In both cases you can define the minimum and maximum number of characters.
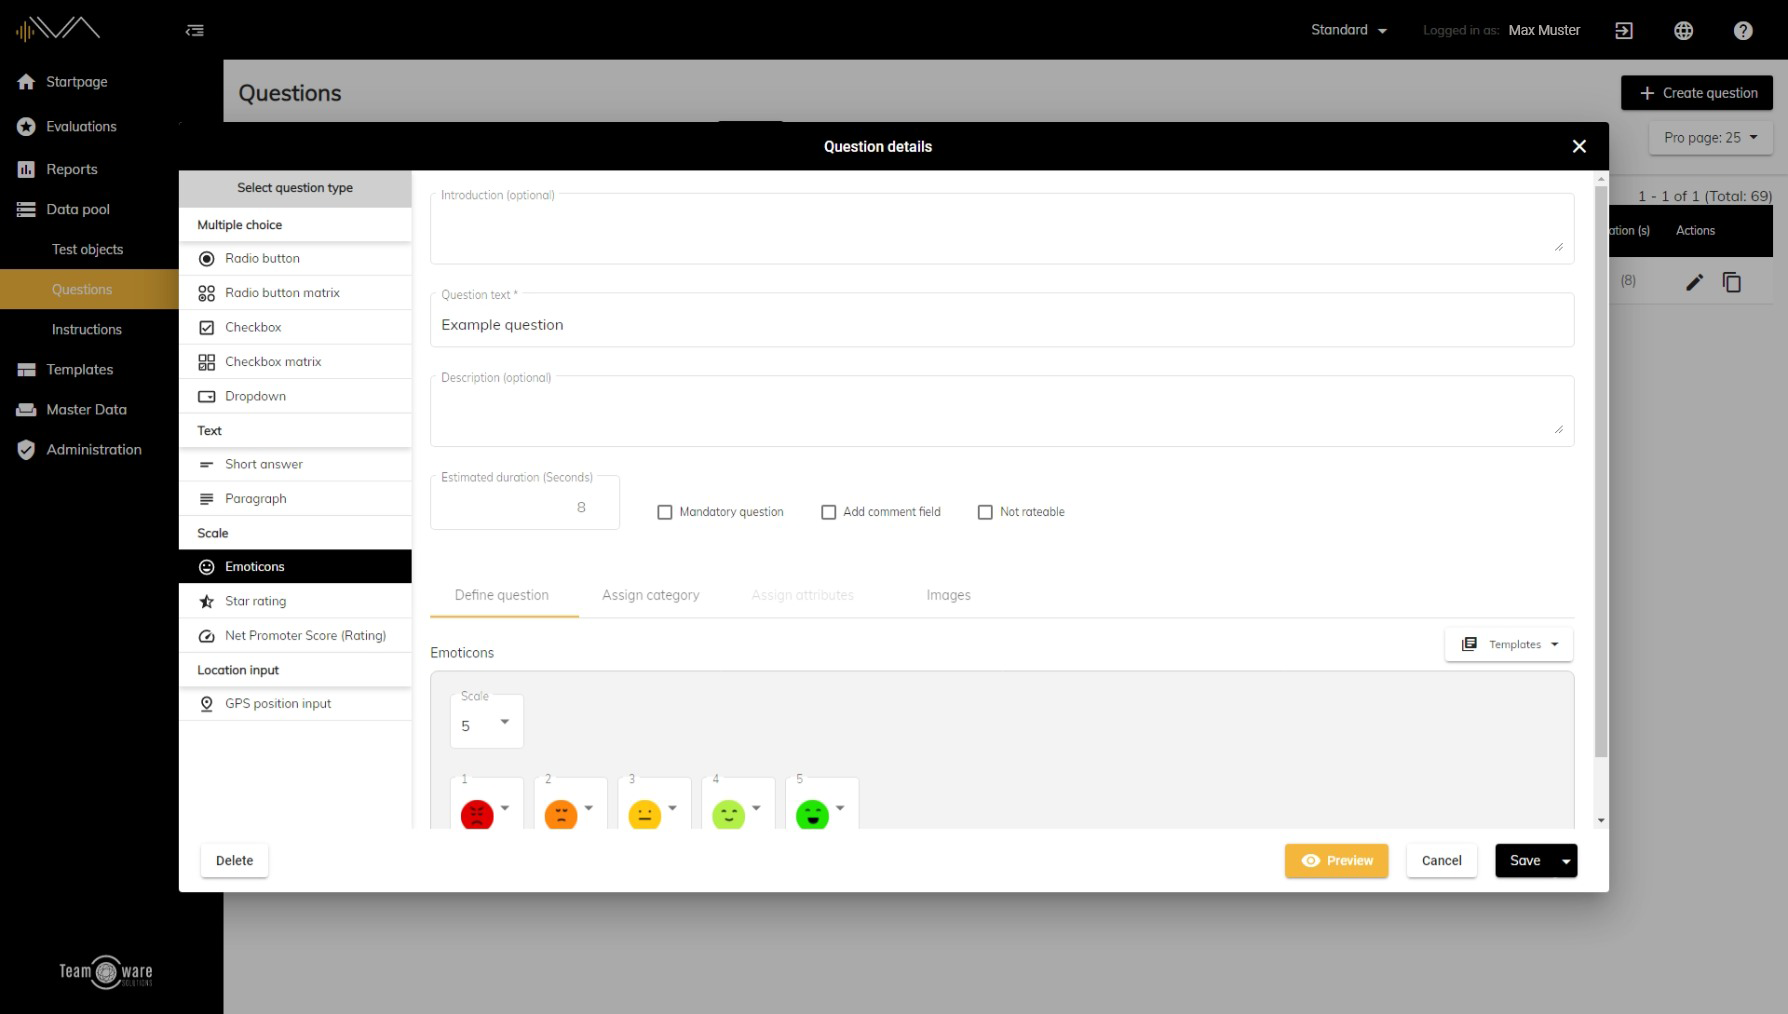
- Scale question types: Emoticons, star rating and net promoter score are available for selection here. For emoticons, you can select a scale of up to 5 emoticons with corresponding images. For star rating, you can select a scale from 1 to a maximum of 10 stars, as well as a color. The net promoter score, which is typical in the automotive sector, consists of 10 levels by default, for each of which a separate error rating can be entered. You can also add a PDF as a legend/explanation.
- Location input: Here the tester can note a location on a map.
Templates
The current question type including the corresponding answers can be saved as a template for reuse. To do this, click on the "Templates" button on the right-hand side and then select "Save as template". You can also use an existing template for the current question - just click the "Templates" button and then select the template you want to use.
Assign category
You can assign a category to your question (mandatory field). To do this, you will see an overview of all categories in this section on the left side. If you want to select a main category, just click on the name. However, if you want to select a subcategory, first click on the arrow to the left of the main category and select the desired subcategory analogously.
Images
If necessary, you can add images to your question to better clarify more complex issues. You can add up to two images via drag&drop or a click on the marked areas.
How do I edit an existing question?
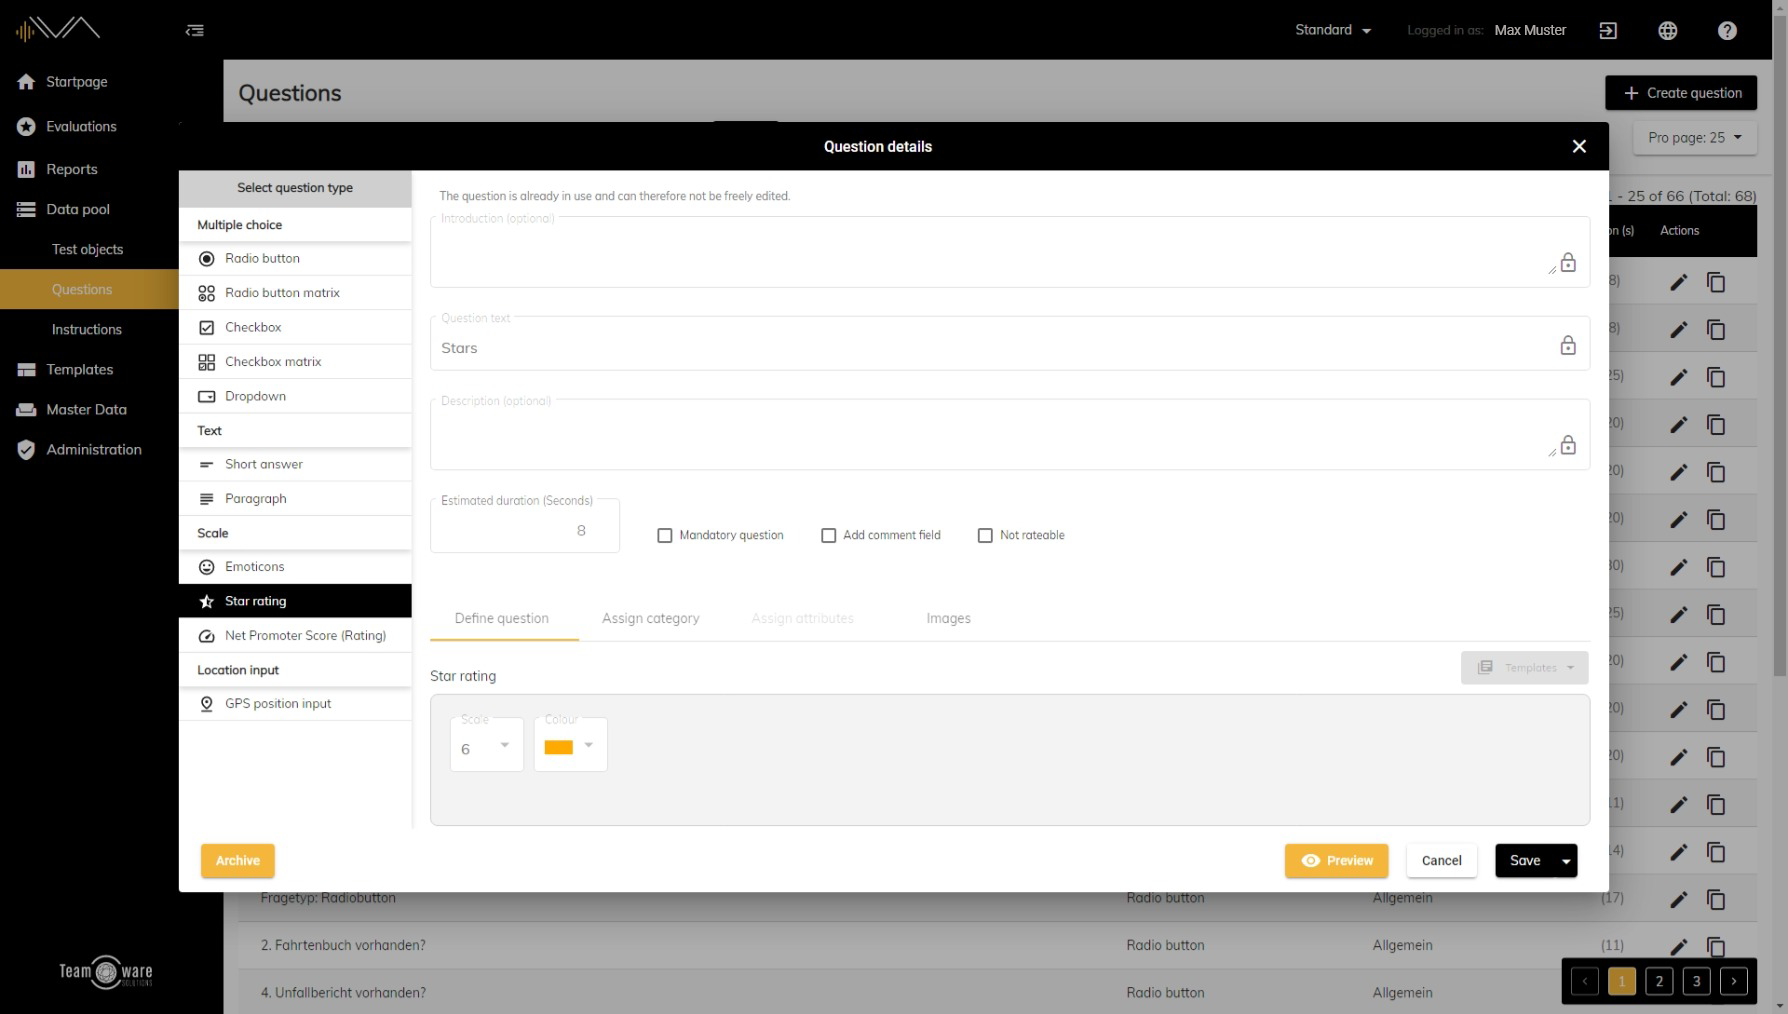
Question text (mandatory field): enter your question here. This field can be changed freely as long as the question is not yet used in any evaluations or tests. As soon as the question is used in one or more evaluations or tests, this field is locked. However, by clicking on the lock, this field can be unlocked and edited again if needed.
Description (optional): If needed, you can add a description text for your question here. This field can be freely changed as long as the question is not yet used in any evaluations or tests. As soon as the question is used in one or more evaluations or tests, this field is locked. However, by clicking on the lock, this field can be unlocked and edited again if needed.
Estimated duration (optional): You can store an estimated duration for answering the question. Thus, an approximate duration for the processing of a created question catalog can be calculated. You can change this information at any time.
Mandatory question (optional): Defines this question as a mandatory question. If one or more mandatory questions are assigned to a question catalog, it can only be sent if these have been answered. You can change this selection at any time.
Add comment field (optional): An additional comment field is added to the question. This allows the user to add a comment in addition to the actual answer to the question. You can change this selection at any time.
The 3 tabs
Define question
Once a question has been created in the data pool, neither the question type nor the other options for defining questions can be changed. In addition, a question that has already been saved can no longer be saved as a template.
Assign category
If required, you can assign your question to a category. For this purpose, you will see an overview of all categories in this area on the left side. If you want to select a main category, just click on the name. However, if you want to select a subcategory, first click on the arrow to the left of the main category and select the desired subcategory analogously. This field always remains freely changeable.
Images
If necessary, you can add images to your question to better clarify more complex issues. You can add up to two images via drag&drop or a click on the marked areas. To remove an attached image, hover over the image and click on the red cross in the upper right corner. You can also add and remove images afterwards.
How do I delete an existing question?
In IVA, questions can only be deleted as long as they are not used in any tests. Otherwise, questions can only be archived.
To delete the question, click on the "Delete" button at the bottom left of the dialog window. The button text will now change to "Confirm deletion!" - Click the button again to finally delete the question.
Instructions
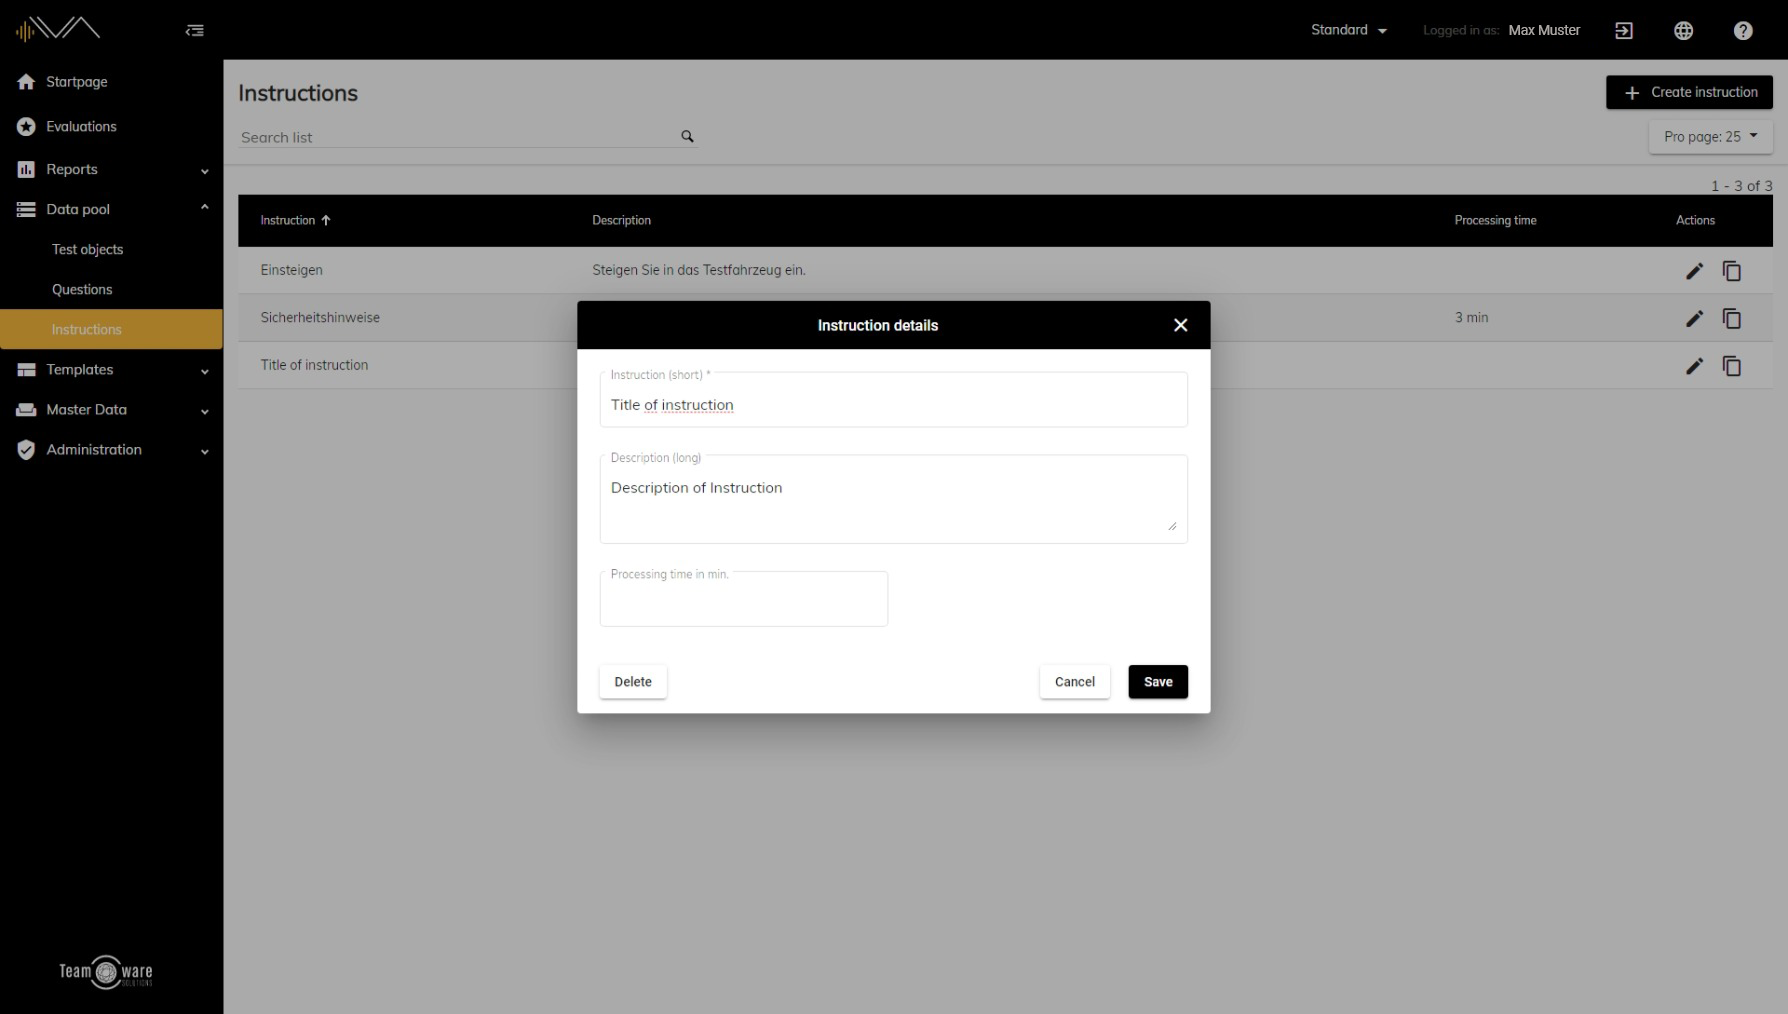
How do I create a new instruction?
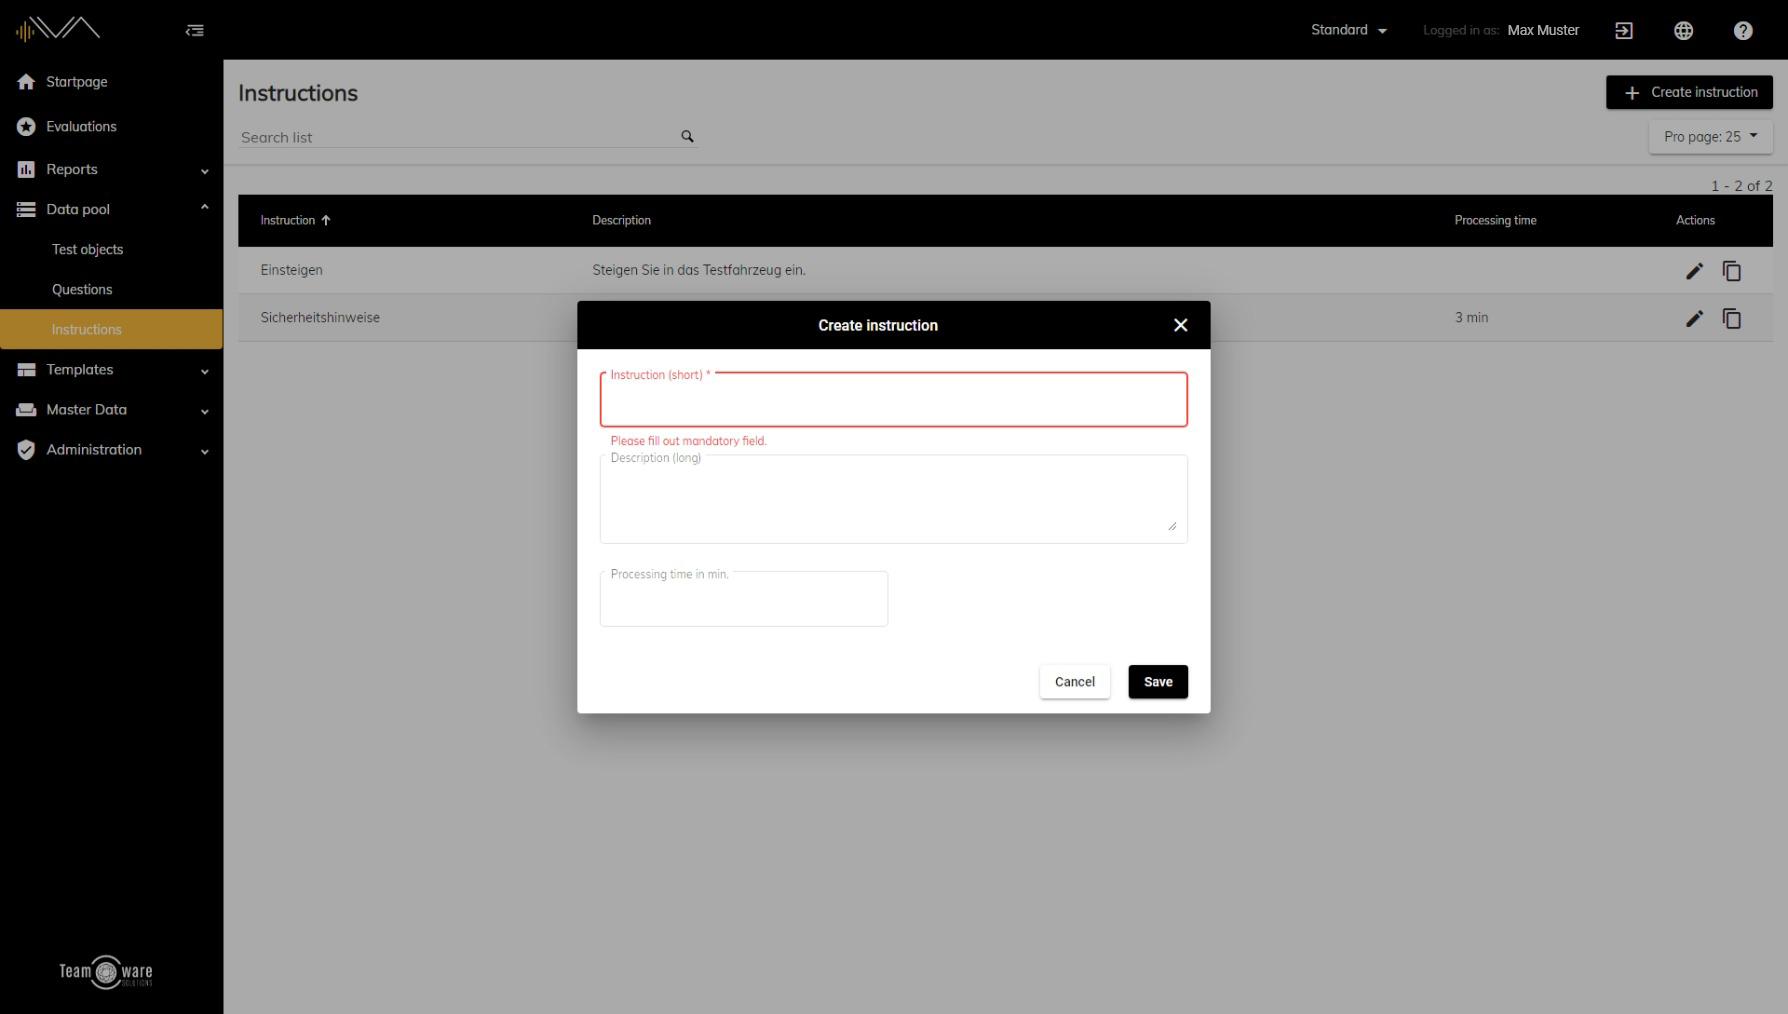
Instruction (mandatory field): enter a short and fitting name for your instruction here.
Description (optional): If required, you can add a descriptive text here to formulate your instruction in more detail or to explain individual steps in more detail.
Processing time in minutes (optional): You can enter an estimated time for processing your instruction. This way, an approximate duration for processing a created instruction catalog can be calculated.
How do I edit an existing instruction?
Instruction (mandatory field): enter a short and appropriate name for your instruction here.
Description (optional): If required, you can add a descriptive text here to formulate your instruction in more detail or to explain individual steps in more detail.
Processing time in minutes (optional): You can enter an estimated time for processing your instruction. This allows you to calculate an approximate duration for processing a created instruction catalog.
Instructions can be changed as long as they are not used in any evaluation or test. As soon as your instruction is used in one or more evaluations or tests, all fields are locked for editing. However, by clicking on one of the locks, the corresponding field can be unlocked and edited again if necessary.
How do I delete an existing instruction?
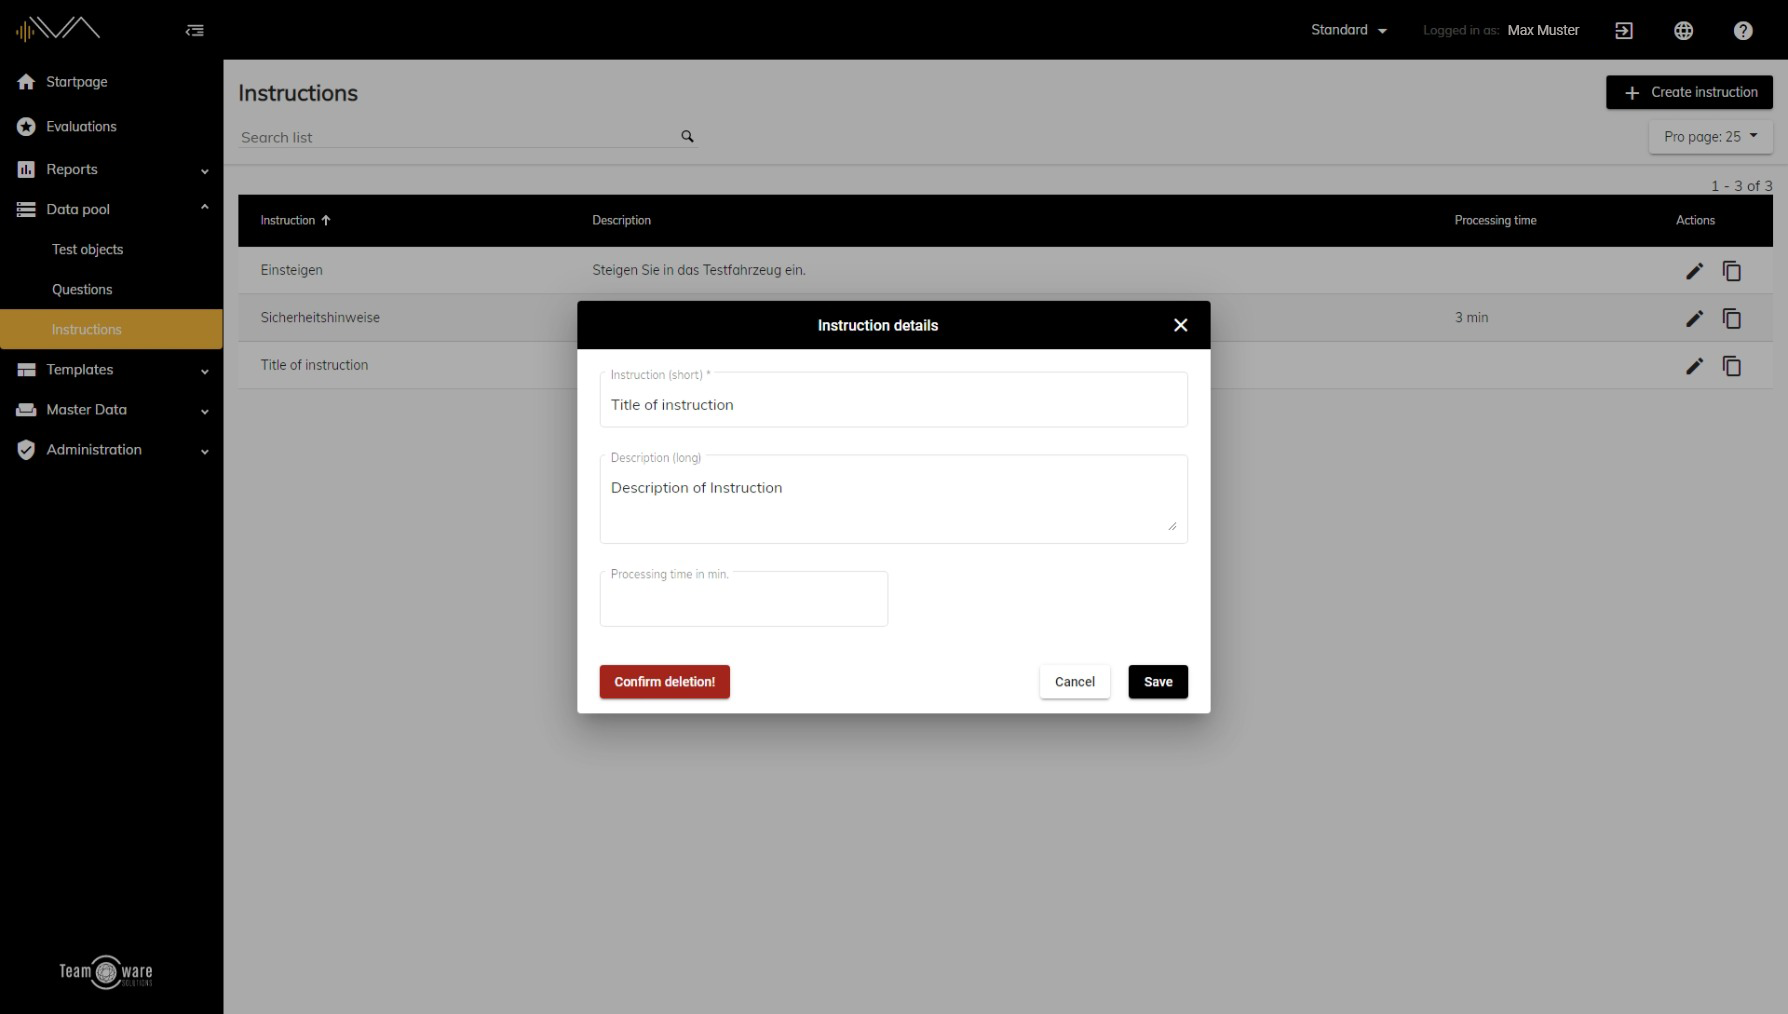
In IVA, instructions can only be deleted as long as they are not used in any tests. Otherwise, instructions can only be archived.
To delete the instruction, click on the "Delete" button at the bottom left of the dialog window. The button text will now change to "Confirm deletion!" - Click the button again to finally delete the instruction.